All
the |
(Navigation bar
directly below.)
*******
© A.J. Goldsby, 2015.
(All rights reserved.)
****************
Click HERE
to see my
Chess Items.
****************
![]()
****************
Buy a book
from Amazon.com
(And help me out as well!)
****************
Click HERE
...
to see a list of the businesses that help to sponsor all of
my chess efforts.
|
|
"The Knight" in Chess
The Knight
(Or 'Life in the Cavalry.')
Click HERE to return to my Training Page.
Click HERE to return to my HOME Page.
Click HERE to go to another site where the basics of chess are covered.
Click
HERE
to go to another site where the basics
of how the pieces move are covered.
The Knight represents The Cavalry, (Mounted soldiers on Horse-back.); in chess. The Knight, like its counterpart in war, can leap over obstacles. The Knight can surprise the enemy with its sudden attacks, change of directions, and its ability to improvise. The Knight is an 'in-fighter' .... meaning that this piece must get close to do its dirty work. (Unlike its counterpart, The Bishop, which can inflict damage from a great distance.)
Now take a very close look at the diagram below.
The Knight is the piece that looks like a Horse’s head in the above diagram. At the beginning of the game, you have TWO Knights and your opponent will have two Knights, regardless of the color army you will be commanding at the beginning of the game. The Knight moves like an "L," which is to say it moves straight two squares in any direction, (North, South, East, or West.); then one square to the immediate right or left.
In the above diagram, The White Knight on g1 can move to h3 or f3. White cannot move his Knight to e2, at least not right at this moment.
(Notice - in the above diagram - I have given the square, e2 a
bold,
green border. It is also high-lighted in yellow.)
You may NOT capture your own pieces! (It would be
disadvantageous to do so,
and would be helping your opponent.)
If, at a later time in the game, after White has moved
his pawn on e2, then he
could go to the e2-square, as long as that square was
empty.
The Knight has many different properties. One thing to remember is that the Knight is the only piece that can "jump over" other pieces! The Knight always moves and captures in exactly the same pattern. For instance, imagine that the above board had no pieces on it except for a White Knight on d4. This Knight could move to e2, f3, f5, e6, c6, b5, b3, and c2. Imagine that the Knight above is still sitting on d4 on the empty board.
Imagine again that the Knight is sitting on a completely empty board, except
for a White Knight on d4. Now picture (pretend/imagine in your head) that there is a Black
Rook sitting on the f5 square. You may capture that piece by raising your Knight
in the air, then removing the Black Rook from the chessboard. Now finish the
move by placing the White Knight on the f5-square.
Congratulations! You have just completed your first capture with the Knight.
Another important property of the Knight is that if it begins a move on a
DARK square,
it will finish on a light square. (And visa-versa.)
(The above diagram shows the hypothetical position that we discussed in detail, above. The Knight on d4 can move to any of the squares marked with a green "X" and high-lighted in yellow.)
Take a good look at the picture above, a Knight sitting on d4 may go to any of the squares marked by one of the "X's". This very clearly shows how much the Knight is circular in its total range; even thought the individual move looks like an "L."
The Knight also could
capture any piece
that landed on any of
the squares marked with an "X".
(Take a very good look at this diagram.
If you have a chessboard, set this position up.)
See the White Knight on the d4-square?
(Notice I have given the d4 - square a broad, bold, red border.
I
also have high-lighted that square in blue.)
-
- The Knight on d4 can capture either of the two Black Rooks on b5 and c6.
-
- The Knight (on d4) can capture either of the two Black Queens on e6 and f5.
-
- The White Knight (on d4) can capture either of the two Black Knights at e2 or f3.
-
- And the White Knight (on d4) can capture either one of the two Black Bishops on c2 or f3.
(Notice I have given all the possible "capture" squares a bold, black border, and have high-lighted these squares in yellow.)
Again, the possible capture squares represent a "Knight-Wheel." (Another way to think of it is as a "Circular Pattern.")
Let me also say the above position is EXTREMELY improbable. I simply set it up to demonstrate, in a very extreme setting, the Knight's ability to 'Leap over' its own (or enemy) pieces. Study the above example very carefully. It is very instructive and demonstrates quite clearly the ability of the Knight.
Knight vs. Bishop
Now we have already seen the section below on the page that dealt with the Bishop. But its good to review it again. And we shall deal with it in more detail, as it goes to the very heart of the basic differences between the Bishop and the Knight.
Take a very careful look at the above diagram.
Here , in this particular example, The Knight is the
vastly
superior piece to its counterpart, The Bishop.
Why? Because the Bishop is hemmed in by its own pawns, which is a very common occurrence.
How would you get the Knight to its ideal square?
The series of "X’s" show the most likely route
that the Knight
might
take in trying to reach its ideal square.
The Knight starts on the square
that it is sitting on.
(The square a5, marked by the blue border.)
The Knight's "Ideal Square" is the square, e5. (Marked by the bold, red border.)
(The squares in between the a5 and e5-squares, are marked with a green border.)
Note that if the Knight were already at e5 in the above
diagram, and it was White's turn to move; he would play 1. Nxg6!
[The Knight on e5 moves and occupies the square at g6, and removes the Black
Pawn that was on g6 and takes it off the board.]
This move, (In our hypothetical position.) {1. NxP/g6,} would win the game for White.
(Black would not be able to recapture because White would push his h-pawn in to promote to a new Queen. More on this, later.)
***
This is an extremely good exercise for ANY player to do. You should be continually seeing squares on the board and be thinking, "How many moves will it take to get my Knight to that square!!"
-
- A good exercise to learn the Knight's movement pattern is to get all 8 pawns. Then place the White Knight on a1. Put Black pawns on c2, e3, etc. (Building a "Knight-Chain.")
-
- Then, after you have built your chain of pawns for your Knight, capture all of them in sequence. Repeat this exercise, varying the position of the Black Pawns in the Knight-Chain as much as possible! This will help firmly fix The Knight, and its somewhat peculiar movement-pattern, firmly in your mind.
Another
exercise for learning the Knight's unusual movement pattern is to put
a Knight
in one corner, and then figure out how many moves, (In a row.);
it takes to get the Knight to
the opposite corner.
See
the diagram above? How many moves does it take to get the
Knight from the a1-square to the h8-square? Use the shortest route!
The Knight needs some assistance. Can you help him?
*****************************
Well, here is one method.
The
final diagram shows just one of the correct routes.
(There are many right answers. For example: N/a1-c2-e3 to f5; etc.
OR N/a1-b3-a5-c6-e7, etc.)
***
NOW MANY DIFFERENT ROUTES CAN YOU FIND?
***
You can vary this exercise too. Keep playing around with the Knight, until you are completely comfortable with its rather eccentric movement pattern.
***
For the true die-hard, the following exercise is a lot of fun. (It can also entertain kids on a rainy day!) Get 64 pennies. (Use the pennies to mark the squares that the Knight has already landed on.) Start the Knight on one square, any square. See how many squares you can cover with the Knight WITHOUT going to the SAME square more than once! If you get really good, you can cover ALL the squares of the chess-board WITHOUT ever visiting the same square twice!!
Look carefully at the diagram below.
Moving
in sequence, (Without letting Black take a
move, or
being concerned if he can capture your Knight.);
how many moves will it take
you to capture ALL 8 pawns.
The trick is to CAPTURE
WITH EVERY MOVE!!
Can you do
it?
More
on the movement of the Knight
(This section added, July 12th,
2011.)
I saw something interesting yesterday on the Internet. To me, it was a VERY STRIKING example of how the Knight moves. (See the diagram just below.)
|
|
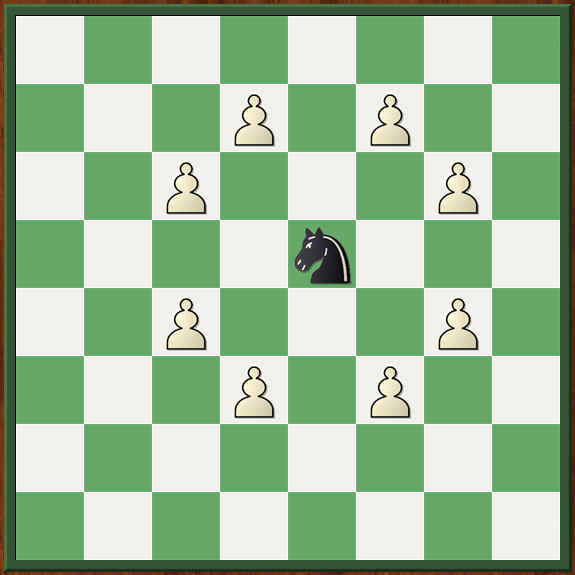
The Black Knight on the e5-square (on its first move) can move to (or capture) any of the squares marked by a White Pawn. (The squares - that the Black Knight can move to on its first move are: d3, f3, c4, g4, c6, g6, d7 and f7. We saw something like this before, but this is a better and larger graphic.)
***************************************
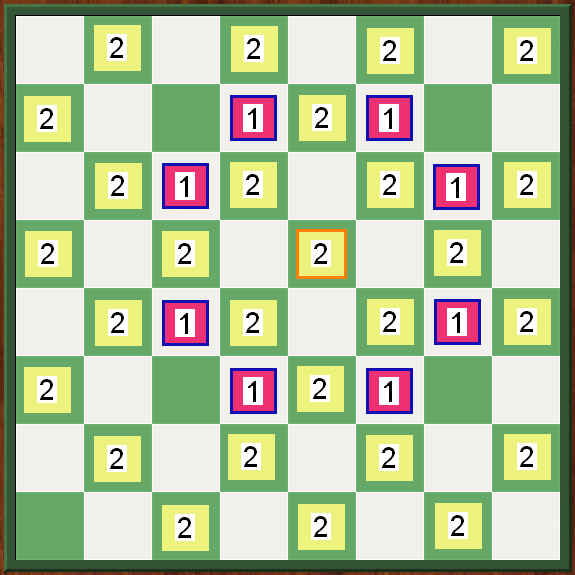
(Please see the diagram just below here.) Now, on its second move, the Black Knight could move to ANY of the squares marked by the number two. [Note that I have removed the Black Knight and the White Pawns, and replaced these units with numbers. A number one ("1") marks any of the squares that the Black Knight could have moved to on its first move, a number two ("2") marks the squares that a Knight could move to on its second move from any of the squares that the Knight went to on its first move. The #1 squares were where the White Pawns were in the first diagram. The #2 square, {in the center of the board, on e5}; with the orange around the box is the square on which the Black Knight had rested.]
|
|
***************************************
(Again, please see the diagram - just below here.) Now look at our third diagram of this section, we see the number three ("3") delineates all the squares that the Black Knight (of the first diagram) could move to on its third move ... note that the board is nearly covered with numbers now.
|
|
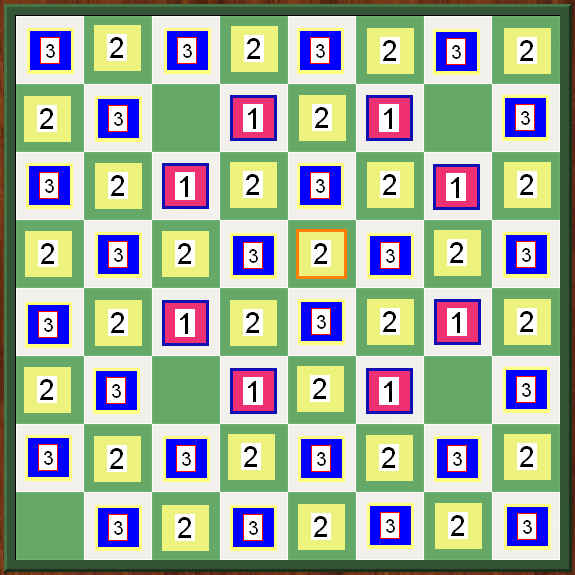
According to my calculations, there are only five squares on the board that a Knight could NOT reach in three moves. (a1, c3, g3, c7, & g7.) I once heard a chess teacher remark (many years ago) that the safest square ... from an enemy knight ... "was two squares away on a diagonal." (At the time that he said this I wondered if this was correct ...) Apparently this is true, we also see that the Knight on e5 takes at least two moves to reach three of the corners, and is unable to reach a1 (from the starting point of e5) in three moves or less.
Many thanks to the user "Waitaka" who inspired this addition to my web page with his post on this page.
The properties of the Knight:
***
# 1.) The Knight always moves in an "L" - shaped pattern !!!
# 2.) The Knight's TOTAL movement capability is nearly circular.
# 3.) The Knight is primarily a "SHORT - RANGE" piece! (As in contrast to the Bishop, which can be a long-range piece.)
#
4.) Because of its range, the Knight is an excellent "in-fighter."
(This means the Knight often excels in slightly cramped or partially
blocked environments where other pieces do poorly.)
Also because of its range, the Knight will usually be found lacking in a "two-front" operation. (The Knight may be unable to return quickly from one wing to assist in an attack or a defense on the opposite wing.)
#
5.) The Knight is a "multi-directional," and will often surprise
even the
most experienced player with the speed and suddenness of its attacks.
The Knight also "changes direction" very suddenly.
NEVER assume you think you know where the Knight is headed! Always try to look at every legal square that is available to this piece!
#
6.) The Knight covers both the light and dark squares equally
well! (Unlike its counterpart, The Bishop.)
The Knight ALWAYS will
start on one color-square, (say a light square) and end up on an
OPPOSITE-colored square than the one it originated from. (Say a dark-colored square.)
For this reason, in an ending where ALL the pawns are on the same side of the board, a KNIGHT may be preferable to the Bishop!!
# 7.) The Knight usually performs poorly from a corner or near the edge of the board. For this reason, the Knight should be kept away from these areas, if you want the optimum performance from this piece. (Because of this, The Knight will often have great difficulty stopping an opponent from advancing his or her Rook Pawn's.)
And that is pretty much it for the Knight. Its movement pattern must be firmly fixed in your mind. It ALWAYS moves and captures in exactly the same way.
The beginner will often have trouble with the Knight, because it is very different from just about all the other pieces.
(This is because ALL the other pieces are basically linear in movement, ... ... ... whereas the Knight is NOT!!!)
(Page last up-dated: Sunday; February 22nd, 2004. Last edit or save on: 02/12/2015 .)
***
Copyright (c) LM A.J. Goldsby I
Copyright (c) A.J. Goldsby, 1975-2014.
Copyright © A.J. Goldsby, 2015. All rights reserved.
Click HERE to go to the next page to go to the next page in my Chess Course for Beginners.
Its called: "The Final Blow" In Chess.