All
the |
(Navigation bar
directly below.)
*******
© A.J. Goldsby, 2015.
(All rights reserved.)
****************
Click HERE
to see my
Chess Items.
****************
![]()
****************
Buy a book
from Amazon.com
(And help me out as well!)
****************
Click HERE
...
to see a list of the businesses that help to sponsor all of
my chess efforts.
A.J.'s Weekly Chess Puzzles (Solutions Page)
This will be my page, (created in July, 2004); to permanently record all of my weekly chess problems. (From just my home page here. I have another page dedicated to problems as well.) I will give the position, {a diagram}; a position check, {where all the pieces are} the participants in the game or who composed the problem, the source of the problem, etc. (All the pertinent and necessary information.)
Plus I will at least give the solution - maybe with some light analysis and explanation as well.
Don't expect me to give the solution before the next problem is posted ... it isn't going to happen!!
*******
Please ... DO NOT send me any e-mails about this feature. Solve the problem, do it on your own. HAVE FUN WITH IT!!! I have more than enough books and stuff to provide the material for this feature. Please don't - send me your games!! No, no, no! Don't bother, OK?
If you are one of those individuals who used a computer to solve this, you need not ever tell me about it! (I especially don't want to hear from someone who used Fritz, and claims to have completed their analysis on their very own!!! Ugh! I would not believe you, anyway.)
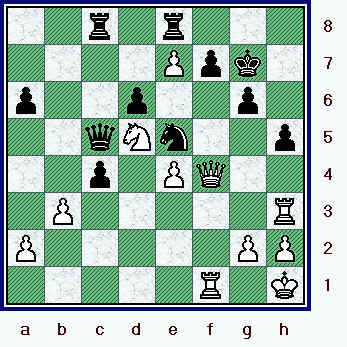
Puzzle Number # 01; August 02, 2004.
*********************
A.J.'s - Problem of the week.
Black to move.
Position in
Forsythe: 3rr1k1; 1pp2pb1; 6pp;
1P2Pn2; 5P3; 1Q3NPq; PB5P; 1R3RK1.
******************************************************************
|
In the
book, (I recently purchased); they state: "What did Black play in this position?" |
*********************************************************************
I found this problem very difficult. I could not solve it from the diagram. I also analyzed for at least 10 minutes after setting the position up on my magnetic chess set. (I had to look at the solution.)
AFTER I have posted the next problem, I will give the solution to this one!
**********************************
GM J. Gallagher (2631) -
GM R. Vaganian (2524)
European Team Championships / Pula, (CRO);
1997.
[A.J.G.]
Puzzle Number Twenty-Two (# 22)
(From the tournament, "The European Team Championships," {men's; Rd. # 02}.)
*************************************************************************
A very incredible ... and also a very unusual combination.
BLACK TO MOVE! {See the diagram in the box,
above.}
**************************************************************************************************
**************************************************************************************************
In the book they state: "After 1...Ne7; 2.Qxf7+!, Kxf7; 3.Ng5+, White would have a winning position."
"Black did not retreat the Knight here. What did he play?"
*****************************************
23...Nxg3!!; {Diagram?}
This even looks like a mistake, it looks like White could just take the Knight, and put his King in the corner. If Black checks again, (on the h3-square); then White could simply play Nh2. {You should then note that White's Queen is reaching all the way across the board and hitting both the h3 and the g3-squares.}
[ Not as accurate would be:
</= 23...Ne7!?; ('?!') 24.Rbc1! c6;
This is pretty much forced.
( </= 24...Rd7?; 25.Ng5!, ("+/-") )
25.bxc6! bxc6!?;
26.Qxf7+! Kxf7;
27.Ng5+ Kg8; 28.Nxh3, '±'
White is clearly MUCH better. ]
24.hxg3, {Diagram?}
This is {now} forced.
[ The combination of: 24.Qxf7+ Kxf7;
25.Ng5+ Kg8; 26.Nxh3 Nxf1; ("-/+") {Diag?}
does not work with White's Rook at f1 under
attack. ]
24...Qxg3+; {Diagram?}
Move order is important here!
(The King is forced into the corner - before Black
continues.)
25.Kh1[] Rd3!!; {Diagram?}
Wonderful!! The really great thing
is that this looks like a blunder, especially at a {first} casual glance.
26.Qxd3[], {Box?} {Diagram?}
This is now ... completely forced.
(Unless White prefers losing to gaining a draw.)
[ Of course not {the very silly}
</= 26.Qc4?? Rxf3; ("-/+") {Diag?}
and Black is now winning. ]
26...Qh3+; 27.Kg1 Qg3+; 28.Kh1 Qh3+; 29.Kg1 Qg3+; ("=")
{Diagram?}
Black continues to check ... until somehow White gets the idea that it is a draw. (Notice that White
cannot play Nh2 now, as this would hang the Queen - this is the whole point of the ...Rd3 move.)
A very unique drawing sequence!!!
Copyright (c) A.J. Goldsby, 2004. All rights reserved.
˝ - ˝
The above problem is from the book: "The Times Winning Moves," by GM Raymond Keene and Byron Jacobs. [ Copyright (c) 2003.] Published by "EVERYMAN Chess," of London, England. (UK) ISBN: # 1-85744-338-1. (Flex-cover, 500 positions/problems; 160 pages.)
I will not promise to use the same source every time ... that would be - just plain boring.
I have literally dozens of problem books, I will probably jump from book to book for this new feature.
Puzzle Number # 02; August 10, 2004.
*********************
A.J.'s - Problem of the week.
White to move.
Position
in Forsythe: r5k1; 2RR3N; 2p1rp2;
5p2; 2b5; p5P1; 7P; 6K1.
******************************************************************
|
Here is a position I have shown to all my friends and students for many, many years. And it is invariably one that they all guess at ... incorrectly! White's position looks nearly hopeless, can you figure a way out of this mess for the first player? |
************************************************************************
*********************************************************************************************************
Charles
Maurian (2000?) - Paul Morphy (2750)
Position number # 02 New Orleans, LA; 1866.
[A.J.G.]
*******
Puzzle Number Two (# 02)
(From the book: "The Times Winning Moves,"
by GM R. Keene and Byron Jacobs.)
[ Copyright by the authors, this book was printed in 2003. ]
*************************************************************************
The authors of the above book
give this game as: "New Orleans, 1866."
(I am pretty sure that this date is WRONG!)
From an off-hand or casual game played {by PM} at Knight-odds.
************************************************************************************************************
This is an interesting position for MANY reasons here:
# 1.) This is a nice combo by Morphy;
# 2.) This is a relatively common mating pattern, it was seen, (in a
variation); of the last
game of the Fritz_X3D (C) - GM Garry Kasparov
match. {I tell all my students:
"If you play chess long enough, eventually
you will see this mating pattern."};
# 3.) I have shown this position to many of my friends and students
over the years. The
large majority of them FAIL to find the correct
solution!!
************************************************************************************************************
************************************************************************************************************
WHITE TO MOVE.
(White's first move is a wonderful
example of a clearance sacrifice.
Black must accept, or be mated.)
35.Rg7+!
Kh8[]; {Diagram?}
Is Black OK? His a-Pawn looks very menacing!
36.Nf8!!,
("+/-") {Diagram?}
Black thought for a while ... and RESIGNED.
(The finish would be {if} 36...RxN/f8;
then 37.Rh7+, Kg8; 38.Rcg7#.)
The curious thing - for me - is how did Keene and Jacobs get the date wrong here? I checked dozens of other sources. This is game # "CCXC" in the famous book of Morphy's games, and is also game # 463 in the CD-ROM of Morphy's games. (In that version, this game is annotated by GM K. Mueller.)
ALL the sources that I could find give this game as being played in the year, 1869.
So how did Keene and Jacobs manage to get it wrong?
(I literally hate these type of errors, once it appears in print; they are almost impossible to correct!!!)
---> Copyright (c) A.J. Goldsby, 2004. All rights reserved.
1 - 0
Puzzle Number # 03; August 18th, 2004.
*********************************************************
Black to move.
Position in
Forsythe: (top-to-bottom/left-to-right)
-
4r1k1; 1b3p1p; p2bq1p1; 2pP4; 1pQ2Bn1; 5KP1;
PP2N1B1; R2R4.
******************************************************************
|
This is the end of one of the most brilliant games ever played. (Black to move.) The second player may actually have more than one way of achieving the desired result. What is the best continuation? |
************************************************************************
GM
Roberto Cifuentes Parada (2535) -
GM Vadim Zvjiagintsev (2585)
ICT / Hoogoven's Masters
Wijk aan Zee, NED; 1995.
[A.J.G.]
***********************************************************************************
(My weekly G-C chess problem.) From the Hoogoven's Open, 1995.
Simply one of the most amazing combinations ever played on the chess board.
[ See the great, fun little book: "Chess Puzzles," by GM Norwood.
Problem # 34, (Page # 51)
Copyright (c) 1995, by the author. Pub. by Henry Holt (Owl) books, NY.
(USA)
ISBN: # 0-8050-4226-1 ]
***********************************************************************************************************
***********************************************************************************************************
Black to move in this position.
What move would you play here?
31...Qe3+!!; (Maybe - '!!!' / '!!!!')
{Diagram?}
Simply one of the most brilliant and also the most shocking moves I have ever seen ... anytime,
anyplace, anywhere.
It is all the more brilliant when you consider that Black had at least TWO other ways to win here. (...h7-h5; and also the Black Bishop capturing its counterpart on the f4-square.)
[ The move of: 31...Bxf4!?; ('!')
{Diag?}
might also work here for Black.
For example: 32.gxf4 Qe3+!!; {Diagram?}
Black does not need the N.
( The move: 32...h5!?; {Diag?} probably also wins for Black. )
33.Kxg4 Bc8+;
34.f5 Bxf5+; 35.Kh4 Qf2+!; 36.Ng3 Re3!; {D?}
and White is rapidly mated. ("-/+") ]
32.Bxe3 Rxe3+!; 33.Kxg4 Bc8+!;
34.Kg5 h6+!!; 35.Kxh6 Re5!!; "-/+" {D?}
White ... RESIGNS!!!
(It is mate next move! White has no checks, AND Black has threats of both ...Rh5#; and also ...Bf8#.)
The ending to one of the most brilliant games of that decade.
Copyright (c) A.J. Goldsby I
Copyright (©) A.J. Goldsby, 2004. All rights reserved.
0 - 1
Puzzle Number # 04; August 29th, 2004.
*********************************************************
WHITE to move.
Position in
Forsythe: (top-to-bottom/left-to-right)
-
3r2k1; 1p1P2n1; p4R2; P1pr2pp; 7q; 6N1; 7P; 1Q2R2K
******************************************************************
|
White is down two pawns. However, White has the move, and he has a few pluses himself. (A strong passed d-pawn, a fairly safe King, and active pieces that work well together.) How does White put all of these factors together ... and try to strike a decisive blow into the opponent's position? (A little calculation is required.) |
************************************************************************
GM
Anatoly Karpov (2755) -
GM Pedrag Nikolic (2600)
World Cup, Skelleftea; 1989.
/ 29.08.2004
[A.J.G.]
*******************************************
The end of a fine game by {Former World Champion} GM Anatoly Karpov.
Position # 325, page # 088.
("The Times Winning Moves,"
by GM Raymond Keene and Byron Jacobs.)
*****************************************
White to move.
"Karpov is two Pawns down, but he has a dangerous d-Pawn, and the Black King is exposed.
How did he now capitalize on these factors?"
*************************************************************************************************************
43.Re8+!, (Maybe - '!!') {Diagram?}
Black Resigns.
Black's position is completely lost, there is no point in continuing.
*******
[ The win is fairly straight-forward, but you do have to do a little bit of work and calculation.
For example: 43.Re8+! Rxe8[]; {Diagram?}
This looks to be totally forced.
( Much worse would be: </= 43...Nxe8?; 44.dxe8Q+ Rxe8;
45.Qg6+, ("+/-") {Diagram?} and mate in three. )
44.dxe8Q+ Nxe8; 45.Qg6+ Ng7[]; {Diagram?}
This is forced.
( Not </= 45...Kh8??; 46.Rf8#. )
46.Qf7+ Kh7; 47.Qxd5, "+/-" {Diagram?}
White - a whole Rook ahead - has an easy win.
]
1 - 0
Copyright (c) A.J. Goldsby, 2004. All rights reserved.
Puzzle Number # 05; September 07th, 2004.
*********************************************************
WHITE to move.
Position in Forsythe: (top-to-bottom/left-to-right) -
2r2k1r; ppN1npb1; 2qBp1pp;
2p5; 4P1Q1;
7P; P1P2PP1; 1R1R2K1.
******************************************************************
|
From a recent GM game. White to move in this position. Many friends and students find White's next two moves ... but the follow-up is not at all easy to discover!! (Even one Master missed this one!) |
*********************
GM M. Dzhumaev (2520)
- GM K. Chernyshov (2585)
14th Open / Abu Dhabi,
UAE; (R #9), 23,08,2004.
[A.J.G.]
************************************************************************************************************
White
to move and win.
(I showed this to many friends and also to a few of my students. Many people
find White's next
two moves, but just about everyone fails to discover the correct follow-up
to this combination.)
The finish to a nice game ... and a truly extraordinary combination.
**************************************************************
19.Nxe6+!!
fxe6; 20.Qxe6 Rc7;
Apparently this is forced.
[ Much, much worse would be: </=
20...Qe8?; 21.Rxb7, ("+/-") {Diag?}
and White is winning easily. ]
*******************************************************************************************
White's
next move almost appears to be a blunder ... until you figure out that
Black's
reply is forced, and that Black's Queen has been left out in the open ... and is
completely
and totally unprotected.
21.Rxb7!! Rxb7[];
This too is 100% forced. (White's threat is RxR/c7 and wins.)
[ Completely losing is:
</= 21...Qxb7??; 22.Bxe7+! Rxe7;
23.Rd8+ Re8; 24.Rxe8#.
**************************************************************************
Or </= 21...Be5?; 22.Rb8+!, "+/-" {Diagram?}
with an easy win for
White.
********************************************************************************
Another bomb is: </= 21...Rh7??; 22.Bxe7+ Rxe7; 23.Qxe7+
Kg8;
24.Rd8+, "+/-" {Diagram?}
and Black is quickly mated. ]
22.Bxe7+,
Black definitely should have resigned in this particular position, (or on his
next move).
Did he played on out of inertia - or to avoid being part of a very attractive
short game
of chess?
(Short game = a MINIATURE.)
[ But not: </= 22.e5? Ke8!; "-/+" {Diag?} and BLACK is now winning. ]
22...Rxe7;
23.Qxc6 Kf7; 24.Qd5+ Ke8; 25.Rb1! Be5; 26.Rb7,
("+/-") {D?}
Black (finally) quits.
The end of a nice game ... and a truly fantastic combination by GM M. Dzhumaev.
(This
game is annotated on my web site for the "Game
of The Month.")
(A supplementary game for the month
of: January, 2004.)
Copyright (c) A.J. Goldsby I. All rights reserved.
1 - 0
Puzzle Number # 06; September 14th, 2004.
Black to move.
Position in Forsythe: (top-to-bottom/left-to-right) -
5rk1/2p3pp/p3p2r/1p5n/3PN2q/4P3/PPQ2P1P/2R3RK
**********************************************************************
|
From a book of chess problems or chess puzzles. Here is a fun problem to solve ... according to the book, it is not supposed to be all that difficult. Yet I have showed it to many people for a number of years - both in person, and also on the Internet. And nearly everyone fails to find the correct sequence of moves from this position. Black to move here - what move would you play? |
************************************************************************************************************
Schneizer
(2000) - H. Cordes (2200)
Wiesbaden, Germany; 1995.
[A.J.G.]
From the tournament: Wiesbaden, Germany; 1995.
**************************************************************
Black to move in this position.
The position appears to be
fairly tranquil, but suddenly the door may have opened and allowed the
second player an amazing tactical solution.
I have showed this to many students friends, but nearly all fail to discover the correct continuation from this particular position.
******************
1...Qxh2+
!!!;
This is both extremely brilliant ... and completely electrifying. I am also guessing - - - that it was
{also} completely unexpected!
[ Or 1...c5!?; 2.Rg2 cxd4;
"=/+" {Diagram?}
and Black seems to be at least a little better here.
]
White now has no choice ... all
of his moves are completely forced from here.
2.Kxh2 Nf4+!;
The only correct square for the Knight.
(It looks slightly wrong ... as it blocks the action of the Black Rook on f8.)
[ Definitely not: </=
2...Ng3+??; 3.Kxg3 Rg6+; 4.Kh2 Rh6+;
5.Kg2 Rg6+; 6.Kf1, ("+/-")
{Diagram?}
and White will escape from all the checks. (Wins easily.) ]
3.Kg3 Rh3+!;
This is the move that even a few Masters have missed.
[ After the moves:
</= 3...Rg6+; ('?') 4.Kh4! Rh6+; 5.Kg4 Rg6+;
6.Ng5 Nd5; 7.Kh3, ("+/-")
{Diagram?}
White's King will find a hiding place ... and Black's attack will
{eventually} run out of gas. ]
Once again ... White's move is
forced.
(In fact, the first player only has one legal move here!)
4.Kg4[] h5+!;
The move gets an exclam for several reasons, 2 big ones are:
# 1.) So many people miss this move back when they began their
calculations at
the start of this particular problem;
# 2.) It is correct on principle.
(In King-hunts, generally the further across/up the
board the opponent's King is driven, the
easier it will be to find the win!)
Once again - - - White only has one (legal) move here, in response to Black's play of ...h5+.
5.Kg5 Rf5#.
Without question ... simply a marvelous combination.
(White's moves also appear to be very plausible in this game.)
SOURCE:
(The book) "Winning Moves 2," by
GM Raymond Keene. Copyright (c) 1996.
Published by Henry Holt of New York City, NY / USA. (Owl books)
ISBN: # 0-8050-8155-6 (pbk) [Puzzle # 95, page 45.]
Copyright (c) A.J. Goldsby, 2004. All rights reserved.
0 - 1
Puzzle Number # 07; September 29th, 2004.
|
|
White to move.
Position in Forsythe: (top-to-bottom/left-to-right) -
3nr1k1/2RR1ppp/pr6/1p2qN2/1P6/P4QP1/5P1P/6K1
**********************************************************************
|
White to move. Black seems to be OK here ... how does White, who is on the move, try to make progress here? |
************************************************************************
GM D.
Bronstein (2685) - (IM) Georgi Illivitsky (2450)
UCPB - Problem # 566 /
30.09.2004
[A.J. Goldsby I]
*********************
From the game:
GM David Bronstein - Georgi Illivitski;
U.S.S.R. Championships / Moscow, URS; 1948.
White
to move.
*****************************************************************************************************
*****************************************************************************************************
White has a dominating position, but
Black seems to have all the key squares covered.
How does White break through here?
*****************************************************************************************************
The ratings here are relatively accurate, Sonas gives instead:
David Bronstein - 2625; and Georgy A. Illivitsky - 2300.
{This strikes me as much too low for both of these players!}
31.Rc8!, (Maybe
- '!!')
This Knight must be eliminated.
(It protects f7 ... and several other crucial points.
It is the glue that holds Black's position together.)
[ </= 31.Nh6+?? Rxh6; "-/+" ]
31...Rb8!?; (hmmm)
Black is lost, so I guess that it does not matter what defense he tries in
this position.
(But not 31...Nc6?; because White then plays 32.Nh6+!, winning
instantly.)
[
Fritz - instead - gives:
31...h6!?; 32.Rcxd8 Rxd8;
33.Rxd8+ Kh7; 34.Qd3, "+/-" {Diagram}
(Black avoids the mate ... but winds up a solid
piece down ...
and a resignable position.) ]
32.Rcxd8!, (remove
the defender)
A nice theme, this idea is often seen in the world of composed chess
problems.
[
Less effective is: </= 32.Rc3 h6; 33.Kg2!, '±'
{Diagram?}
and White is still better. {But
not as accurate as the game.} ]
32...Qe1+; (what
else?)
This is known in the business as a "spite check," the last gasp -
before reality sets in.
[
Another line for Black is:
32...Rbxd8?!; 33.Nh6+! Kh8; {Diagram}
This looks to be forced here.
( </= 33...gxh6?; 34.Qxf7+ Kh8; 35.Qxh7#.)
34.Nxf7+ Kg8; 35.Nxe5, "+/-" ]
33.Kg2, ('!')
("+/-") {Diagram?}
Black Resigns ... his position is completely hopeless.
A nice combination ... by a man who
once played Botvinnik ...
for the World's Chess Championships.
***********************************************************************************
Puzzle No. # 566, Page 132.
Source: "The ULTIMATE Chess Puzzle Book,"
by GM John Emms.
Copyright (c) 2000, by the author. PUB: Gambit Publications, Ltd.
(London, UK / & New York, USA) ISBN: # 1-901983-34-X (pb)
[
It's an easy win for White after:
33.Kg2 Rbxd8; 34.Nh6+! Kh8; {Diagram}
This appears forced, if Black captures,
it is mate in two.
35.Nxf7+ Kg8; 36.Nxd8 Rf8!?; {Diagram}
Maybe the only try for
Black.
( Fritz 8.0 gives: >/= 36...Qe4[]; 37.Qxe4 Rxe4; 38.Nb7, +/-
This avoids mate, but the ending with a whole piece less
does not really appeal to me. )
37.Qd5+ Kh8; 38.Nf7+ Kg8; {Diagram}
Its ugly, I know
...
(Or if: 38...Rxf7; then 39.Rd8+, and mate next move.)
39.Nh6+ Kh8; 40.Qg8+ Rxg8; 41.Nf7#. ]
Copyright (c) A.J. Goldsby, 2004. All rights reserved.
1 - 0
Puzzle Number # 08; Saturday; October 16th, 2004.
A.J.'s - Problem of the week.
|
|
White to move.
Position in Forsythe: (top-to-bottom/left-to-right) -
2r1r3/4Ppk1/p2p2p1/2qNn2p/2p1PQ2/1P5R/P5PP/5R1K
**********************************************************************
|
White to move here. Note that the Black Knight on e5 seems to hold everything together. How does White proceed from this position? (No points for incorrect tries, not even the computers get this one completely right.) |
******************************************************************************
GM V. Nevednichy
(2480) - GM M. Marin
(2530)
Problem # 40, (Page # 29)
Pensacola, FL/USA; (1) 15,10,1994.
[A.J.G.]
****************************************************************************************************
****************************************************************************************************
(My weekly G-C chess problem.)
From the "GM-vs.-GM" game:
Vladislav Nevednichy - Mihail Marin;
The Ciocaltea Memorial Tournament /
Bucharest, Romania, 1994.
A very clever {and deep} combination.
[ See the great, fun little book: "Chess Puzzles,"
by GM David Norwood.
Copyright (c) 1995, by the author. Published by Henry Holt (Owl) books, NY.
ISBN: # 0-8050-4226-1 ]
********************************************************************************************************
White to move in this position.
What move would you play here?
27.Rxh5!!, (Maybe - '!!!')
Not even the computer gets this
combination right!!!
Very, very, VERY brilliant!!
The most efficient execution ... White threatens Qh6+, and then mate on the next move.
[ Instead, the box wants White
to play the <slightly inferior>
continuation of: </= 27.Qf6+! Kg8; {Box,
Diagram?}
This is probably forced.
( Not </= 27...Kh7?; 28.Rf5!! , "+/-" {D?}
(Box says mate </10 moves.) )
28.Rxh5!! gxh5; 29.Qg5+! Ng6; {Diag?}
This is completely forced.
30.Rxf7!!, {Diagram}
with mate in around 6-7 moves.
(This transposes back into the
game ...
but winds up adding
more moves to the solution.) ]
27...gxh5!?,
(Maybe - '?')
Maybe not the best defense ...
but Black was lost in any case.
[ The computer says that Black
must play - instead - the following
very interesting continuation: (>/=)
27...f5!?; ('!') 28.Qh6+ Kf7;
29.Rhxf5+!! Ke6[]; {Diagram}
This is forced here.
( But of course not:
</= 29...gxf5??; 30.Qh7+!, "+/-" {D?}
and mate next, on the f5-square. )
30.Qh3!! Kd7; {Diagram} This is (also) forced here.
(Black cannot play: </= 30...gxf5??; 31.Qxf5#.).
Fritz says that the remaining
moves are all forced for Black.
31.Rf8+! Kc6; 32.Qxc8+! Rxc8;
33.Rxc8+ Kb5; 34.a4+!!, {Dg?}
Very fine and also sophisticated.
( The average player would be
quite happy with: (</=)
34.Rxc5+? Kxc5; 35.e8Q, "+/-" {Diagram?}
and a completely won game. )
34...Ka5; 35.Rxc5+ dxc5; 36.e8Q cxb3; 37.Ra1 Nc6;
38.Qxc6 b2; 39.Qc7#. ]
The remaining moves are all
pretty much forced here.
28.Qg5+! Ng6[]; {Diagram}
Obviously, this is (now) very
much forced for Black in this
position.
[ But definitely not: </= 28...Kh8??; 29.Qh6+ Kg8; 30.Nf6#.
*************************************************************************
The same idea, but with the
reverse move order is the
following variation:
</= 28...Kh7??;
29.Nf6+ Kh8; 30.Qh6#. ]
White appears to be stymied ...
how do you proceed from this
particular position?
29.Rxf7+!!, (WOW!!) {Diagram?}
An incredibly brilliant move, the
tournament book says that Black
looked shocked
and that the
spectators had to be quieted.
[ Did he expect: 29.Rf6, {Diagram?} instead? ]
29...Kxf7; 30.Qf6+, ("+/-") {Diagram?}
BLACK RESIGNS, (1-0).
Black's game is completely lost,
in fact - I am sure that Marin had
no trouble in
calculating out the
mate from the final position.
[ White is mating after the moves:
30.Qf6+! Kg8; 31.Qxg6+ Kh8;
32.Nf6!!, ("+/-") {Diagram?}
The two exclams is not so much for
the difficulty of finding this move,
but for the fact that Black has so
much material on the board ...
and is so helpless to prevent a
mate from this position.
( Of course after: </=
32.Qh6+ Kg8; 33.Qg6+ Kh8;
34.Qh6+, ("=") {Diagram?}
White has an easy draw. )
32...Rxe7; {Diagram?}
The only {real} move to prevent
a mate in one.
( Of course Black can play the {so-called} suicide check with:
32...Qg1+!?; {Diagram?} but this is just plain silly. )
33.Qh6+ Rh7[]; {Diagram?}
Black's only legal move!
34.Qxh7#. {Diagram?}
This proves that the Queen and
the Knight are the deadliest
combination of pieces in chess!
]
A nice game/combination ... and also a great game.
Copyright (c) A.J. Goldsby, 2004. All rights reserved.
1 - 0
Puzzle Number # 09; November 01, 2004.
|
|
White to move.
Position in Forsythe: (top-to-bottom/left-to-right) -
r2q2kr/ppp2p1p/1b3p1B/4n3/2ppN1b1/5N2/PPP1QPPP/R3R1K1
**********************************************************************
|
White to move, and make his 14th move here. The first player seems to have a slight edge in development here. This is off-set by Black's extra pawns. So who is better here ... and why? Hint: This is a very messy position, but White had a very simple and elegant solution. (Go for it!) |
******************************************************************************
W. Brown (2200) - Gibbs
(2000);
[C55]
London, UK; (1), 1918.
[A.J.G.]
*************************************************************************************************************
For the record, the moves of the game that led to this
position were:
1.e4 e5;
2.Nf3 Nc6; 3.Bc4 Nf6; 4.d4 exd4; 5.0-0 Bc5; 6.e5 d5; 7.exf6 dxc4;
8.Re1+ Kf8?!;
(Book theory today says Black must play
...Be6!) 9.Bg5! gxf6;
10.Bh6+ Kg8;
11.Nc3 Bg4; 12.Ne4 Bb6?; 13.Qe2 Ne5?; reaching the current
position.
*************************************************************************************************************
An incredible combination.
White is on the move in this particular position. (Judging from the pawn structure, one could
almost guarantee that this line arose out of a "Two Knight's Defense, The Max Lange Attack.")
This is from the game: Brown - Gibbs; London, (ENG); 1918.
[ From the fun book: "100
Awesome Chess Moves," by FM Eric Schiller.
Copyright (c) 2000.
PUB: By Cardoza Publishing. USA. ISBN: # 1-58042-021-4 ]
****************************************************************************************************
****************************************************************************************************
A complicated and messy position.
**************************************
White to move from here.
14.Nxe5!!, (Maybe - '!!!') {Diagram?}
A very spectacular chess move!!
[ One student suggested the move: </= 14.h3!?, here, in this position. ]
14...Bxe2;
{Box?} {Diagram?}
Black feels that he must accept, if he does not - he will lose at least a piece.
[ Or
14...Bf5!?; 15.Qg4+!! Bxg4[]; 16.Nxg4! f5!?;
{Diagram?}
Black is completely helpless, the second player is faced with an
impending Knight fork ... there is absolutely no defense.
17.Nef6+ Qxf6; 18.Nxf6#. ]
White's next move is also rather shocking, doubly so if you have never seen this idea before.
15.Nd7!!, (Wow!!) (d7-square) {Diagram?}
Black has no defense, ("+/-") therefore he resigned here.
[
Black is quickly mated, for example: 15.Nd7!! d3;
{Diagram?}
One of those rare positions where it does not matter what
move Black plays.
( A quicker execution is: </= 15...Qxd7!?; 16.Nxf6#. )
16.Ndxf6+! Qxf6; 17.Nxf6#. ]
Simply incredible ... BRAVO!!!!!
Copyright (c) A.J. Goldsby, 2004. All rights reserved.
1 - 0
Puzzle Number # 10; November 15th, 2004.
|
|
White to move.
Position in Forsythe: (top-to-bottom/left-to-right) -
4r1k1/pp2qp1p/1r1b2pB/3Bp3/6Q1/2PR4/Pn3PPP/3R2K1
**********************************************************************
|
White to move from here. Player # 1 seems to have blundered, Black has just forked both Rooks. Did the first player miscalculate, or is there a way out of this for White? |
******************************************************************************
Kraidman (2400) - Bernstein
(2200)
Weeky Problem # 2;
Pensacola, FL (USA), /
15,11,2004.
[A.J.G.]
Weekly Problem # 02 / November, 2004.
A very interesting position. {Source = ChessBase.}
****************************
Based on the game,
Kraidman - Bernstein; ICT / Masters || Tel-Aviv; Israel, 1967.
*******
Player # 1 seems to have blundered, Black has just forked both Rooks.
Did the first player miscalculate, or is there a way out of this for White?
*********************************************************************************************
White to move in this position.
1.Rf3!!, (Surprise # 1) ('!!!')
White rushes to the attack, there is no point in trying to play defense in this position!
[ The position after: 1.Be3!? e4!; "/+" greatly favors Black. ("-/+" ?) ]
1...Nxd1!?; (hmmm)
Quite possibly a mistake ... but Black may already be lost from this position ...
no matter which move he plays. (The box gives other moves, {like ...Rd8; or
even ...P/e5-e4}; for Black that lose, but avoid the mate.)
[ Fritz says that Black can avoid the mate from this position by playing
the following continuation: (>/=)
1...Rd8; 2.Rxf7 Qxf7;
3.Bxf7+ Kxf7;
4.Rd2 e4;
5.Be3 Nc4; 6.Bxb6 axb6;
7.Rd1, ("+/-") {Diagram?}
Black is clearly lost, I cannot see any normal, human player enjoying
this position for Black. ]
2.Rxf7!, (nice)
Another shock, lower-rated players invariably choose to play the Bishop capture
from this position.
This is surprise number two. (# 2.)
[ After the continuation:
</= 2.Bxf7+?! Kh8; 3.Bxe8 Qxe8;
Black is probably winning. ("-/+") ]
2...Qxf7; {Box?}
Apparently this is completely forced for Black here.
Black seems to be hanging on here.
(I have given this position to 1800+ players, and they have not correctly
evaluated this position.)
[ Black cannot play
</= 2...Ne3?;
because of: 3.Rf8#!, {Diagram?}
Please note that this is a DOUBLE check ...
the Black King is attacked by BOTH the Rook and the Bishop.
(And since the Black King has no good escape square to flee to ...
it is also a checkmate.) ]
3.Qd7!!, (Wow!!!)
Definitely surprise No. # 3.
(At first it even looks like a big, fat blunder!)
(Again, most lower-rated players that I have tested this position on
want to play some other move ... or simply miss this idea entirely.)
Once you have found this move, based on the pin on the a2-g8 diagonal,
the rest of the tactics are fairly easy to figure out.
[ After the moves:
</= 3.Bxf7+!? Kxf7; 4.Qxd1, "~" {D?}
I not even sure that White can win from this position.
{Black has two Rooks for the Queen.}
]
3...Rf8[]; (ugh)
This is forced, after Black plays ...Kh8; and White responds with the very simply
QxQ/f7, it would be time for Black to hang it up.
{And ...Re6; BxR/e6, is of absolutely no help at all.}
[ The alternatives look to be completely without any merit.
For example:
Variation 03Ba.)
</= 3...Re7!?;
4.Qc8+ Re8; 5.Qxe8+ Bf8; 6.Qxf8#.
*****************************************************************
Or Black could try:
Variation 03Bb.)
</= 3...Qxd5?;
('??') 4.Qg7#.
*****************************************************************
Also of no help to Black is:
Variation 03Bc.)
</= 3...Be7?!;
4.Qxe8+ Bf8; 5.Qxf8#. ]
4.Bxf8! Be7; {Box?}
Black keeps making the only move that he can to avoid a certain mate.
[ </= 4...Qxd5?; 5.Qg7#.
*********************************
</= 4...Kxf8??; 5.Qxf7#. ]
5.Qxe7! Rf6;
Once again, Black cannot capture the Bishop on d5 due to the mate
threats on the g7-square here.
[ Of no help is:
5...Re6!?;
6.Bxe6 Kh8; 7.Qxf7, "+/-"
with an easy win for White. ]
Now one would almost certainly expect White to capture the Queen in this position.
But as I tell all my students, you should not play the first move that comes into your
head. (Stop! Look for a better one!)
6.Bh6! Rxf2;
Unless Black was in severe time pressure, I don't think that this move was a blunder ...
the second player simply realized that the position on the board is hopeless.
[ Or (>/=) 6...Kh8!?; 7.Bxf7, "+/-" ]
7.Qe8#!, (VERY Cool!!!)
{Diagram?}
White's use of the pin here - and the associated tactical motifs - were
VERY impressive!
Copyright (c) A.J. Goldsby, 2004. All rights reserved.
1 - 0
Puzzle Number # 11; December 01, 2004.
|
|
White to move.
Position in Forsythe: (top-to-bottom/left-to-right) -
6r1/1qr1R1pk/1p3Qb1/p2p2Pp/3P3P/2P3N1/P4PK1/4R3
**********************************************************************
|
White to move in this position. ***************************************************** This is a game from a recent training match between a relatively young player and a former World Champion. Black was fine earlier in the game, but several errors - probably caused by time pressure - caused the second party's position to deteriorate. How does White continue from this position? |
******************************************************************************
GM Darmen Sadvakasov (2631) -
GM Anatoly Karpov (2682)
Weekly Problem,
December, 2004.
(#01)
[A.J.G.]
This is from a {training?} match that was recently (Nov, '04?) played in Astana, KAZ.
(The second game {#2} of this match.)
---> White to move and win. <---
Black's King appears to be very secure here, in this position ... or is it?
39.Qxg6+!! Kxg6; {Box?}
This is forced.
[ </= 39...Kh8?!; 40.Qxh5#. ]
40.R1e6+, (Maybe - '!')
The only way to continue the attack.
[
40.R7e6+? Kh7!; ("-/+") {Diagram?}
Now Black's King is safe ... White has no good way to pursue
the attack from here.
( But not: </= 40...Kf7??; {Diagram?}
This harmless-looking move, ... ... ... is a terrible blunder.
41.g6+ Kf8; 42.Re8#.) ]
Black has only one legal move in reply to the Rook check.
40...Kh7;
Now I tested this position on a group of children at a local school.
(No one immediately found the correct move for White.)
White to move in this position.
41.Rh6#! (cute)
A nice mate ...
based on the Pawn on g5 and the lateral pin by the White Rook on the e7-square.
Note: Karpov resigned as soon as he saw White's thirty-ninth move here.
Copyright (c) A.J. Goldsby, 2004. All rights reserved.
1 - 0
Puzzle Number # 12; December 13th, 2004.
|
|
White to move.
Position in Forsythe: (top-to-bottom/left-to-right) -
7k/1p4rn/4Q1p1/p2pP1P1/2bP4/2B5/qP1K4/7R
**********************************************************************
|
White to move in this position. ***************************************************** White is a piece down here
... I showed this position to a few of my Internet students. The
opinions were sharply divided, many felt it was only a draw. |
******************************************************************************
Canfield (2200) - Stowe
(2000);
Oakland, CA
/ (U.S.A.);
1954.
[A.J.G.]
****************************************************************************************************
Puzzle Number # 339.
(From the book: {Page # 91.}
"The Times Winning Moves," by GM Raymond Keene and Byron Jacobs.)
[ Copyright (c) 2003.] Published by Gloucester/Everyman /formerly Cadogan Books.
ISBN: # 1-85744-338-1
<< White has very active play, and
can win immediately, but he needs to find a very
accurate sequence to do so. Can you see it? >>
- GM R. Keene
**********************************************
White is a piece down here ... I showed
this position to a few of my Internet students.
The opinions were sharply divided, many felt it was only a draw.
Is this (only) a split point ... ... ... or can White do better?
***********************************************************************************************************
***********************************************************************************************************
(The ratings are only estimates.)
1.Qe8+!!, {Diagram?}
It might seem trite to award this simple check a double-exclam, but to play this move, White must
have already found the winning line.
[ White can also win with: </= 1.Qc8+!?, {Diag?} but it takes longer. ]
Black's replies are all forced.
1...Rg8[]; 2.Qf7! Rg7[];
Now White appears to be stymied.
{The box says that Black can delay the mate here by sacrificing the Queen, but that is pointless.}
3.Qf8+! Rg8[];
4.Rxh7+! Kxh7; 5.Qh6#.
A very nice combination ... in these types of positions, it is extremely important to see the
final position in your head, and then work backwards to the position that you actually have
on the board. (PLEASE NOTE: Without the key Pawn on g5, {protecting
the vital h6-square};
for White - this little combination would not have been possible!)
Copyright (c) A.J. Goldsby, 2004. All rights reserved.
1 - 0
(After December 31st, 2004; I will post no more problems on this page. See the next page for the problems and solutions.)
Click HERE to return to my Home Page.
Click HERE
to go to the second page ... for the solutions to my weekly
problems.
(I will try to limit the number of problems per page ...
to cut down on complaints
about excessive scrolling.)
Click HERE to see the "Archives Page" ... that has the problems ... AND the diagrams.
***********************************************************************************************************
Click HERE to see a page (on this site) with more chess problems and puzzles.
***********************************************************************************************************
This page was created in July, 2004. It was first posted {here}
on Monday; August 02,
2004.
This page was last updated on 07/14/12
.
Copyright (c) A.J. Goldsby I
Copyright
(©) A.J. Goldsby, 1995 - 2008.
Copyright © A.J. Goldsby, 2009. All
rights reserved.
