All
the |
(Navigation bar
directly below.)
*******
© A.J. Goldsby, 2015.
(All rights reserved.)
****************
Click HERE
to see my
Chess Items.
****************
****************
Buy a book
from Amazon.com
(And help me out as well!)
****************
Click HERE
...
to see a list of the businesses that help to sponsor all of
my chess efforts.
|
|---|
The Smothered Mate
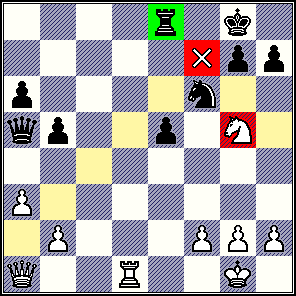
"A chess problem," White to move in the position given above.
Now check out the above position. I will confess, it is a composition, as far as I know this exact position has never actually occurred in any game. However, I went through great pains to make it resemble a real or actual game of chess as much as I possibly could. I also took the effort to point out key squares and lines by highlighting them for you. (White to move here, you may want to study the position for a few moments and try to solve it in your head - before you look at the answer below.)
*******
1.Qa2+, ('!')
The correct first move, no points for any other tries. (Note how the Queen immediately occupies the key a2-g8 diagonal and gives check to the BK.)[ Less effective is: 1.b4 Qc7; 2.Rc1, "+/=" ]
1...Kh8;
This is completely forced.[ Of course not: 1...Kf8??; 2.Qf7#. ]
Now comes a couple of fairly obvious moves ... where Black's responses are completely forced.
2.Nf7+ Kg8; 3.Nh6+! Kh8;
Once more this is forced, Black cannot move his King to the f8-square, due to the constant threat of Qf7 mate.Black - if he is very inexperienced - might even believe that his position is quite safe, and that White has no way to make any real progress from this particular position.
Will White be forced to take a draw by repeating the position? (Nf7+, Kg8; Nh6+, Kh8; etc.)
4.Qg8+!!,
Apparently not! Black Resigns, (1-0); as either capture is answered by the wondrous move, and simple move of Nf7#!
*******
Please note that this is a true smothered mate. (Kopec's position # "R" of the basic mates.)
To
explore this subject further, please see WCA lesson
for March, 2005.
(This is where this material was culled from.)
[Home] [Site Map] [A.J.'s School of Tactics] [My lessons on the WCA website.]
Page created in March, 2006. Page last edited or updated: Monday, April 14, 2014 .
Copyright (c) A.J. Goldsby I
Copyright (©) A.J. Goldsby, 1985-2012. Copyright (©) A.J. Goldsby, 2013.
Copyright (©) A.J. Goldsby, 20
14. ALL Rights reserved.