Loek Van
Wely (2679) - Valerij
Popov (2588)
|
|
|
Dutch GM Loek van Wely was a promising junior, and was being touted as the replacement for the aging, but still feisty Timman. Loek became a highly rated GM before he was 20, but many feel that he never fulfilled his early promise. And while one would hardly call 32 "over-the-hill" or a near-2700 rated GM, "all washed up," he has yet to make a run at the World's Championships that many predicted he would.
Here is a game that shows he can play chess VERY well ... it shows the true master's touch.
(Not even Fritz gets the analysis of all the variations right the first time around.)
A WORLD-CLASS GAME!!! (From TWIC # 537.) (It also made for two days of interesting analysis!)
**********************************************************************************
1.d4 d5;
2.c4 c6;
3.Nc3 Nf6; 4.Nf3 e6;
5.Bg5 h6; {Diagram?}
The Moscow Variation.
6.Bh4,
A wild sideline ... that has seen a lot of action lately.
(The Anti-Moscow Gambit.)
[ The {older} main line {was} is:
6.Bxf6 Qxf6; 7.e3 Nd7; 8.Bd3 dxc4;
9.Bxc4, "+/=" {D?}
White maintains a slight plus, almost no matter what Black does
from this particular position. (Although the second player has the
Bishop pair ... IF he can survive into the ending.)
[ See MCO-14, page # 471; column # 37-38, and all notes. ]
See the GM encounter: Pedrag Nikolic - Vishy
Anand;
{Round # 2.1}
ICT / FIDE World Champ. (K.O.) / Groningen, NED; 1997. (0-1)
{Black won a very nice, and also an instructive game - in 36 moves.}
]
6...dxc4;
7.e4 g5; 8.Bg3 b5; 9.Be2 Bb7; 10.Ne5,
{Diagram?}
Once again ... the "older" main line from this particular position. (Old ... now new again?)
This line is NOT that old ... Ne5 was a TN in the late 1990's.
(Today it is commonplace.)
White occupies a key outpost, practice has shown it is NOT all that easy to play Black's position,
the practical results favor White from the current position.
[ For the move of:
10.h4!?,
('!') {Diagram?}
see the complicated game:
GM Garry Kasparov -
GM Alexey Dreev;
57th National Champ. Tnmt.
(R6) Moscow, RUS; 2004.
(1-0, 59 m.) ]
10...Bg7;
11.Qc2,
Certainly a logical move ... White covers key central squares and clears the back row for the Rook on a1.
(This move is not new, it was played in several games before this one.)
I am not sure what theory thinks of this move ... we are basically at the outer limits of my knowledge ... and
also pretty much at the tail end of all of my opening books here.
[ The alternative was:
11.h4!? Nfd7; 12.Ng4!,
"+/=" {Diagram?}
and White is slightly better.
GM V. Topalov - GM J.
Timman;
ICT / Hoogovens Masters
/ Wijk aan Zee, NED; 1998.
{This game was eventually drawn.}
[ See MCO-14, page # 471; col. # 37 and especially note # (b.). ] ]
11...Nfd7;
Certainly a logical ... and a safe move for Black in this position.
(In several other games, Black played the extremely risky capture on d4 here, but quickly
came to grief in all of these encounters.)
[ I do not advise that Black capture the d-pawn here, for example:
(</=)
11...Qxd4!?; 12.Nxf7!? 0-0!?;
{Diagram?}
Maybe dubious ('?!') ... Black had to capture the Knight on f7 ...
hang on for the ride ... and see just what was going to happen.
( >/= 12...Kxf7[]; 13.e5 Ne8!?; 14.Bh5+ Ke7; 15.Rd1,
15...Qb6; 16.Qg6, "~" with some play. )
13.Nd6,
'±' {Diagram?}
White is clearly better in this position.
A. Armbruster (2253) -
I. Madl (2361);
FSIM (4) /
Budapest, HUN; 2003.
{White won a nice game.} ]
12.Nxd7 Nxd7;
13.Rd1 e5!?; {Diagram?}
One book, (and also in one opening survey - in another yearbook); gives
this move an exclam ...
however, I am not so sure.
Both ...a6; and ...Qe7; were to be considered for Black in this position.
[ Yet another possibility for Black was the very sharp move of:
(>/=) 13...Qb6!?;
{Diagram?}
which I analyzed for nearly two hours ... but never came to
any really solid conclusion about.
]
14.d5 Qa5!?;
Interesting, but a shade risky.
[ Maybe it was safer to play:
14...cxd5; 15.exd5 a6;
"~" (Maybe -
"=/+") {Diag?}
and Black looks to be OK. ]
15.0-0 0-0;
16.h4!,
This loosens Black's King-side.
[ Fritz chooses: 16.b3!?, here. ]
16...Rad8;
17.hxg5 hxg5;
18.Qc1 f6!?; (Hmmm)
{Diagram?}
None of the alternatives were pretty, but now Black's KB is just a tall Pawn.
(Black should have just swapped on d5, played ...Nf6; and let it go.)
Now having damaged Black on the King-side, White turns his attentions back to Black's Queen-side.
19.a4! a6;
20.Bg4 cxd5!?;
This is risky, and probably inferior to the correct move here.
[
Black should have played the distinctly superior move
of:
>/=
20...Nc5!; "~"
("=/+")
{Diagram?}
And according to the computer, Black is OK,
he may even have a small edge in this position.
]
21.Nxd5 Kf7;
{Diagram?}
Black panics. (Out of the frying pan ...)
[ Seemingly the following continuation was forced for Black in this position:
21...Kh8; 22.axb5 axb5;
23.Bf5,
"--->" ("+/=")
{Diagram?}
White will play the idea of Qe3-f3, and on over to the King-side.
]
22.Bh5+ Ke6;
(...and into the fire!)
Black probably thought that this was forced here, the other retreat loses at least an exchange for Black.
[ After the continuation:
(>/=)
22...Kg8; 23.Ne7+ Kh8;
24.Qe3 Qb4; 25.Ng6+ Kh7;
26.Nxf8+ Bxf8; 27.Bg4,
'±' {Diagram?}
Black has lost an exchange, and White's attack is still going strong.
]
23.axb5 axb5;
24.b4!!, {Diagram?}
The final line-opening device. After this excellent move, Black will always remain ahead
two or three Pawns ... even after he is check-mated!
[ The try of 24.Qe3, '±' {D?} was also good for White. ]
24...cxb3; (Really
'?') {Diagram?}
This looks like the required move ... but actually Black should now lose
by force ...
and pretty quickly, to boot! (24...Qa4; was probably forced for Black in this position.)
Black is lost no matter what ... so I find it difficult to be extremely critical
of this move.
(Yet the box's "eval's"
of the position change too radically for me to ignore it completely.)
[ The continuation of:
>/=
24...Qa4[]; 25.Qe3! Bxd5!?;
{Diagram?}
Its a matter of choosing between the firing squad and the gas chamber
for Black at this point.
( The continuation of: 25...Rh8!?; 26.Bg4+ Kf7; 27.Nc3 Qxb4;
28.Rxd7+ Rxd7; 29.Bxd7, ("+/-") {Diagram?}
is a fairly easy win for White.)
26.Rxd5,
{Diagram?}
It seems natural to keep lines open ... but taking with the Pawn
was also good for White.
( The continuation of:
>/= 26.exd5+! Ke7; 27.d6+ Ke6; 28.Qe4 , ("+/-")
{D?}
is decisive for White as well. )
26...Qxb4; 27.Rfd1,
{Diagram?}
is a relatively easy win, ("+/-"); for White from this position.
(The threat of Bg4+, and winning the Knight on d7, cannot be met.)
]
25.Qe3,
(hmmm) (OOOooops!!!!)
{Diagram?}
This wins ... but Loek Van Wely
actually missed a big improvement here.
(It is now White turn to miss one ... and it is a real ... "BIGGIE!!!")
Now
Nc7+! ... ... ... a seemingly
obvious check, but with a very subtle follow-up, would
have won routinely here for White. (Bxe5 here also won for White!)
To be honest ... when I was going over
the game here without the computer, I was considering
awarding Qe3 an exclam. (But that would be kind of superfluous in view of what Fritz
finds here
- from this position - for White.)
[ White could have won instantly
by playing the following combo:
>/= 25.Nc7+! Ke7; 26.Bxe5!! fxe5;
{Diagram?}
Black could have prevented the mate
by giving up the Queen with 26...Qb6;
but that was also totally hopeless.
( </= 26...b2??; 27.Bd6# )
27.Qxg5+ Bf6; 28.Qf5! Qxc7;
{Diagram?}
To prevent Qe6 mate.
29.Qh7+! Bg7; 30.Qxg7+ Ke6;
31.Bg4+ Rf5[]; {Diag?}
Forced - Black's only legal move
(here).
32.Bxf5#.
{Diagram?}
A most unusual mating pattern ... which is probably why van Wely
missed it. ]
Now the play becomes forced.
(26.Rxd5! was probably - also - better than what was actually
played in the game. But to me,
the pawn capture - with check - and also opening lines looked
correct. It is simply amazing to
me that a near 2700-rated player could have missed all of this.)
25...Bxd5;
26.exd5+ Kd6; 27.Rc1 Rc8; {See
the diagram, just below.}
Black - being pushed from pillar to post - really had no choice.
*********************
|
|
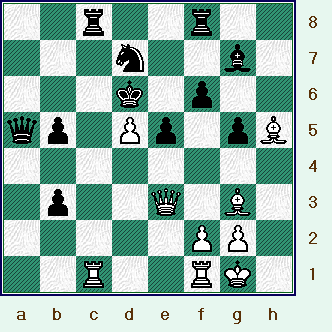
*********************
Now it has almost become a chess problem here,
"White to move ... "
(2r2r2/3n2b1/3k1p2/qp1Pp1pB/8/1p2Q1B1/5PP1/2R2RK1)
[ </= 27...Kxd5??; 28.Qd3+ Ke6; 29.Rc6+, and mate next move. ]
28.Rc6+! Rxc6;
29.dxc6 Kxc6;
30.Rc1+, (yes)
Sometimes the direct method is the best approach.
[ The continuation of:
(</=)
30.Qe4+!? Kc7; 31.Qh7 b2; 32.Qxg7 Qd2;
33.Bg6 Ra8; 34.Bb1 Ra3;
"<=>" {Diagram?}
might allow Black too much play.
]
30...Kd6?!;
{Really - '?'}
(ooops)
{Diagram?}
This move is definitely an error, now White will quickly win a piece.
[ The move
...Kb7; was forced. But it did not bring much relief. I.e.,
>/= 30...Kb7[]; 31.Qxb3! Rc8!?;
{Diagram?}
The most natural reaction, disputing the c-file without further delay.
( Maybe >/= 31...Nb6; was a little better.
However, Black's game still
appears to be very grim here.)
32.Qd5+ Kb8; 33.Rxc8+ Kxc8;
34.Bg4 Qa7; 35.Qg8+ Kc7;
36.Qxg7,
("+/-") {Diagram?}
and White has won a piece. ]
31.Qd3+ Ke7!?;
32.Qh7, ("+/-") {Diagram?}
White wins a piece ... so Black throws in the towel here.
[ >/= 32.Rd1!, ("+/-") was better, according to the computer. ]
An instructive game in a highly popular and topical line.
Copyright (c) A.J. Goldsby, 2005. All rights reserved.