All
the |
(Navigation bar
directly below.)
*******
© A.J. Goldsby, 2015.
(All rights reserved.)
****************
Click HERE
to see my
Chess Items.
****************
![]()
****************
Buy a book
from Amazon.com
(And help me out as well!)
****************
Click HERE
...
to see a list of the businesses that help to sponsor all of
my chess efforts.
An Amazing K+P Endgame
(Reti K+P endgame composition, number one.)
A prize-winning composition by one of the most creative chess players who ever lived.
Below is an ending that I saw many years ago. Then - at chess club - a friend was showing me a chess book that he had received as a Christmas present. (The name of the book is "Chess Endgame Training," by B. Rosen. ISBN# 1-904600-01-8 Buy this book from USCF.) In that book was this same problem. We went over it together, and that piqued my curiosity.
I had always wanted to come back and analyze many such problems and famous or well-known positions/endgames. (Especially since the computers have improved so dramatically over the last decade or so ... the Nalimov Endgame Tablebases have virtually eliminated all guesswork of any position with just a few pieces left on the board.)
So allow me to share a treasure with you. If this Pawn ending does not bring a smile to your face ...
Click HERE to see an explanation of the symbols that I use when annotating a chess game.
Click HERE to replay ... just the main line ... of my solution.
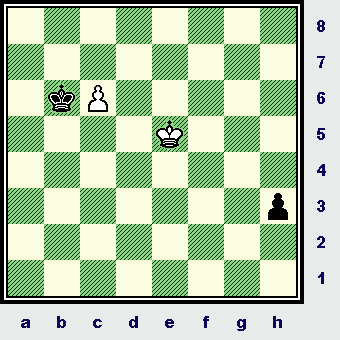
7K/8/k1P5/7p/8/8/8/8 w
A very famous problem, created by Reti back in the early 1920's. (It also won prizes in several composition contests.) It has been reprinted countless times in both books and magazines. [See the "Encyclopedia of Pawn Endings," page # 37.]
[ Composition by - GM R. Reti / Kagan's Neueste / Schachnachrichten, 1921. ]
The stipulation (here) is ... "White to move and draw." At first glance, this looks to be completely impossible ... as Black's King is very close to White's Pawn, while his counterpart, (the WK) appears to be " a hundred miles" behind the Black passer. *** *** *** *** *** *** *** *** *** *** *** *** *** *** *** *** *** *** *** *** *** *** *** *** (The moves here have been checked against Fritz 8.0, Fritz 9.0 ... and the latest of the Nalimov Tablebases. The variations that are given here actually represents a complete analysis, and may differ from the standard solution ... that is given in many chess books.)
1.Kg7!!,
[ Hopeless for White would be: **************************************************************
Going in ... "the most direct route" (after the Black RP) does not work,
2.Kg6 h4; 3.Kf5 h3;
4.Ke4, (hmmm) ( Or 4.Ke6 Kxc6; "-/+" winning. )
4...h2; 5.Kd5 h1Q+;
6.Ke5 Qxc6; "-/+" {Diagram?} Note that delaying the correct procedure (for White) by even one tempo is fatal! ]
1...Kb6!; Its been 30+ years ago, but I remember studying this problem with a friend. I once showed this position to an Expert in a tournament I was playing in. I asked him, "What would you play in this position?" He studied the board for a few minutes and said, "Resign," ... rather laconically, as he sauntered away from the chess board.
[ Or Black could try: ***************************************
( Another way to play would be: ( I.e., 3...Kxc6!?; 4.Kf4, "=" with a draw. )
4.Kd6, "=" {Diagram?} ***************************************
3.Ke7! h2;
( Or 3...Kb6!?; 4.Kd7 h2;
5.c7, "=" (also with a draw),
4.c7 Kb7; 5.Kd7,
"=" {Diagram?}
White continues to move on the long diagonal here, as this brings the White
King closer to both pawns ... ... ...
2.Kf6!! h4; (Forced?) [ 2...Kxc6; 3.Kg5 Kd5; 4.Kxh5, "=" ]
It would be easy to give up here ...
{assuming that White was lost}, but the first player simply continues with the correct strategy
(that was outlined earlier).
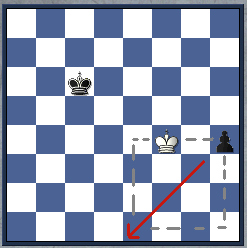
8/8/1kP5/4K3/8/7p/8/8 w
It might be easy to glance at this position and assume nothing has changed ... but actually, White has made real progress ...
********************************************************************************************** [ After 3...Kxc6; 4.Kf4, "=" {See the analysis diagram ... given just below.}
The White King is inside the "square of the Pawn," and thus catches and captures it. **********************************************************************************************
(Returning to the main line of the analysis of this excellent little composition.)
4.Kd6!, (Unity of forces.)
[ </= 4.Kf4? h2; 5.Ke5 Kxc6; "-/+" ]
4...h2;
5.c7 Kb7;
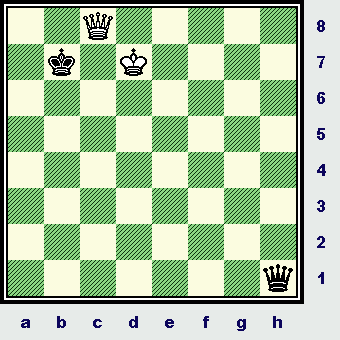
6.Kd7 h1Q; 7.c8Q+, "=" (A
'book' draw, the Q+P ending is easily drawn.)
2Q5/1k1K4/8/8/8/8/8/7q b
An incredible composition ... by one of the greatest and most original players who ever lived. In closing, the technique is actually pretty simple ... that is, once you have learned it. The White King simply continues to move on the diagonal, each step brings him closer to both pawns. Eventually, the WK will either catch the Black Rook Pawn, or be united with his own Pawn. (This results in the desired outcome, which is - of course - a draw.)
*** *** *** *** *** *** *** *** *** *** *** *** *** *** *** *** *** *** *** *** *** *** *** *** ***
BIBLIOGRAPHY / Reference:See the book, "Pawn Endings," by GM Yuri Averbakh and also I. Maizelis. (Chapter Three, page # 37, diagram/problem # 124.) First released in the USSR. It was translated by B.T. Batsford in 1974, and published in the U.S. by Chess Digest, Inc. (hard-back)
Copyright (c) A.J. Goldsby, 2006. All rights reserved.
Ẅ - Ẅ |

Copyright (c) LM A.J. Goldsby I
Copyright (©) A.J. Goldsby, 2013. All rights reserved.
This page was created on February 01st, 2006. This page was last edited on: April 19, 2013 01:36 AM .
[Home] [Site Map] [My Training Page] [Endgames, Lessons & Challenges II]
|
|