All
the |
(Navigation bar
directly below.)
*******
© A.J. Goldsby, 2015.
(All rights reserved.)
****************
Click HERE
to see my
Chess Items.
****************
![]()
****************
Buy a book
from Amazon.com
(And help me out as well!)
****************
Click HERE
...
to see a list of the businesses that help to sponsor all of
my chess efforts.
The Greek Gift |
I have always wanted to deal with this topic ... well, obviously I have ... although this was not the main thrust of the pages that I have created in the past.
On this page, I discuss the "Greco Trap" (greek gift); but it is NOT the main topic, so I have always felt that the lesson of the page had gotten diluted by all the other topics and areas of discussion that has crept onto that page over the years. (Some of this was necessary ... as that page is aimed at a nearly raw beginner. So - in order to really give good instruction, many bases had to be covered.)
However, on this page, I get a chance to discuss the "Greek Gift" solely ... with no other areas (of chess) or problems/lessons being dealt with. In other words, this page is as close as being a chess scientist as I can be. In other words, we are ONLY going to examine this type of sacrifice (The "Greek Gift") on this particular web-page. We are going to arrive at a critical position as quickly as possible, not even caring, (at least - for the moment); how we arrived there. The ONLY thing that we want to discuss on this page is "The Greek Gift" sacrifice. (What it is, what are its prerequisites, how it is carried out, etc.)
As far as I know, this is ALWAYS a Bishop sack on h7; although one student showed me an example of a Bishop-sack on f7 that was probably highly similar in all facets of the ensuing details. Nonetheless, the true "Greek Gift" type of sacrifice normally begins with the Bishop sack on the h7-square.
Now
- before we get into the actual analysis, lets look at the sample line and
discuss the main characteristics of the "average position" ... ...
...
that might lead to such a "stock sacrifice" as the Bishop sack on h7.
(See the section given - just below.)
| Oct-16-11 |
LIFE Master AJ:
<Dom> Yes, everything you said was
correct, this was just the shortest (fewest moves) example - that I could
find - 1.e4
e6; 2.d4 d5; 3.Nc3 Nf6; 4.e5 Nfd7; 5.Nf3 Bb4; 6.Bd3 0-0; (Line.)
Black's
fifth move is only semi-bad, however, his sixth move - blindly following
simple principles ("always castle early") turns out to be
disastrous.
(This is) a good pattern to look for, (I have successfully used this sacrifice, even in bullet chess.): #
1.) White LSB on the b1-h7 diagonal. {See my CG forum for all of the discussion that went on about this particular topic.} |
The above is a copy of my forum on the "Chess Games" website, it outlines the basics of what the prerequisites were for this sacrifice. To all this, I would only add that a White Knight must be present to reach the g5-square ... this is normally part of the pattern as well.
Any Player - A.O. Player
|
|
|
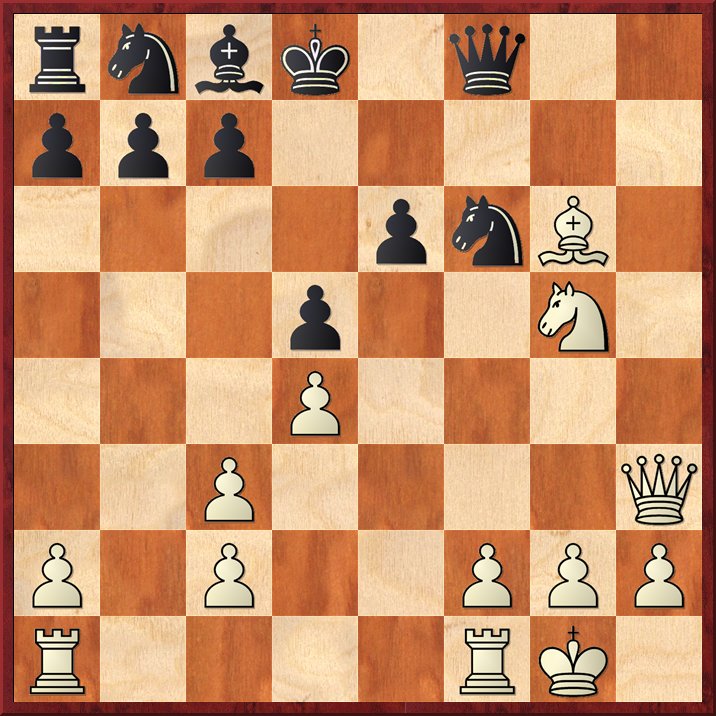
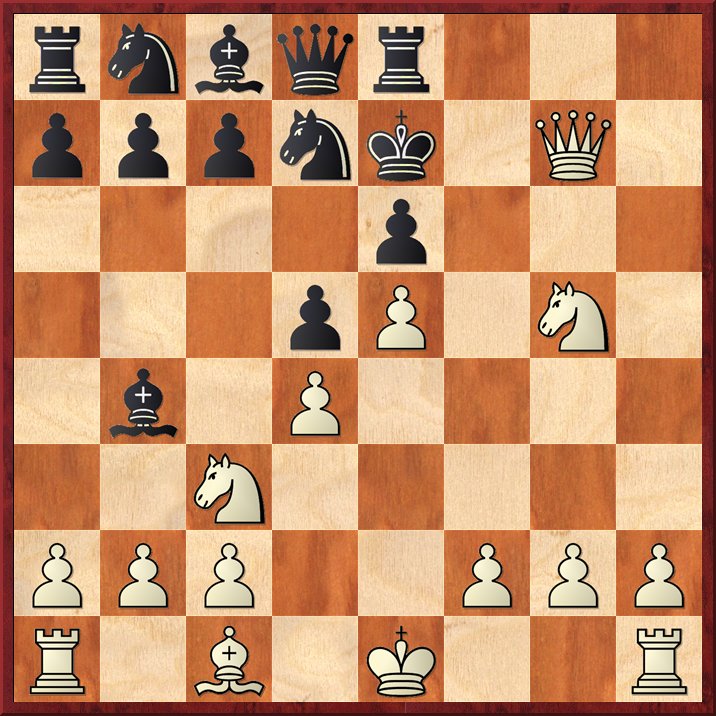
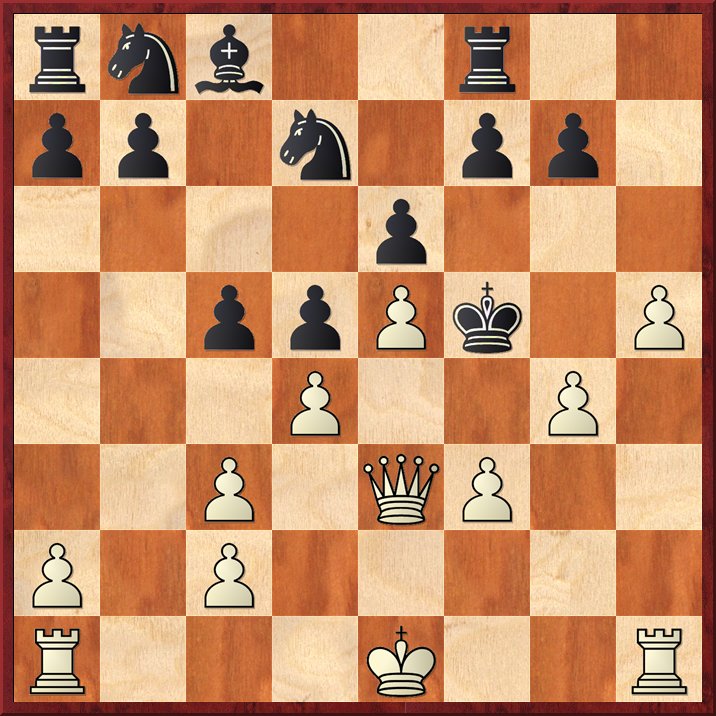
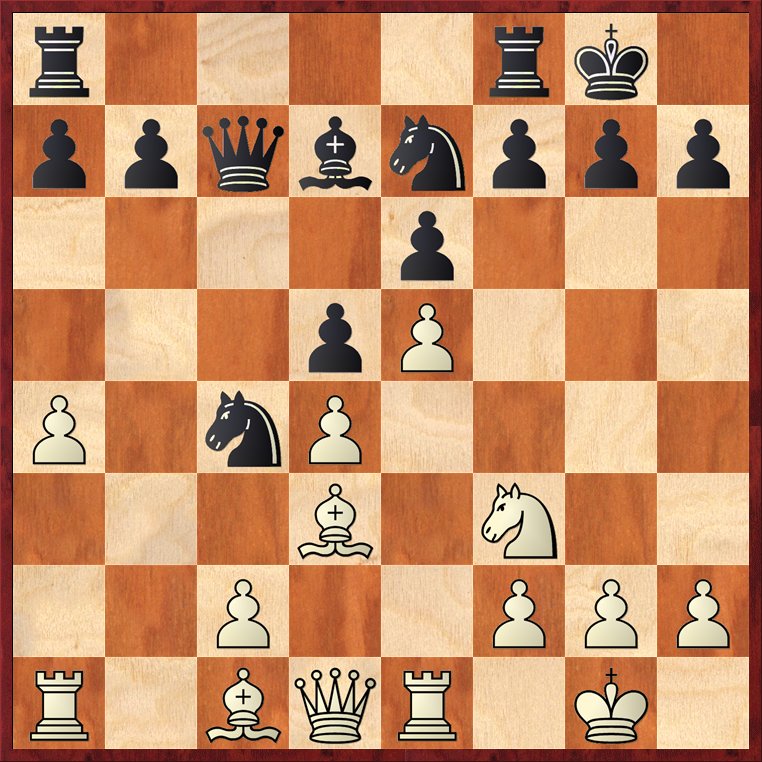
rnbq1rk1/pppn1ppp/4p3/3pP3/1b1P4/2NB1N2/PPP2PPP/R1BQK2R w KQ - 0 7
White to move here, what is the correct idea here for White?
7.Bxh7+!,
Like
the Greeks ... who offered the Trojans a giant wooden horse ...
White presents Black with a gift.
(Yet White's intentions - like the Greeks in our story - has intentions
that are ... "ahem" ... ... ... shall we say, "less than
noble?")
|
|
rnbq1rk1/pppn1ppB/4p3/3pP3/1b1P4/2N2N2/PPP2PPP/R1BQK2R b KQ - 0 7
Only
this move is correct here, as really nothing else is as decisive as this
move is.
(Now Black's sixth move has been exposed as a grievous error.)
7...Kxh7;
Black - pretty much - has to play this.
|
|
rnbq1r2/pppn1ppk/4p3/3pP3/1b1P4/2N2N2/PPP2PPP/R1BQK2R w KQ - 0 8
Otherwise, White could simply retreat and be a Pawn up. (Also - the BK is badly exposed.)
[
RR
7...Kh8; 8.Ng5!
g6; '[]' (Forced.)
The machine gives ...QxN/g5 here, but
a human would resign before playing this way.
9.Qg4! Qe7; 10.Qh3
Kg7; 11.Nge4!! Bxc3+;
12.bxc3 f6;
White's threat is Qh6+, followed by a quick mate.
(</= 12...dxe4?; 13.Qh6+ Kh8; 14.Bxg6+ Kg8; 15.Qh7#.)
13.Bh6+
Kf7; 14.exf6 Nxf6;
15.Ng5+ Ke8; 16.Bxg6+
Kd8; 17.Bxf8 Qxf8;
18.0-0, "+/-"
Black has avoided mate, but the
second player has lost a substantial (decisive) amount of material.
|
|
{Analysis diagram.}
(Analysis by - Fritz 12.) ]
8.Ng5+, '!' (Best.)
This is the only correct follow-up, now the Black King will be mated, or White win material.
|
|
rnbq1r2/pppn1ppk/4p3/3pP1N1/1b1P4/2N5/PPP2PPP/R1BQK2R b KQ - 0 8
Take a few minutes and study this position as well.
[
Some students want to play: </= 8.Qd3+!?,
but after 8...g6;
White does not have a winning attack,
not from this position. ]
8...Kg6; (Forced!?)
Black must play this ... everything else is quite hopeless.
|
|
rnbq1r2/pppn1pp1/4p1k1/3pP1N1/1b1P4/2N5/PPP2PPP/R1BQK2R w KQ - 0 9
If
you are not convinced that the play of 8...Kg6; would be forced here, then
see my analysis ... ... ...
just below.
[ We can dismiss: </= 8...Kh6?; as after: 9.h4! f5; 10.Nxe6+, Black is losing his (or her) Queen. ("+/-")
|
|
{Analysis diagram.}
**********************************************************************************************************
Black also loses after: RR
8...Kg8!?; 9.Qh5 Re8; ("Box?!?")
Again, the computer (chess engines)
gives ...QxN/g5 here; but any human would probably
resign before playing in this manner.
(IMO)
10.Qxf7+ Kh8; 11.Qh5+ Kg8; 12.Qh7+ Kf8; 13.Qh8+ Ke7; 14.Qxg7#.
|
|
{Analysis diagram.}
( ---> Analysis checked by many engines.) ]
9.h4!, (Threat / h4-h5+, winning.)
Normally, Qg4 would be played in such positions, however, in this set-up, (because White has not castled); the first party has an idea that is even stronger.
|
|
rnbq1r2/pppn1pp1/4p1k1/3pP1N1/1b1P3P/2N5/PPP2PP1/R1BQK2R b KQ h3 0 9
Now Black has to work hard not to get mated from this position.
[ Even if White plays a ... "less-than-best" move here, (like
Qg4); ... ... ...
... he will still have an
overwhelming attack.
Of course, there is one doubting Thomas in every crowd, so I provide at
least one line here:
</= 9.Qg4!?
f5; 10.Qg3 Qe7; 11.h4! Kh6; 12.Nxe6+
Kh7; 13.Nxc7 Nc6;
14.Bg5 Qf7;
15.e6 Qh5; 16.exd7 Bxd7; 17.Nxa8, "+/-"
|
|
{Analysis diagram.}
White has an overwhelming material advantage here. ---> Main analysis engine - Fritz 12. ]
9...Bxc3+;
Now Black takes on c3 ...
|
|
rnbq1r2/pppn1pp1/4p1k1/3pP1N1/3P3P/2b5/PPP2PP1/R1BQK2R w KQ - 0 10
Its
a time-proven principle ... that when you are being attacked ...
... you should trade as many pieces as possible.
10.bxc3 f5T; (100% forced.)
If Black does not play this now, he will be forcibly mated. (See the note just below.)
|
|
rnbq1r2/pppn2p1/4p1k1/3pPpN1/3P3P/2P5/P1P2PP1/R1BQK2R w KQ f6 0 11
To see what happens if Black omits ...f5; please see the note - just below here.
[
</= 10...c5?; 11.h5+ Kh6;
(</= 11...Kf5?!; 12.Qf3#.)
12.Qd3 Qxg5;
13.Bxg5+ Kxg5; 14.Qe3+ Kg4; 15.f3+ Kf5;
16.g4#.
*****
|
|
{Analysis diagram.}
Black has been mated - see the analysis diagram ... just above. ]
11.h5+ Kh6; 12.Nxe6+ Kh7; 13.Nxd8, "+/-" (White is winning on material.)
|
|
rnbN1r2/pppn2pk/8/3pPp1P/3P4/2P5/P1P2PP1/R1BQK2R b KQ - 0 13
Black
can resign here, the second player has lost his Queen and two pawns for
only two minor pieces.
(Further, if Black recaptures the Knight on d8, White has a winning
attack, see the variation given ... here, just below.)
[
13.Nxd8
Rxd8; 14.Qd2! Nc6; 15.Qg5 Nf8; 16.Ba3
Bd7;
17.Bxf8 Rxf8;
18.Qg6+ Kg8; 19.h6 Rf7; 20.h7+,
"+/-"
|
|
{Analysis diagram.}
White is winning here ... rather easily. ]
1 - 0
There are a few other pages, where I look at a combination, beginning with a sack on h7/h2, although none of these games are strictly "a Greek Gift" type of combination. However, I do think it would help the average player to study these battles ... ... ...
#1.)
Its one of the grandest games of all time ... its also an original, played
by the second World Champion, himself. And it starts with BxP/h7+!
Of course, I am talking
about the classic confrontation of: Em.
Lasker - J.H. Bauer; Amsterdam, NED / 1998.
#2.)
It starts with a sack on h7 ... but it does not end there, in fact;
this is only the beginning of this combination.
Of course, I am making a
reference to the fantastic clash: Kasparov-
Portisch; Niksic, YUG / 1983.
#3.) Black also begins with a Bishop sack on h2 ... here, I am talking about: Nimzovich - Tarrasch; St. Petersburg; RUS / 1914.
Once you become familiar with this pattern, you can spot its defining characteristics fairly quickly:
***********************************************************************************************
A.J. Goldsby (2070) -
Some Amateur (2130)
[B02]
On-line Game (R#01) / October, 2011.
[A.J.G.]
One Minute game.
(No increment.)
1.e4 Nf6; 2.e5 Nd5; 3.c4 Nb6; 4.c5 Nd5; 5.Nc3 e6; 6.Bc4 Nxc3; 7.dxc3 Bxc5; 8.Nf3 d5;
9.Bd3 0-0?!;
10.Bxh7+!! Kh8; 11.Bc2!? f6? 12.Nh4!? fxe5?!; 13.Qh5+ Kg8; 14.Bh7+ Kh8; 15.Ng6#.
1-0
Fischer - Schweber, 1970
R.J.
("Bobby") Fischer - Samuel Schweber; [replay]
[C19]
ICT, Buenos Aires, ARG; (R#4) / 1970.
The first thirteen moves were:
1.e4 e6; 2.d4 d5; 3.Nc3 Bb4; 4.e5 c5; 5.a3 Bxc3+; 6.bxc3 Qc7; 7.Nf3 Nc6;
8.Be2 Bd7; 9.0-0 Nge7; 10.a4 Na5;
11.Re1 cxd4; 12.cxd4 Nc4; 13.Bd3 h6.
Why did Black play 13...P-KR3 (13...h7-h6) here?
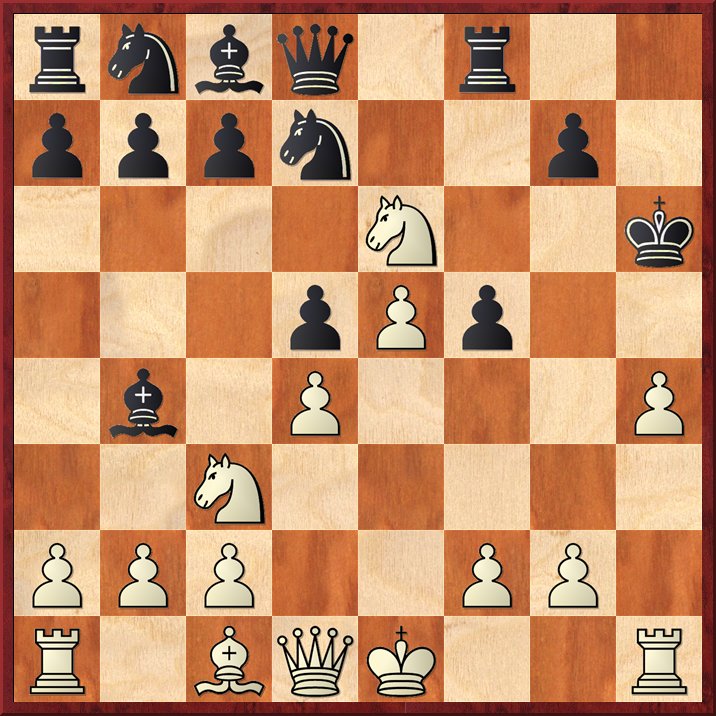
To understand this move better, let's look at the (hypothetical/analysis) position that occurs after 13...0-0, see the position just below.
|
|
Now, White wins, just as in our first example, by sacrificing the Bishop on h7.
14.Bxh7+! Kxh7; (Forced?)
Otherwise White retreats ...
and Black is down a Pawn for absolutely nothing.
15.Ng5+ Kg6T; Forced.
Black had no choice at all ... not in this position.
[ Distinctly worse is: </=
15...Kg8?; 16.Qh5 Rfb8;
17.Qxf7+ Kh8;
18.Ra3!! Nxa3;
(What else?) Black could not allow Rh3#.
19.Qh5+ Kg8;
20.Qh7+ Kf8; 21.Bxa3! Qc5T;
22.Bxc5 Ke8; 23.Qh8+ Ng8; 24.Qxg8#.
]
16.Ra3!! f6; 17.exf6! Nxa3;
Black does not have a lot of good alternatives here.
(RR 17...Nf5!?; 18.fxg7 Nxa3; 19.gxf8Q, +-)
18.Qg4! e5; 19.Ne6+ Kxf6;
Not much choice ...
[ </= 19...Kf7?;
20.Qxg7+ Kxe6; 21.Qxe7+ Kf5; 22.g4+! Kxg4;
23.Qh7!
Nxc2; 24.h3!+ Kf3; 25.Qd3+ Ne3; 26.QxN/e3#.
Or </= 19...Kh7??; 20.Qxg7#. ]
20.Rxe5! Qxe5T; (Forced.)
This is the only move for Black, according to Fritz.
(The alternatives are vastly inferior and explored in the analysis - just below.)
**********************************************************
[ a.) </= 20...Bxe6??; 21.Qxe6#.
b.) </= 20...Kf7?; 21.Qxg7+ Ke8; 22.Qxf8#.
c.) </= 20...Nf5?; An error.
Now White wins easily with Qg5+ and then NxQ/c7; however the box finds a line that is more convincing.
21.Rxf5+! Kxe6; 22.Rxf8+ Kd6;
This is best.
( </= 22...Ke7?; 23.Bxa3+ Qd6T; 24.Qxg7+ Ke6; 25.Qf7#. )
23.Qg6+ Be6T; (Forced.)
Now Black gets mated.
24.Bf4+ Kd7; 25.Qxg7+ Bf7; 26.Qxf7+ Kc6; 27.Qxc7#. ]
**********************************************************
Returning to our analysis of what occurs if Black had castled on his (unlucky) 13th move.
21.dxe5+ Kf7; (Forced?)
Black did not have much choice.
**********************************************************
[ Or
21...Kxe5!?; 22.Bxa3 Ng6;
Best/forced ... ... ... at least, according to the strong chess engine, F-12.
( Or 22...Bxe6; 23.Qxg7+ Kf5; 24.Bxe7 Rf7?!;
The natural move ... but it loses (badly).
25.Qg5+ Ke4; 26.Bd6 Kd4; 27.Qe3+ Kc4; 28.Qd3#. )
23.Qxg6 Rf6; 24.Qxg7 Kxe6; 25.Qe7+ Kf5; 26.Qxd7+, "+/-" ]
**********************************************************
22.Ng5+ Ke8; 23.e6 Bxe6T; (Forced.)
Fritz gives this as best ... everything is losing here for Black.
( Or 23...Rf6?!; 24.exd7+ Kd8; 25.Bxa3, "+/-" )
24.Nxe6 Nxc2; (What else?)
Nothing here will save Black.
( Black could (also) try: 24...Nc4;
25.Nxg7+ Kd8; 26.Ne6+ Ke8; 27.Nc7+ Kd8; 28.Nxa8,
"+/-"
or 24...Rf6; 25.Bxa3 Rd8; 26.Nxd8 Kxd8; 27.Bxe7+ Kxe7;
28.Qxg7+, "+/-" etc. )
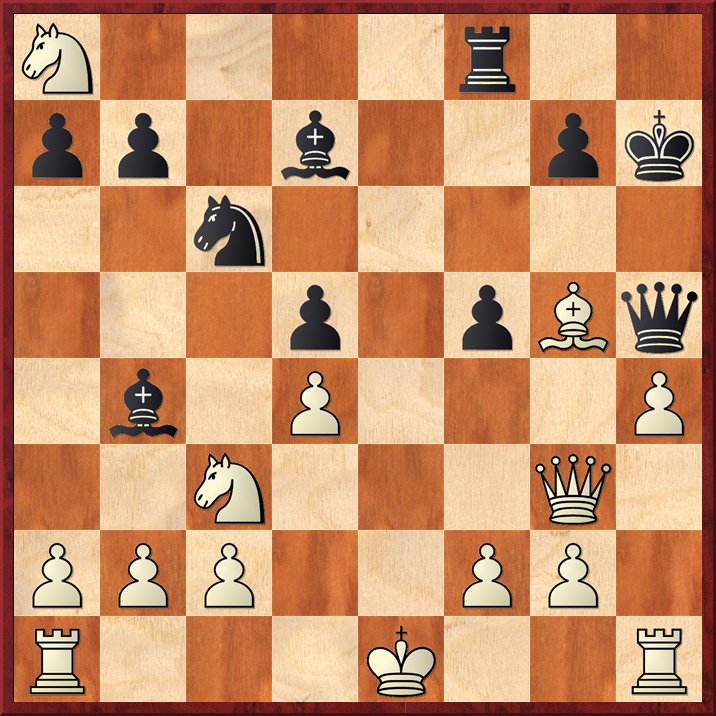
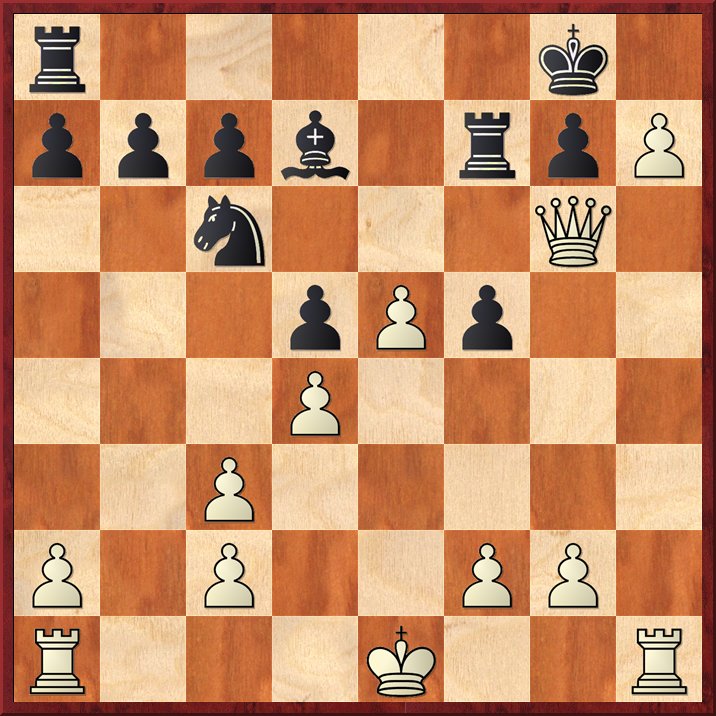
25.Nc7+ Kd8; 26.Nxa8, "+/-" (White is winning because of the first player's huge lead - based on the table of material value.)
|
|
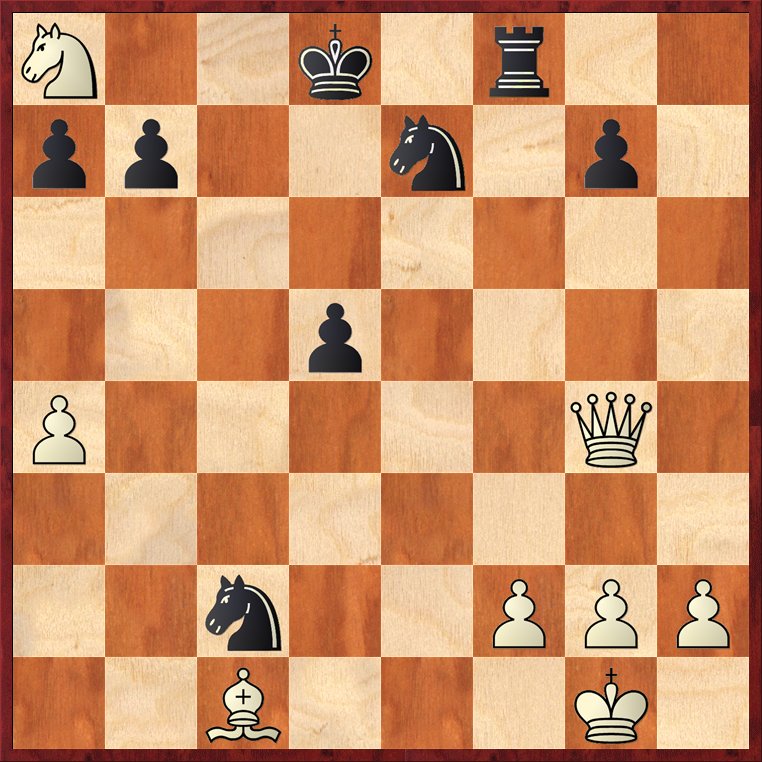
N2k1r2/pp2n1p1/8/3p4/P5Q1/8/2n2PPP/2B3K1 b - - 0 26
Black has avoided a checkmate, however, White has an easy win ...(a huge lead in material) ... from this particular position.
See my web page on this game ... ... ... see my YT video on this game.
Copyright (c) A.J. Goldsby, 2012. All rights
reserved.
(This section added: Feb. 4th, 2012.)
Nov. 19th, 2011: I added this page to my "Opening School." (See my "Training Page" for the links.) This is because - in my mind - this type of mistake is one that (primarily) a beginner or a new player might make in the opening. Of course, its possible to make a mistake like this deep in the middle-game, but that would be a topic for an entirely different web page! Also - if you know of any famous games that feature this type of sacrifice, be sure to e-mail me. (Please make sure that you remove the "No-SPAM_" from the e-mail address, that is in there to fool the robots/programs that cruise the Internet looking for e-mail addresses to send junk mail to.)
Another example of this type of sacrifice ...
Harry Nelson Pillsbury - NN
[D31]
Newark, New Jersey, (USA)
1899.
1.d4 d5; 2.c4 e6; 3.Nc3 c6; 4.Nf3 Bd6; 5.e4 Ne7; 6.Bd3 0-0; 7.e5 Bc7; 8.Bxh7+! Kxh7; 9.Ng5+ Kg6; 10.Qg4 f5; 11.Qg3 Qd7; 12.Qh4, 1-0 [ replay ]
HERE is a very nice video (not one of mine) with the analysis of a Bishop sacrifice on h7. (Below is the game in question.)
GM
Peter K. Wells (2495) - IM Dragos Dumitrache (2495)
[D46]
Balatonbereny GM / (R#5) / 1997.
1.d4 d5; 2.c4 e6; 3.Nc3 c6; 4.Nf3 Nf6; 5.e3 Nbd7; 6.Bd3 Bd6;
7.0-0 0-0; 8.e4 Nxe4; 9.Nxe4 dxe4; 10.Bxe4 Re8;
11.Re1 c5; 12.Bxh7+!! Kxh7;
13.Ng5+ Kg6; 14.g4 Nf8; 15.Qd3+ f5; 16.Qh3 Kf6; 17.Qh5 f4;
18.Re5 Qd7;
19.Bxf4 Bxe5; 20.Bxe5+ Ke7;
21.Nf7 Qa4; 22.Bd6+ Kd7; 23.Qxc5 e5; 24.d5 Ne6; 25.Nxe5+ Kd8;
26.Bc7+, 1-0
Click HERE to see a web page (of a game of my own) that I did ... that also features the sack on h7.
The analysis for this
page was prepared with the excellent program,
ChessBase
10.0. (My main engine was/is
Fritz 12, although I also checked my analysis with Rybka 3,
Deep Shredder, several versions of Crafty, Firebird, and Houdini
1.5.
The HTML was polished with several different tools and programs, (mostly FP) ... the text was checked for spelling with MS Word.
The diagrams were created with the program, Chess Captor 2.25.
|
Go ... or return ... to my Home Page for this site. Go (or return) ... to my "Annotated Games" (II) Page. Go
... or return ... to my "Best Games" Page. *******
Copyright (c)
LM A.J. Goldsby
I *******
This page was first generated in: 2010. (I
never finished it.)
(This page was first posted on:
October 8th, 2011.) |