Click here to look for "chess" with the Google search engine.   Hello friend!     ...............    Welcome to one of the best {private} chess sites around. (Recognized as such by several national chess federations and also "C.J.A." Site of The Year for 2004.)     ................     Check out my School of Tactics!!  ..........  Many improvements and NEW PAGES!!!!   (Be sure to check the T.L.A. in 'Chess Life' for the tournaments in your area.)  Thanks, and have a great day!!!

   A FIDE "Top 100" site.  
  Best site, CJA, for 2004.

All the 
best 
in chess.
(TM)

(Navigation bar 
directly below.)

Home
UP (One level)
 

*******

Keep watching these pages as they grow and change!!

 © A.J. Goldsby, 2015. 
  (All rights reserved.) 

****************

    Click  HERE 
     to see my       
    Chess Items.  

  ****************  

Official PayPal Seal

****************

Buy a book  
from Amazon.com
(And help me out as well!)

****************

 Click  HERE ...
 to see a list of the businesses that help to sponsor all of my chess efforts.


A.J.'s TS;  Game  # 1

Back Next


This is the first game of my tactical school. The more you study and go over this game, the more you will begin to be able to understand and use the ideas.  I advise  repeated study.   This game could be studied 2-3 hours, (at one time); in a tactical vein. It could also be studied  for 30-90 minutes at a time during your openings study.  (See the parent page for details.) 

I   STRONGLY   advise that you study the plain, un-annotated versions of this game, (Click  HERE.);  before you even look at the annotated version of this game. (See the parent  page  for details.) 


GM E. Bacrot (2653) - R. Kasimdzhanov (2674)
[E97]
 FIDE Grand Prix (Rapid?)
Moscow, RUS; (1.1), 01.06.2002

[A.J.G.]

   The CB medal for this game ... you can tell at a glance the important features of this contest.  (tac-sch_g1-med.gif, 02 KB)


Tactical school, GAME ONE.  (#1.)  

These players - who are both highly rated,  2600+ ...   - play the King's Indian.  

 Black wins a very nice game. 


Click  HERE  to see a list that explains the symbols that I use.  Replay this game ... but on another website. 


1.d4 Nf62.c4 g63.Nc3 Bg74.e4 d65.Nf3 0-06.Be2 e5
7.0-0 Nc6
8.d5 Ne79.b4 Nh5!?;    
Theory recommends this, but I much prefer ...a5. 
(Other games will concentrate on this line.)

     [ I like 9...a5!?; "~" here. (See game # 2.) ]  


10.Re1,  ('!')   
This is one of the main lines, but White has close to a dozen different 
ways to meet ...Nh5. 

MCO  -  and  GM Nick de Firmian  - obviously like Re1 here very much. 
(They award this move an exclam.)

(MCO states that Re1 was first worked out by ... Kramnik!) 

GM Loek van Wely  likes to play the move, 10.g3!? 
(I think g3 originated with Tal ... or other Russian analysts. The whole idea of
 g3 is to completely deprive the Knight on h5 from using the f4-square as a 
 potential outpost.) 


     [  GM John Nunn  gives the line: 10.g3!? f511.Ng5 Nf612.f3 c6; {D?} 
         This is the same idea as we see in this game. 

***

           ( MCO gives: 12...a5!?; "~"  {Diagram?} )    

             I stop here and call this unclear. I am not sure if I would be    
             comfortable playing the line that MCO gives in this line.     

             That line continues:  13.Bxa5, Rxa5;  14.Qb3, Kh8;  15.Bd2, Ra8;    
             16.Bd3, b6;  17.Kg2!?, f4!?;  {Diagram?}     
             The end of the column.    
             18.a4, Bh6;  19.gxf4, Nh5;  20.fxe5!?, Nf5!?;  {Diagram?}  
               ... "and Black had good play."  - GM Nick de Firmian

             Veingold - Atalik;  Oviedo (rapid) Tournament.  
             Oviedo, ESP; 1993.  

             [ See MCO-14, page # 588;  column # 10, & also note # (o.). ]   

***

        13.Be3 f4; 14.Bf2 Ne8; 15.Qb3 fxg3!?;  (Maybe - '!')  {Diagram?}  
          Black immediately opens lines. 

           ( Instead, MCO gives the line of:  15...h6; 16.Ne6 Bxe6; 17.dxe6 fxg3; 
             The end of the column. 18.hxg3, "~" {Diagram?}   
             This is a VERY unbalanced position. MCO continues on for many more   
             moves, instead I challenge everyone to set this position up on the chess   
             board, and run a few test lines through their own computer program.   
             (Or play this position against a friend or a training partner.)     
             GM A. Miles - GM A. Shirov;  Biel, 1992.     
             [ See MCO-14; page # 588, col. # 12, and study note # (t.). ]    

         16.hxg3 Nf5!?;  {Diagram?}  Praised when it was first played, 
          this move could be less than best in this position. 

            ( Maybe a little better is the following line: >/= 16...h6!; 17.Ne6 Bxe6;    
              18.dxe6 Rf6; 19.c5 d5!; "~"  {Diagram?}    
               when Black seems to have excellent play. (Analysis.) )    

         17.exf5 Qxg5; 18.Ne4!,  "+/="  {Diagram?}  and White had great play. 
          (The game soon resolved itself into a draw in 22 moves.)   
         Sharivazdanov - Diachkov;  Russian Junior Ch, 1995. 

         See the book:  "The Main Line King's Indian,"   
         by  GM John Nunn  and also  FM Graham Burgess.  
         [ (c) 1996, the authors. Henry Holt. ] 
         Chapter # 14, (on 9.b4); Line # B521, page # 304. 

***

         White could also play:  10.Qb3 Nf4; 11.Bxf4 exf412.c5 Bg4; 
         13.Rac1,  "+/="  {Diagram?}  with a slight advantage to White.  ]  


10...f5; ('!')  {Diagram?} 
This (Pawn break) is Black's main source of play in a King's Indian. 
 If he does not get this move in, and just fools around while White plays 
 on the Q-side ...  eventually he will be squashed like a bug. 

Several books I have decry ...f5; here, suggesting that Black should play 
...Nf4 instead. 


     [  Many books say ...Nf4; is much better, but the results of this move
        really do  NOT  back this assertion up. 

        MCO gives the line: 10...Nf411.Bf1 a5!?;  {Diagram?}  
        This weakens b5 slightly.  
        12.bxa5 Rxa513.Nd2 c5!?14.a4 Ra6!; 15.Ra3!? {Diag?} 
        I am not sure about this. It is OK, but ...  

          ( Instead, the book:  "Nunn's Chess Openings,"  gives:    
            15.Nb3 b6!?; 16.a5 bxa5;  17.Ra4 Nh5!?; {Diagram?}    
            The end of the line. (row)  18.Bd2 f5; 19.Qa1 Nf6; 20.f3 Bd7;     
            21.Nb5, "~"  {Diagram?}  Nunn continues forward for several more   
            moves. I will stop here and just say my analysis - which I have been    
            working on for several years! - indicates that Black should probably    
            try  (21.) ...fxe4!  "=/+" (Black would seem to be a little better.)      

            GM V. Epishin - Ye Jiangchuan; Geneva, 1997.    
            (The game was drawn in just 27 moves.)      
            [ See NCO, page # 537, line/row # 8, and note # 45. ]    

        15...h616.Nb5 Kh817.g3 Nh5;  {Diagram?} 
         This is pretty much forced. (The end of the column.) 

           (Not 17...Nh3+?; 18.Bxh3 Bxh3;  because now the move: 19.g4!, "+/-"   
            {Diagram?}  traps the Bishop and wins a piece in this position.)    

        18.Bb2 Bd719.Be2 Nf620.f4!?,  "~"   {Diagram?}  
         "White had an edge."  ("+/=")  -  GM Nick de Firmian.  
         (White has just a little more space in this position.)   

        Milov - Gofstein;  Israel, 1997. 
        [ See MCO - 14; page # 588; column # 7, and note # (b.). ]  ]   


11.Ng5!?,  
If you are not going to play Ne6, this move is - in my opinion - 
a complete waste of time. 

I should also point out that this move is ... THE MAIN LINE. (!) 
(In this continuation.) 

     [ White could also try: 11.Nd2 Nf4; 12.Bf1, "+/=" ] 


11...Nf6(Maybe - '!')  
Does Black avoid taking his out-post square at f4 because this is an 
improvement, or because he wanted to avoid book? (TN?) 


     [  MCO gives the continuation of the line:  11...Nf412.Bxf4 exf4 
        13.Rc1,  "+/="  {Diagram?}  MCO continues on for many moves here. 
          (I stop here because Black's next move is ...Bf6!? If this is the best  
           that Black can do, the whole line is bad.)    

        [ See MCO-14; page # 588, column # 9, 
          and notes # (a.) through note # (g.). ]  ]  


12.Bf3!?,  
This looks artificial.  (But is still the main line.) 


     [  If White plays: 12.Ne6!? Bxe613.dxe6,  {Diagram?} 
        White's e-pawn, (formerly his d-pawn); could be eventually lost.  

        Another approach for White is: 12.exf5!? gxf513.f4! "~"   
        with wildly unclear results. 

        Maybe 12.f3!?  
        (To try and defend the pawn chain and the e4-square.)  ]  


12...c6!;   
I like this, Black begins to break down White's center.  
(This is not always played in {some lines of} the K.I.D.) 

***

  Now the main line ('book') is Bb2.   

Bacrot decides to take a slightly different route. 
13.Qb3
,   
This is actually quite logical, White clears the back row, gets ready to 
centralize the Rooks, and greatly pressures the center and the key  
light squares here. 


     [ According to several books I have, one of the key the main line(s) is: 
        13.Bb2 h614.Ne6 Bxe615.dxe6 fxe416.Bxe4 Nxe417.Nxe4
        17...Nf518.Qg4 Kh719.Rad1,
"+/="   
         White has very strong pressure here. (A fair initiative.)   

***

         White can also play: 
         13.Be3!? f4!?; (Maybe - '!?')  {Diagram?}  
          I don't like this, it strikes me as rather premature.  14.Bc1 h6 
         15.Ne6! Bxe616.dxe6 Nc817.Qb3 Qe718.c5 Re8 
         19.Be2!?, "~"  {Diagram?}  MCO claims a small edge for White, I am 
         not so sure. I would prefer the evaluation of unbalanced, or "unclear." 

         Krasenkov - Gutman;  Vilnius, 1997.   
         [ See MCO-14; page # 588; column # 9, & also note # (e.). ]  ]   


13...Kh8(Maybe - '!')    
Black signals his intention to attack ... and also avoids any unpleasant 
surprises along the a2 - to - the - g8 diagonal. 

Both sides continue to mobilize their pieces. 
14.Rd1 fxe4
15.Ncxe4 cxd516.cxd5 Nf517.Bb2!? Nxe4;  
18.Nxe4 Nh419.Be2 Rf4!;  {Diagram?} 
Suddenly Black has the nice makings of a King-side attack. 

20.f3?!,   
This looks natural but is probably much less than best. The main drawback 
that I see is that Black is quickly allowed to get all of his pieces to good 
stations and is quickly ready to start operations on the King-side. 

     [ Maybe better is: 20.Qe3, "~"  with an unclear position. 
        Not 20. g3?, Rxe4; "/+"   and Black is clearly better. ] 


Now Black rapidly masses his pieces for a K-side assault. 
20...Qb6+
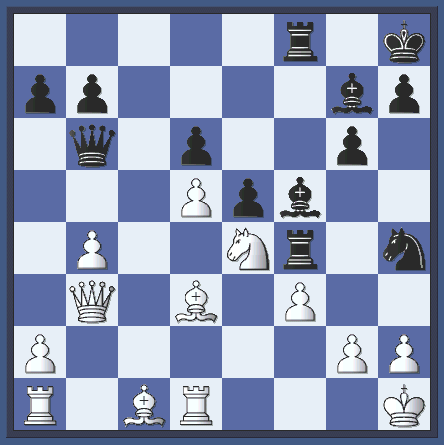
21.Kh1 Bf522.Bd3 Rf823.Bc1!?   {See the diagram below.}   
White thinks to win the trapped Rook. 

This is ...  THE KEY POSITION!!!!!  

   The actual game position after White's 23rd move.  (tac-sch_g1-kpos1.gif, 17 KB)

The key position. Black to play his 23rd move.
What is the correct move here?


     [  After  23.a4!? Nxg2!!;  "--->"  {Diagram?}  Black has a strong attack. 

***

        The pawn fork, g2-to-g3, does not work: 23.g3? Rxf324.Re1,  {Diag?} 
        This could be forced. 

           (24.gxh4?? Bxe4; "-/+"  {D?} Notice the pin along the third rank here.)    

        24...Bg425.Ng5 Qf2;  "/+"  {Diagram?} 
        Black is much better here.   
         - I think Black has a winning attack here. (Maybe even "-/+")  

        Maybe the best move was: 23.Rac1, {D?} with a fair position for White. ]   


Now Black unleashes a devastating combination of great power. 

One of the KEYS to getting better ... and seeing and/or anticipating these 
types of sacrifices, is to play through dozens and dozens of games for this 
type. After a while, you will develop an instinct for when it is time to sacrifice. 
23...Nxg2!!
;  
An incredible tactical shot. 

The main idea is quite simple, Black hopes to rip away the pawn cover 
in front of the White King; exposing the White leader to the full fury of 
Black's attack. 

24.Kxg2?!(Maybe - '?')    
This may be forced.  Or it may lose by force.  

That does not matter to us here! 

Our main goal is to work out the King hunt down to a conclusion. 

     [ Maybe better was: >= 24.Bxf4 Nxf4; "=/+" {Diagram?}  
        but Black has a continuing  (very strong)  K-side attack. ]  


24...Rxf3!;   
Another thunderous shot. 
(But really the only follow-up to the sacrifice on g2.)

     [  Several of my students have suggested the continuation: 
         24...Bxe425.Bxe4, Rxe4;  etc; with an attack. 
         (A big check is coming on f2.)  ] 

25.Qc4,  
This looks like the best move here for White. 

     [  It is suicide if White takes:  25.Kxf3? Bxe4+26.Kg4,  {Diag?}  
        This might be best. 

          (26.Kxe4? Qd4#;  or  26.Kg3 Qf2+; 27.Kh3 Qg2+; 28.Kh4 Bf6+;  
            29.Bg5 Bxg5#)    

        26...h5+27.Kh3,  {Diagram?}  
        Once again, this could be forced. 

          (27.Kg5? Qd8#;  or  27.Kh4 Qf2+; 28.Kg5 Qf6#)    

        27...Rf3+28.Kh4 Bf6+29.Bg5 Qf2#.  {Diagram?}   
        Study this line very carefully!!  It is the whole reason 
        for the tactical school I have started.  

***

        After Qc2,  Black has a relatively simple win.  I.e.  25.Qc2?! Bxe4;  
        26.Bxe4 Rf2+;  {Diagram?}  The Rook on f2, supported by its partner 
        on f8, FORKS the White King and Queen. 
        (Of course, Black is winning.  "-/+")  ]  


25...Rxd3!!;  
Yet another incredible tactical shot. 
 (Most of my students have NOT seriously considered this move, 
  and/or looked at it last.) 

     [  Most of my students want to play other moves here, i.e.,
         25...Bxe4!?,  or  25...Rf2+!?,  or even  25...Bh3+;  {Diagram?} 
         all with various degrees of success.  ]  


26.Rxd3,   
This could be forced. 

     [  Much worse would be: </=  26.Rxd3?!, Qxb4; "/+" (or even "+/-")  {Diag?} 
        Black hits and wins e4. The variations are very long, some are very complex.
        (You may work these out for yourself!)  But the basic idea is relatively simple. ] 


26...Rc8; ('!')  27.Qxc8+,   
Now this is forced.  


        [  Much less attractive (really inferior) is: 
           27.Qb3 Bxe4+28.Rf3,  {Diagram?} 
           This is forced. 

              (28.Kh3?! Qg1;  "-/+"   
               The computer says it is mate in six or seven moves.)   

           28...Qd429.Bb2 Bxf3+30.Kxf3 Rf8+;  "-/+"  {Diag?}  
           Black has a winning attack.  ]   


Black now has a win. 

The aspiring student should study Black's winning technique over and over 
and over(!) again ... until he completely understands the process. 
27...Bxc828.Bd2 Bf529.Re1 Qb530.Rde3 Qxd5!?;   
This is nice, but did Black miss an even better move, leading to a quicker win? 

     [  It seems better was: >=  30...Bh6!31.Nc3 Qxb432.Nb1 Qc4;  
        33.Nc3 Qd4!;  {Diagram?}  with overwhelming pressure. ]  


31.Bc3 Bh632.R3e2 Qd333.Ba1 Bxe4+!?;    
This wins ... but Black actually had TWO moves ...  
 that were better than this one! 


     [  Black could play: = 33...Bh3+!;  with a winning attack. 

        The best move probably was: >/=  33...Bg4!34.Nf2,   {Diag?} 
        This appears nearly forced.   (34.Rf2!? Be3)   34...Qd5+35.Re4,  {D?} 
        Otherwise White loses a Rook.   (35.Kf1 Bxe2+; "-/+")    35...Bd2!;  ("-/+") 
        {Diagram?}  Black is winning MUCH more material, White's position is 
        completely hopeless. Note that White's Bishop on a1 is not in play at all.  ]  


White plays on ... perhaps through inertia. 
34.Rxe4 Kg8
35.Bxe5?! dxe536.Rxe5 Bf837.b5 Bd6;  
38.Re8+ Kf7
;  39.R8e4 Qxb5, "+/-"   
White could resign here. 

40.h4 Qd541.R1e2 b542.Kf1 b443.R4e3 Qh1+;  
44.Kf2 Bc5
;   "-/+"  (White Resigns.)  
A tremendous game by Black.   

A GREAT game to study  ...  especially to improve your tactics. 
 (Study it over and over!) 

  (Code initially)  Generated with  ChessBase 8.0  

  0 - 1 


 Click  HERE  to return to my home page.

Back UP (One level) Next

  (Page last updated:  Thursday;   January 30th,  2003.)  Last edit/save on: 04/14/2014 


  Copyright (c) A.J. Goldsby I  

  Copyright (©) A.J. Goldsby, 1985-2014.  

  Copyright (©) A.J. Goldsby, 2014.  All rights reserved. 


 Counter