GM Peter
Leko (2722) - GM
Vladimir Kramnik (2777)
|
|
|
*************************
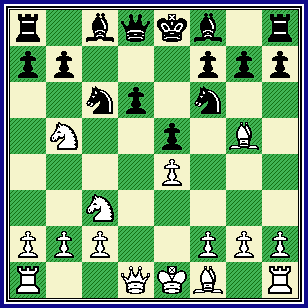
The idea behind this move is to pin
(and exchange off) Black's KN. Since
Black has already weakened his
light, central squares ... MOST notably
the d5-square ... White prepares to
occupy this point with his pieces. (Preferably, of course, a Knight!)
[ Slower, but playable is:
7.a4!?,
"+/=" with the idea of Na3-c4. ]
7...a6!;
The sharpest line ... and certainly the
most important branch of this system
that Black can play.
Note that the White Knight is driven
all the way back to the edge of the board - a rather inferior
square on
a3. Also note that this is the ONLY
square available for this Knight.
(At least the only square that did not
lose material for the first player!)
[ Interesting was: 7...Be6!?; "~" ]
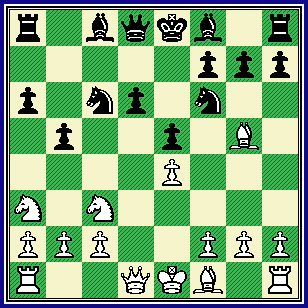
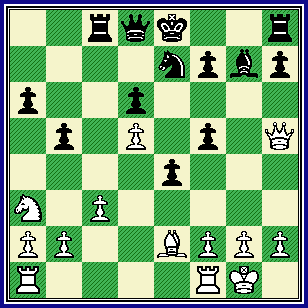
8.Na3 b5!;
(space + initiative)
{See the diagram ... just below.}
Once again ... the most aggressive
line that Black can play here. Many
of the other variations ...
that do
not play the move b7-b5 here ... are somewhat timid and do not offer
the second
player the best chances.
*************************
|
|
*************************
Note: This move (...b7-b5; for Black)
gains space on the Q-side, and also
provides a square for the light-square
Bishop on b7, and a (possible) Knight
outpost on c4. And of course Black
is now threatening to fork White's
Knights (on a3 and c3) with the Pawn
fork of ...b5-b4.
{Obviously!!! White
must do something to meet this
threat to win material by Black here.}
According to the book on this opening,
by the author, Evgeny Sveshnikov; we have now
entered one of the most
complex lines in all of chess. << The Chelyabinsk Variation. >>
[ Not quite as good is:
8...Be6!?; 9.Nc4!,
"+/=" {Diagram?}
and White has a solid advantage.
See the instructive encounter:
GM Anatoly Karpov - GM John Nunn;
ICT / Phillips and Drew (Invitational)
London, ENG; 1982. (1-0, 51 moves.) ]
9.Bxf6,
('!')
(The fight for the
initiative.)
{Diagram?}
Today it has become accepted that
this is the main line of this opening ...
replacing earlier (slower) methods.
This method is also very forcing ... and leaves Black with few ways of
really dealing
effectively with this
exchange.
[
The older (previously ... the "main
line" here) method was to play
Nd5!?
in this position. For example:
9.Nd5 Be7; 10.Bxf6 Bxf6;
11.c3 0-0;
12.Nc2 Bg5!?;
{Diagram?}
A modern continuation ... that
is also probably close to 30 years
old, as well!
***************************************************************
***************************************************************
( Also played is ...Rb8; here.
(Many books consider this
one of the best lines
that the
second player can employ.)
I would like to share with you a
very nice game in this line. Viz:
12...Rb8!?; 13.Be2 Bg5; 14.0-0 Be6;
15.Qd3 Qd7; 16.Qg3 f6?!; ('?') {D?}
This looks very awkward.
( >/= 16...Bd8; "~" - A. Karpov )
17.Rfd1, "+/="
17...a5; 18.Na3 Na7;
19.h3 Kh8!?; (Maybe - '?!')
{Diag?}
Inaccurate - according to Karpov.
***
( Black could play: 19...Bh6!?; "~" {Diagram?}
with a fairly good game.
Or >/= 19...b4!; "<=>" - A. Karpov. )
***
20.Bg4 Rfc8; 21.Bxe6 Qxe6; 22.Qd3 Rc5;
23.Nc2 g6; 24.b4! axb4;
25.Ncxb4 Rb7; 26.a4! bxa4; 27.Rxa4 f5;
28.Ra6 Nc8!?; {Diagram?}
This looks a little passive.
( Maybe 28...fxe4!?; 29.Qxe4, "+/=" )
29.Ra8 Kg7; 30.Qe2!? fxe4; 31.Qxe4 Qf5!?;
{Diagram?}
This could be a mistake, but I
am not completely certain.
( Better (safer) is: >/= 31...Qf7!? )
32.Qe2,
(hmmm) {Diagram?}
This is good ... but White may
have had something better.
( The shot of: (>/=) 32.Nf6!, '±'
{Diagram?}
appears to be better for White
in just about all variations.
(Did Karpov miss this move?) )
32...Rf7; 33.c4 Bh4; 34.Rf1 Ne7!?;
35.Ra6 Qd7?!; {Diagram?}
Definitely inaccurate ... most
chess programs show an immediate
and significant
change in their evaluations of the game now.
( >/= 35...Nxd5; 36.Nxd5, "+/=" )
36.Qe4 Nxd5; 37.Nxd5 Be7!?; 38.Rfa1 Bf8!?;
39.Qe2 Rc6;
40.R6a3!!, (why?)
{Diagram?}
An unusual retreat ...
White
plans Rf3 to exchange off the
Black Rook
on this file. After
this idea, Dolmatov is strangely
helpless to defend his game.
( Interesting was: 40.Ra8!?, '±' )
40...Rc5; 41.Rf3 Rxf3; 42.Qxf3 Qf7!?;
{Diagram?}
This could be inferior.
***
( Maybe just 42...Be7!?; {Diagram?} instead?
Of course not:
</= 42...Rxc4??; 43.Qf6+ Kg8; 44.Nb6!,
"+/-" {Diag?}
which wins a whole Rook. (Karpov gives only 44.Ra8.)
)
***
43.Qg4 h5; 44.Qe4 Rc8!?;
{Diagram?}
Karpov brands this as dubious,
('?!'); but since this move is the
first choice of
several strong
chess programs, it is really
difficult to agree with him.
( Possibly, just the move: (>/=) 44...Kh7; {Diagram?}
here, was an
improvement over
the game? (- GM A. Karpov.) )
45.Ra3 Qf5; 46.Ra7+ Kh6; 47.Qe3+ g5;
48.Qe2!?, ('!') {Diagram?}
This move is good enough for a
solid White advantage here. But
when I was studying this
game in
a chess magazine - shortly after it
was played - I thought Qb3! was a
lot better.
(I even wrote several
chess magazines, but no response.
I also wrote the move down in
the
margin of one of my books on this
great player.) It is curious that one
very strong
program, ...
(Prof. SHREDDER) - almost
instantly - chooses the move
48.Qb3!, for
White in this position.
( Much better was: >/= 48.Qb3!!, '±' {Diagram?}
which is very close to winning
the game here for White. )
48...Rb8; 49.g4!? hxg4; 50.hxg4 Qb1+;
51.Kg2 Rb7?; {Diagram?}
This is a horrible mistake by
Black here, but no comment
by Karpov at all.
( If Black does not want to resign,
he had to play something like:
>/= 51...Rb3; 52.Rf7 Bg7; 53.Ne7 Kh7; 54.Nf5 Rb7;
55.Nxd6 Rxf7; 56.Nxf7, '±' {Diagram?}
White is very close to winning,
("+/-"); but Black can struggle
on ... if he desires to do so. )
52.Rxb7 Qxb7; 53.Qf3 Qc8??;
{Diagram?}
A blunder ... of absolutely
monstrous proportions here!
(The ONLY move for Black
was ...Kg7; in this position.)
---> To show just how bad this
move really is, it changes the
box's 'evals' of this position ... by eight (or more) points!!!!
***
(
Black's only hope is:
>/= 53...Kg7[]; 54.Qf6+ Kg8; 55.Qxg5+,
55...Qg7; 56.Qf5!?,
'±' {Diagram?}
and although objectively Black
is lost here, ("+/-"); he can fight on
for as long as cares to continue the
movement for resistance.
Of course suicidal was:
</= 53...Qg7???;
{Diagram?}
This is terrible, and the move
of 53...Bg7???; loses in exactly
the same way. 54.Qh3+ Kg6; 55.Qh5#.
)
***
54.Qf6+ Kh7; 55.Qf7+!, "+/-" {Diagram?}
Black is completely lost here ... and therefore ... ... ...
Black RESIGNS. (1-0, 55 moves.)
GM Anatoly Karpov (2682) -
GM Sergey Dolmatov (2536);
ICT / IBM - Masters (Invitational) Amsterdam, NED; 1980.
[ See the book: "Anatoly Karpov,
My 300 Best Games." (c) 1997.
{Game # 95, page # 79.}
Publisher: 'Chess VIP's.'
ISBN: # 9984-9229-0-1 ]
*******
( After the moves of:
55.Qf7+! Kh6; {Diagram?}
This is forced.
( </= 55...Kh8?!; 56.Nf6,
"+/-" {Diagram?}
and the second player will
not be able to avoid mate ...
even by giving up the Queen. )
56.Ne3!, ("+/-")
{Diagram?}
Black will be forced to give
up the Queen when the Knight
reaches
the f5-square.
{Professor Shredder says that it
is a mate in eight moves, no matter
what Black plays!} )
***************************************************************
***************************************************************
(Returning to the analysis line,
that began with Nd5.)
13.a4 bxa4; 14.Rxa4,
"+/=" 14...a5;
"<=>" {Diagram?}
An approximately level position
has been reached where Black
has pretty good chances.
See the following games:
K. Asiran - GM A. Khalifman;
(FIDE) Team Ch. / Men's Olympiad
Bled, SLO; 2002.
(Draw, 29 moves.)
GM Judit Polgar - GM V. Toplalov;
ICT / "A" Group
(Invitational)
Wijk aan Zee, NED; 2003. (1/2,
36 moves.)
** ** ** ** ** ** ** ** ** ** ** ** ** ** ** ** ** ** ** ** ** ** ** **
Now White can continue:
15.Bc4!?,
{Diagram?}
The 'book' move here, and the one
that White players almost always
seem to
choose in this position.
But it is not the only move, White
as several different
options in this
particular position.
***
( Also playable is: 15.Bb5!?, "+/=" {Diagram?}
as in the game: GM G. Kasparov - GM L. van Wely;
ICT / "A" Group (Invitational) Wijk aan Zee, NED; 1999. )
***
15...Rb8; 16.b3 Kh8;
17.0-0 f5!?; 18.exf5 Bxf5; 19.Nce3 Bg6!?;
20.Be2 Bf7;
21.Nc4 e4; 22.Kh1,
"+/=" 22...Bg8;
"~" {Diagram?}
... "with even chances for both
sides here." - GM N. de Firmian
{I rate this position as probably
just a little bit better for White,
but it is
an extremely complex
and strategically murky position.}
GM Peter Leko - GM Boris Gelfand;
ICT / 35th Rubinstein Memorial
Polanica Zdroj, POL; 1998.
(This game was drawn in 37 moves.)
[ See MCO-14, page # 340; column # 07, and also note # (e.). ] ]
*********************************************************************************
{After an excursion into theory ... and several other sidelines ...
we
return to the actual game at hand.}
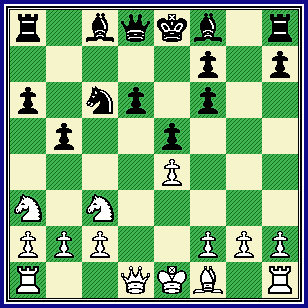
9...gxf6;
{Box.}
{See
the diagram just below.}
No choice here, Black must recapture
or lose a piece.
("Box," = a completely
forced move ... for either player in the
language of "Informant speak.")
*************************
|
|
*************************
This was the position that I was talking about earlier. Black's position appears to be a complete wreck. Weak squares everywhere, busted and doubled Pawns, (plus a very weak and isolated KRP); and a ready-made square for White's Knight right in the center of the board. Additionally, Black does NOT have a lead in development to compensate for his many weaknesses, as he does receive in many of the other lines of the Sicilian.
So why would any sane player try his
hand at this position? There are many
reasons:
A.)
The Bishop-pair; (If the game opens up, they
can be useful!)
B.)
The
second player has a lot of lines, files,
and diagonals for his pieces;
C.)
The
extra Black center Pawns can often
be employed to attack White's
central position. Additionally Black's
position is very "dynamic" and also
extremely UN-balanced. (If Black
is faced with an opponent who wants
a quick and easy draw ... there are
few lines where White can force a
quick
half-point, unlike many other
openings that Black could use against
the
opening of 1.e2-e4.)
Another
reason to play this line is that players
who depend on "play-by-route" ...
are often completely befuddled by
Black's set-up here.
*********************************************************************************
[
Taking with the Queen used to be
played here, but is considered a
completely
refuted line today. Viz:
</= 9...Qxf6?!; ('?')
10.Nd5 Qd8; 11.c4!,
11...Ne7!?;
('?!') {Diagram?}
GM E. Sveshnikov states that this
move is completely forced here ...
but I have grave doubts.
(The move, ...Be6; looks better
than the Knight play here.)
( Probably better is: >/= 11...Qa5+!?; 12.Qd2 b4;
13.Nc2 Rb8;
14.Be2, '±' {Diagram?}
and Black has an ugly game, but
avoids any material loss. )
12.cxb5! Nxd5;
{Diagram?}
Otherwise - Black can hardly
move or develop anything.
( NOT 12...g6??; ('????') 13.Nf6#. )
13.Qxd5!,
(nice) {Diagram?}
Absolutely the best ... the 'Morphy
Principle' at work in practical play.
( Also very good is: 13.exd5!?, "+/=" )
13...Be6; 14.Qd2 d5!?; ('?!')
{Diagram?}
It is possible that this move, which
attempts to break free, only makes
matters much worse for Black.
{I searched the database, this
position
has never occurred; at
least not between
master-level players.}
( (>/=) 14...a5!?; 15.Nb1!, '±' )
15.bxa6! Bxa3; 16.bxa3!,
{Diagram?}
Several programs confirm that
this is the best move for White
in this position.
*******
( Also good for White would be:
16.Bb5+!?, ('±') {Diagram?}
with a very clear advantage.
- GM Euvgeny Sveshnikov.
{He end his analysis here.};
** ** ** ** ** ** ** ** ** ** ** ** ** ** ** ** ** ** ** ** ** **
Another reasonable try here is:
16.exd5!? Bxb2; 17.Qxb2 Qa5+; 18.Qd2 Qxd2+; 19.Kxd2 Bxd5;
20.f3 0-0-0; 21.Ke3, '±' {Diagram?}
D. Rizzi - J. Cashon; (1-0) / IECC {e.mail} Swiss /
Correspondence game, 2001. /
(White won a long game.) )
*******
16...0-0!?; {Box?}
{Diagram?}
This is virtually forced, any other
try is met by the devastating move
of Bb5+! by White.
17.exd5 Qxd5; 18.Qxd5 Bxd5;
19.f3! Rfc8!?; 20.Kd2!,
'±' {Diagram?}
I have had this position
TWICE in
postal chess ... and I had no
difficulty in
winning from here!!
{This line represents a rather
significant improvement over
the analysis in
several books.}
]
*********************************************************************************
10.Nd5,
(centralization)
(centralization)
White grabs the VERY significant
Knight out-post in the middle of
the board.
This Knight ... if left
unchallenged ... will often wreak
havoc on Black's position.
[ The other move here is:
10.Nab1!?;
"~" ("+/=")
{Diagram?}
but I don't think this move gives
the first player any edge at all. ]
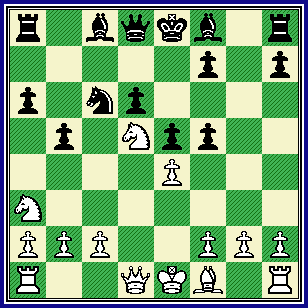
10...f5;
('!') {active}
{See
the diagram below.}
This is definitely the 'main line'
for Black in this position.
(At least
according to MCO, and also several
newer books on this line. Years ago,
sometimes Black would try to defer
this idea until after he had castled.)
Black attacks White's center and also
opens diagonals for the Black Queen
and
the dark-squared Bishop.
*************************
|
|
*************************
Some books say this is the ONLY good line for Black here ... but such
is NOT the case.
(Several GM's today
specialize in various Black sidelines
from this position. For example,
the
young (15 or 16) and talented player
from the country of Azerbaijan, GM
Teimour
Radjabov, only plays the
move 10...Bg7; in this position. And
he does very well with it.)
[ Black can also play:
= 10...Bg7;
"~" {Diagram?}
with a very playable position.
[ See MCO-14, page # 337;
columns # 05 through column # 6,
and all applicable notes. ]
For anyone who needs to see
proof, I suggest you download all
the games of
Linares, 2004.
Study
(in depth) all the games of ... "The young Lion of Azerbaijan,"
...
GM Teimour Radjabov.
He had this position three different
times as Black, (versus V. Topalov,
P. Leko,
and also F. Vallejo Pons);
and he did not lose once!
{He drew twice and won one.}
]
Both sides continue to develop.
11.Bd3!?
Be6;
12.0-0, ('!?')
A perfectly playable move ... but
perhaps a somewhat timid reaction.
(I would have expected Leko to be
more aggressive ... especially as he
was facing one of his main rivals.)
*********************************************************************************
[ The "main line" of 'book' runs:
>/= 12.Qh5! Bg7;
13.0-0 f4!?; 14.c4! bxc4;
15.Bxc4 0-0; 16.Rac1 Kh8!?;
17.Rfd1 Rb8; {Diagram?}
The end of the column here.
18.b3 Qd7; 19.Qh4 f5!?;
{Diagram?}
A possibly doubtful concept.
( (>/=) =19...Bxd5!?; 20.Bxd5, "+/=" )
20.Nxf4! exf4;
{Diagram?}
This is now forced.
( </= 20...Bxc4??; 21.Ng6+, etc. )
21.Bxe6 Qxe6; 22.Rxc6 fxe4;
23.Rcxd6 Qe8!?; 24.Qg4!?, {Diag?}
This is good, but ...
( The try of: >/= 24.Nc4!, '±'
{Diagram?}
could be even better than what
was played in the game. )
24...e3; 25.Qf3!,
'±' {Diagram?}
... "leaves Black with little
compensation for the Pawn."
- GM Nick de Firmian.
GM Thomas Ernst - H. Holmsgaard;
ICT / Peer Gynt, Masters
Gausdal, Sweden; 1993.
(1-0, 51.)
[ See MCO-14, page # 337; col. # 01, and also note # (f.). ];
****************************************************************
Both the moves of:
12.c3!?, "+/="
{Diagram?}
with a playable position.
(Or ...)
*******
And also: 12.c4!?, "+/=" {Diagram?} also with a good game for White here. ]
*********************************************************************************
12...Bxd5!?;
(hmmm)
(hmmm)
Most modern masters know that ...
sooner or later, anyway ... Black must challenge this powerful
piece - on this magnificent square.
(If this Knight is left here too long,
it can cause real problems for the
second player.)
[ After the moves: 12...Bg7; 13.Qh5, "+/=" we transpose back to the main line of this variation. ]
13.exd5 Ne7;
14.Qh5!?,
Now does this excellent move come
too late to do any real good?
(Maybe ... maybe not.)
I get the general feeling here (now),
{Sunday AM; March 28th, 2004}; that
Leko either
was having some
difficulty deciding on which course
to take from this position, or that he
had not prepared this line very well.
Last night I pulled out all of the games
out of the database of this variation
that I could find,
{that Leko had played
one side or the other}; and I went over
a few of them. I got the feeling
that
maybe Leko - as White - did not
always have a great "feel" for these
lines.
(Maybe, maybe not.) I am sure
that Kramnik and his team are much
more adroit at finding and
noticing
such things than I am.
The latest book by GM Yuri Yakovich
prefers to play 14.c3! (He also awards this move an exclam,
clearly indicating to me that he feels this is the best move for White from this position.)
(12/15/2004.)
*****************************************************************************
*****************************************************************************
[ The (main) 'book' continuation
here is the following variation:
14.c3!? Bg7; 15.Qh5 e4;
{Diagram?}
This gains space for Black
...
but is also slightly loosening.
Now I expected Be2, but ...
16.Bc2!? Qc8!?; 17.Rad1 0-0;
{Diagram?}
This appears to be the most
accurate line for Black here.
*******
(Editor's note: GM Yuri Yakovich prefers 17...Qc5!
here.
However,
I do not find his analysis all that convincing.) 12/15/'04
( Less appealing for Black is:
</= 17...Qc5!?; 18.Bb3, "+/="
{Diagram?}
- GM Nick de Firmian. )
*******
18.Bb1 Ng6; 19.Kh1 Re8;
20.f4!, "+/=" ('±')
{Diagram?}
White has a solid edge here.
GM Z. Almasi - T. Markowski;
ICT / Bern Cup
Berne, Switzerland; 1996.
(White won a nice game in
just 32 moves.)
[ See MCO-14, page # 337; column # 01, and also note # (f.). ]
*************************************************************
White also has a sharp try here
of taking on b5. The computers
like it a lot,
but apparently it is
not all that great. For example:
14.Nxb5!? Bg7!; 15.Nc3 e4;
"<=>" {Diagram?}
and Black has very good play
for the Pawn in this position.
GM J. Ehlvest - GM L. van Wely;
ICT / Masters, Premier Section
The Aeroflot Open
(0-1, 45 moves.)
Moscow, RUS; 2004.
(Black won an amazing and a
very difficult game.);
*************************************************************
Another good idea ...
that has not
been DEEPLY explored ...
is the
try of c2-c4 here for White.
14.c4!? Bg7; 15.Qd2 e4;
16.Be2, "+/=" (imbalance)
{Diagram?}
White holds a small but solid edge
in this position.
(But Black has some
play, especially on the King-side.)
A. Kosteniuk - L. McShane;
78th (0203) Christmas Congress
Hastings, ENG; 2002. (1-0,
38 moves.) ]
*****************************************************************************
*****************************************************************************
(Again, after a brief look at theory, we return to the game from Linares.)
Black continues to try to generate
some play ... and also free his
position just a little.
14...e4;
('!')
15.Be2 Bg7; 16.c3 Rc8!?; (TN)
(Q-side?)
{See
the diagram ... below.}
Apparently this is the new move,
Black had almost always played
castles (or even ...Qd7)
in this
position - previously.
*************************
|
|
*************************
Black goes for some (possible) early Queen-side counterplay.
************************************************
[ Black could
(also) play: 16...0-0;
('!') with a solid game.
But after:
17.Nc2,
"+/=" {Diagram?}
White retains a very solid edge.
GM Alexander Grischuk (2702)
-
GM Michal Krasenkow (2651);
Bundesliga 0203 (Team
Tournament) /
Germany; October, 2002.
(Drawn in 41 moves.)
**********************************************************
(
Another author gives:
17.Nc2,
"+/=" 17...f4!;
"<=>" {Diagram?}
"White has failed to blockade Black's central pawns and therefore
Black
has excellent prospects."
- GM Yuri Yakovich, page 234 of his excellent book on this
opening.
(Now f3 looks relatively forced.)
18.a4!? f5!; 19.Rfe1!? f3!!;
20.gxf3 Nxd5; 21.fxe4?! Nf4!;
{Diag?}
"Black has seized the initiative." - GM Yuri Yakovich.
22.Qf3 fxe4; 23.Qg3!? Kh8;
24.Bg4? Be5!?; 25.Rxe4 h5!;
{Diag?}
The immediate Knight check on the e2-square ... winning the White
Queen,
also looks very good. {A.J.G.}
26.Bxh5 Nxh5; 27.Qh4!? Qe8;
28.axb5 Ra7!?; {Diagram?}
Not the most accurate.
( Fritz finds the superior: >/=
28...Rg8+!; 29.Kh1!? Qg6!; "/+"
with a strong attack. ("-/+" ?) )
29.bxa6 Rh7; 30.a7 Qa8; 31.Rxe5?
dxe5; 32.Qb4? Rg8+!?; {D?}
("-/+") White resigns, 0-1.
GM L. Yurtaev - GM M. Krasenkov; / Tashkent, U.S.S.R; 1987.
[ See the book: (line # C23.) "The Complete Sveshnikov
Sicilian," (2002)
by - GM Yuri Yakovich. / Chapter # 13, page # 234. ]
*** *** *** *** *** *** *** *** ***
( Much better was:
>/= 32...Rg7+!; 33.Kf1 Qg2+; 34.Ke2 Rxf2+;
35.Kd1 Qf3+; ("-/+") ... & mates. ) );
)
]
************************************************
************************************************
17.Nc2,
"+/=" (re-deploy?)
White is just a little bit better here,
White's last move is an attempt to
try and return
his Knight from exile.
[ Also possible was: 17.f3!?, "+/=" ]
17...Rc5!?;
(rook-luft)
(rook-luft)
Black attempts to play actively,
but castling soon here must also
be a priority for Black.
[ Another option was: 17...0-0; getting the King to safety. ]
Now my first instinct would be to
play f3! here to try and try to exploit
the fact that the
second players has
not yet managed to castle. Instead,
White plays Ne3 and Black
decides
to push his f-pawn.
18.Ne3!?
f4!?; (Probably
- '!')
(hmmm)
This move is very sharp and will
also require Black to sacrifice at
least one Pawn.
Had Kramnik
prepared this in advance?
This is good, because Black has
to play actively. (Slow play generally
allows White
to consolidate and
slowly build on his positional edge.)
[ Interesting was: 18...Qd7!? ]
19.Nf5 0-0;
20.a4!,
This is the most active move
for White, although other moves
were possible in this position.
[ 20.Rfd1!?, "+/=" ]
20...Nxf5;
('!') {Box?}
{Diagram?}
This is very close to being positionally
forced for Black in this position.
(But it is also very good, and clearly better than
many of the alternatives!)
[ But not the obvious trap of:
</= 20...Rxd5??;
21.Nxe7+ Qxe7;
22.Qxd5, ("+/-")
{Diagram?}
and White has won a Rook. ]
21.Qxf5 Qe7!?;
(Maybe - '!')
A lot of players would probably try ...Re8; in this position, but I think
Kramnik already
has a specific idea
in mind from here.
The next few moves look about
best for both sides.
22.axb5 axb5;
23.Qxf4, ("+/=")
23...Rxd5; 24.Rfd1!?, (d-file)
A natural move trying to trade
a pair of Rooks and exploit the
line right in the middle
of the
chess board, here.
[ Maybe better was:
(>/=) 24.Ra5!?,
"+/=" ('±')
(Maybe - '!')
{Diagram?}
hitting the Black b-Pawn, and
also preparing to double the
Rooks for White. ]
24...Re5!;
(hmmm)
(Maybe only - '!?')
Black avoids the exchange, and
keeps material on the board ...
but it is not immediately clear as
to why Kramnik does so.
[ After the moves of:
24...Rxd1+!?;
25.Rxd1,
"+/=" {Diagram?}
White is better, but it is not
a clear win for White. ]
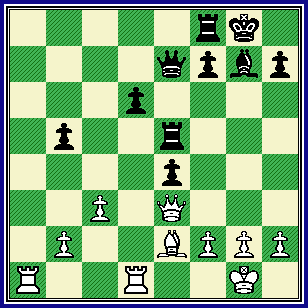
25.Qe3!?,
(Q-side)
{See the diagram just below.}
Leko prepares to move all of
his pieces ... shift left.
(The idea
being to exploit the open a-file
and White's {possible}
passed
pawns {majority} on the Q-side.)
White also blockades the Black KP,
and controls a7, in preparation for
a possible Rook intrusion into the
seventh rank.
*************************
|
|
*************************
The position at this point is definitely full of tension and deserves a good look.
**************
[
Almost certainly better was:
>/= 25.Ra6!,
"+/=" (Possibly - '±')
{Diag?}
with a very large edge for
White from this position.
*******************************************************************
Another very good move was:
(>/=)
25.Rd4!?,
"+/=" {Diagram?}
with good piece play for White
from this position. ]
**************
25...f5!;
(K-side)
Black has some ideas of his own.
And it is important to get his own
counterplay going without
any
further delay. (Not that pushing
the d-Pawn drops Blacks button
on the b5-square.)
[ Many programs want the second
player to try the move of:
25...b4!?;
{Diag?}
I guess trying to break up all of
White's Pawns on the Q-side. ]
26.Qb6!?,
(hmmm)
An invasion with the Queen, and
White targets the Black d-pawn
as well.
[ Also interesting was: 26.Qa7!?, "+/=" {Diagram?} in this position for White. ]
26...f4!,
(Maybe - '!!')
The 'big push' here for Black.
[ Not
26...Rd8;
as after
27.Ra7,
'±' {Diagram?}
White's position is nearly
overwhelming.
(Passive defense will
not get Black anywhere here.) ]
27.Qxd6,
(Lunch is served!)
White snags the material.
[ Also possible was: 27.Bxb5!?, "+/=" ]
27...Qg5!?;
(Probably
- '!')
(g-file)
Black wants to keep his Queen
on the board for the (possible)
mating attack on White's King.
[ One master on a chess server
said that ...Qg5; was forced. He
also said that if Black
traded the
ladies in this position, the second
player was "hopelessly lost." But
this is
not entirely true. VIZ:
(</=) 27...Qxd6!?; 28.Rxd6 f3;
29.gxf3 exf3; 30.Bd3,
30...Rg5+; 31.Kf1 Rg2;
"~" ('compensation')
{Diagram?}
This line may give Black enough
counterplay to hold the balance. ]
28.f3,
{Box?}
{Diagram?}
This is pretty much forced for
White in this position.
[ </= 28.Ra7? f3; 29.Bf1[] e3!; "/+" ]
The next couple of plays look
pretty natural for both players.
28...e3;
29.Ra7! Kh8!;
Nice ... Black says: "My heavy pieces
want to use the open lines!"
(And
not just the Queen, either!)
[ Very amateurish was:
29...h5!?;
which accomplishes little for
Black.
The idea of ...h5-h4,
(and on to h3, if White allows
it); was simply
too slow here.
*******************************************************
Also somewhat pointless was:
29...Rfe8!?, {Diagram?}
which threatens almost nothing
here for Black, at least as long
as White
does not move his KB
in this position.
(The first player
would simply respond with the
over of: Qb4!, '±' {D?}
with a very large
advantage to White here.) ]
30.Qd7!?,
(hmmm)
This is nice, but if the 7th rank is
so alluring ... why not play Qc7 in
this position,
so as to play Rd7 ... TRIPLING on the 7th rank?
[ Maybe a fuzz better was:
(>/=) 30.Rd7!?,
(Maybe - '!') "+/=" ('±') {D?}
aiming for Rd8 ... trying to swap
off at least one set of Rooks.
************************************************************
Another very wise thought was
to simply play:
(>/=) 30.Kh1!?,
"+/=" {Diag?}
so as to play Rg1 to guard against
the coming mate threats on the
very sensitive
g2-square. ]
30...Rg8!;
(threat?)
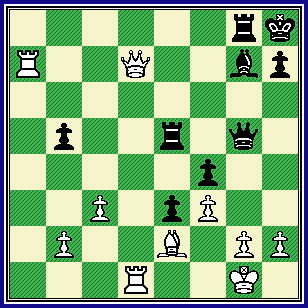
{See the diagram ... just below.}
Black is slowly and methodically
preparing his attack. (The g7-B
cannot move quite yet, due
to the
mate threat by White on the h7-square here.) Now one attacking
idea (for Black) is
simply ...Rf5-f6;
(and around to h6), followed by
...Qh4. (The move ...Rg8; would be
useful
here for both a possible
attack AND defense during this
maneuver, covering g7 as well.)
*************************
|
|
*************************
A position so full of tension and
possibilities definitely merits a very
close look ...
and a diagram as well!
[ Possible was:
30...Qg6!?;
{Diagram?}
here.
(Another student suggested the
try, ...h7-h5;
but that looks
positively lame here.) ]
Here I predicted Qg4, trying to
reach the end-game for White.
(I also talked about Rd6!?, trying
to keep Black's Queen off of the
g6-square in this position.)
Now many commentators, (on the
Internet); were saying that Kh1 was
practically forced for
White in this
position. But instead there came
the move:
31.Qh3?!,
(UGH!)
This is positively terrible. Why
would a player of World-class
caliber like Leko even play such
a move as this? Was it a blunder,
or even an oversight of some
kind? Well, ... yes and no.
Leko thought a long time before
playing this, so a simple mistake
seems unlikely. I will tell you
what
I think happened.
I think after say 10-20 minutes of
careful reflection that the Champ
from Hungary realized that
any
chance of a real advantage from
this position was illusory. So he
decided to force a draw.
At first
I thought he was just going for a
real simple repetition of moves, but
this was (probably)
incorrect.
What probably happened is that in
his careful calculations to gain the
draw, Leko simply missed
a very
important sub-variation that contained
a move that was very sharp ... ... ...
and very unexpected.
[
Better was:
>/= 31.Kh1[],
"+/=" {Diagram?}
and White is still just a tiny bit
better ... but with the presence
of opposite-colored Bishops, the
chance of a decisive result
is
probably slim. ]
31...Qg6!;
(nice)
On first look, I thought the main
point of this move was to try and
force a repetition
of the position,
but this was completely wrong.
You have to admire "Big Vlad's"
rather casual attitude here ... he
seems completely
unconcerned that
White may double his Rooks on the
seventh rank in this position!!
[
Inferior was the seemingly
plausible move of:
31...Rd5!?;
{Diagram?}
here for Black. (White can either
capture on d5, or play Rd7, with
a fair advantage in either case. )
]
32.Rad7?,
(error) {Diagram?}
Technically speaking, this move
is a blunder ... as it allows Black
to win in really magnificent fashion.
(Most writers in newspaper columns
and chess columns on the Internet -
have said White's only
move was
Kh1[], in this position.)
But White would have already had
great difficulty in properly organizing
his game, or even trying to
find an
adequate defense from this position.
********************************************************************************
********************************************************************************
[ Variation # 32W1.)
Not
</= 32.Bd3?? e2!;
"-/+" {Diagram?}
and Black wins instantly.
(If White plays BxQ/g6?, then the
second player simply
plays the
move ...PxR/d1=Q with check.);
*******************************************************
Variation # 32W2.)
One pundit - on ICC - was saying
that White could play g3 here and
hold easily ... but such is not the
case at all:
</= 32.g3?! fxg3; 33.hxg3 Rh5;
34.Qg2 Bxc3!!; {Diagram?}
An unexpected shot!
35.g4,
(hmmm) {Box?}
{Diagram?}
This is probably forced ...
the alternatives lose horribly.
***
( Of course not:
</= 35.bxc3?? Qxg3; 36.Qxg3,
{D?}
This could be forced here.
( Or just: </= 36.Bf1? Qf2#!)
36...Rxg3+; 37.Kf1 Rh1#.
{Diagram?}
Kayyy - - - rrrunch!!! )
***
35...Be5!;
"/+" "--->" {Diagram?}
and Black's onslaught is virtually
unstoppable from this position.
******************************************************************
Variation # 32W3.)
Doubling on the 7th rank now
does not seem to help White
much at all:
</= 32.Rdd7? Rh5; 33.Qg4[]
Rg5; 34.Qh3 Qb1+; 35.Rd1 Qxb2;
"/+" {D?}
and White's position crumbles.
******************************************************************
Variation # 32W4.)
White could also try a little trick
in this position:
>/= 32.Kf1!? Rh5; 33.Rd6! Qxd6?!;
34.Qxh5; "~" {equal?}
{Diagram?}
when the first player is probably
out of the woods here.
******************************************************************
Variation # 32W5.)
White's best move is probably:
>/= 32.Kh1,
{Box.} {Diagram?}
but even this move will not
absolutely guarantee the first
player a tranquil life.
(Black
can probably play either ...Qc2;
or ...Rh5; both tries which
might give
the second player
a very small edge.) ]
********************************************************************************
********************************************************************************
32...Rh5;
('!') 33.R7d6!?,
This does not really save White ... but there was nothing that was
any better for Leko from here.
[ Also insufficient for White was
the following continuation:
</= 33.Qg4?! Rg5; 34.Qh3 Bf6!?;
35.Bf1 e2!; ("-/+")
{Diagram?}
and Black wins major material.
]
Black's next move looks to be both
good, forced ... and also winning. (!!!)
33...Bf6!;
('!!')
{Diagram?}
A very fine move ... Leko may
have simply thought that this
move was not even possible.
Note that the power of Black's other
Rook, which had previously been
'hiding' on g8, has
now been
fully released.
[ Black could have played:
</= 33...Rxh3?; 34.Rxg6 hxg6;
35.gxh3 Rb8!; "=/+" {Diagram?}
and Black is still much better
here, but this is vastly inferior
to the actual
continuation that
was played in the game.
**********************************************************
After the moves of:
</= 33...Qf7?; ('??')
34.Qg4!,
'±' {Diagram?}
the position actually favors White! ]
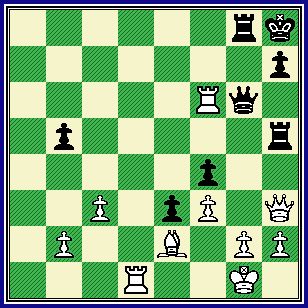
34.Rxf6!?,
(decoy?)
{See the diagram ... just below.}
Leko had counted on this little
trick to save his bacon ...
but he
had missed Kramnik's reply here. (At least, I
believe this is what happened.)
*************************
|
|
*************************
The piece has unfolded, the players
are all in full costume, and the stage
has been set.
Now comes the final
act of this partie.
[ Or if
34.Qg4!?
then just 34...Rg5;
{Diagram?}
and Black should win ("-/+")
without any undue difficulty. ]
If you were Kramnik here ... what move would YOU play in this position?
34...Qc2!!;
(BOOM!!!)
A brilliant repartee by Kramnik. Note
that this is a "zwischenzug," ...
White just took a piece here, and
the 'normal' move is to recapture.
Instead Kramnik responds with this
"in-between" move ... which decides
the game in his favor.
[
I think Peter Leko
had calculated the following line:
</= 34...Rxh3!?; 35.Rxg6 Rxg6;
36.Bxb5, "~"
("<=>")
{Dg?}
and believed that he had enough
play and material to draw from
this
particular position.
(Its 2 Pawns + 1 Bishop versus
Black's Rook here.
White could
even be slightly better in the final
position of this analysis
variation.)
*********************************************************
Of course not:
</= 34...Qxf6??; 35.Qxh5,
("+/-") {Diagram?}
and White is the one who is
winning in this position! ]
35.Qxh5,
{Box?}
{Diagram?}
This was played relatively quickly
by Leko, he probably believed that
it was forced for White.
[
White could also play Re1, but
this move will not save him either:
35.Re1,
('?')
35...Qd2!;
36.Kf1!?,
{Diagram?}
This could be forced here.
( Much worse would be:
</=
36.Qxh5?? Qxe1+; 37.Bf1 Qf2+;
38.Kh1 Qxf1# )
36...Rxh3;
("-/+") {Diagram?}
with an obviously won position
for Black. (Mate in under 10.) ]
It looks like it is time for Leko
to give up the ship, but he has
one more trick left to try.
35...Qxe2;
36.g4!? Qf2+!; ("-/+") White Resigns.
The cause is completely hopeless for Mr. Leko.
[ White is lost. If you need to see
the proof, here it is:
36...Qf2+!; 37.Kh1 Qxf3+;
38.Kg1 Qxd1+; 39.Kg2 Rxg4+;
40.Qxg4,
{Box.}
{Diagram?}
It is not nice to have to give
up your Queen ...
and even
this will not save White here.
(Or just: </= 40.Kh3? Qf3#)
40...Qxg4+; 41.Kf1,
{Diagram?}
It does not matter where White
puts the King - it is mate in the
same number of moves.
( 41.Kh1 Qf3+; 42.Kg1 Qf2+; 43.Kh1 Qf1# )
41...Qf3+; 42.Ke1 Qf2+;
("-/+") {Diagram?}
and mate (on d2) next move. ]
A
great game by Leko AND Kramnik.
(Also Kramnik is to be congratulated,
he must have worked hard to resist the impulse to offer a draw
around
move 20.)
Without question, this is one of the
most important games of Linares.
(Kramnik won, but as my analysis
clearly shows, I don't think Leko played the best move every time.)
This is also a VERY good game to study, (over and over again!); and try to improve your tactics.
*************************************************
Copyright (c) A.J. Goldsby, 2004 & 2005.
(All rights reserved.)
*************************************************
All pages - HTML code initially generated with the program, ChessBase
8.0.
The diagrams on this page were generated with the use of
the program, ChessCaptor
2.25.
*************************************************
