GM V. Anand (2766) - GM J. Timman (2578)
[B67]
|
|
|
****************************************************************************
A.J.'s "Game of The Month."
(For the month of February, 2004.)
****************************************************************************
Anand won his second straight Wijk aan Zee Tournament this year. (January, 2004.)
{He took clear first despite a rather
poor game that he lost to Topalov in the penultimate round. He was given clear first when he quickly drew the last round ... and none of the players who had a shot, had the courage to try and go for the win - in an attempt
to try
and tie Anand.} This is Anand's fourth victory at this very strong event. (Anand joins an extremely select group
of players who have won or tied for first in this tournament a total of four times. The only other two players that I can
think of off the top of my head who have also achieved this are {former} World Champion, Max Euwe; and also the incomparable ... GM Viktor
Kortschnoij.)
To honor this accomplishment, we will examine one of the games of the fabulous Indian player.
*******
(I often refer to
Anand as:
"The People's Champion." I do this for many reasons. He is popular,
he has played a great deal - at ALL time controls - over the last five years,
and he was the FIDE
Champion just a few years ago.)
I also must apologize to Timman. I met
him personally a few years ago. I am a big fan of his,
(I used to go over all of his games in any chess magazine.) ...
and wished he could have had a much better result. I mean him no disrespect
by examining one of his losses here.
****************************************************************************
The game starts off as a Sicilian.
1.e4 c5; 2.Nf3,
('!') {Diagram?}
One of the best moves for White in this position. It is the main line,
and possible the most energetic
move. (It also hits all four of the
main opening principles.)
[ The move:
2.Nc3!?, {Diagram?} could lead to the main lines of
the Sicilian known as: "The Closed Sicilian."
(White tries to avoid the open lines,
and almost never plays an early
pawn advance of d2-d4.)
{See MCO-14.}
When Spassky played Geller in the (FIDE) Candidates Matches, Efwim Geller
was considered one of the premier experts in his knowledge of
the theory of the
"Open Sicilian." Spassky's trainer deeply studied
Geller's games and decided to
use the "Closed" systems to get Geller
away from one of his greatest strengths.
(It must have worked! Boris beat Geller twice ... if any one
man prevented the
great Geller from ever getting the opportunity to play
a World's Championship
Match, that man was definitely Boris Spassky!!)
]
2...d6;
(simple & solid)
The 'modern' way of playing the Sicilian. (But not the only way!)
{This move is good because it releases the Black QB, discourages e5 by White, and
prepares rapid development by the second player.}
From this move order can arise a Sozin Sicilian, A Dragon, The Najdorf Sicilian,
a Scheveningen Sicilian, the English Attack, etc. (The number of lines possible from
this position is almost endless.)
The above list is probably the reason that modern masters choose this particular move order -
without any doubt, it is one of the most flexible.
The second most popular move for Black is ...Nc6; which is examined in one game ... just below.
************************************
[
Black could also play:
= 2...Nc6!?;
"~" {Diagram?}
This is just as playable as
2...d6.
3.d4 cxd4; 4.Nxd4 Nf6; 5.Nc3 d6;
{Diagram?}
Transposing to our game (here) with Anand and Timman.
6.Bg5 e6; 7.Qd2 Be7; 8.0-0-0 0-0;
{Diagram?}
We have reached a standard (opening) 'book' position ...
hundreds, or even thousands, of master-level games have been
played from here. {This
is also a Richter-Rauzer.}
9.Nb3!? Qb6!?; 10.f3,
{Diagram?}
As in the Anand game, we see this seemingly innocuous move of f2-f3.
But this was not the only way for White to play this position.
( White could also play:
10.Kb1 a6; 11.h3 Bd7; 12.f4 Rfd8; 13.Bd3,
13...Rac8; 14.g4, "/\" {Diagram?} with a formidable looking assault. )
10...Rd8; {Diagram?}
Black prepares a central break.
11.Be3 Qc7; 12.Qf2! d5; 13.exd5 Nxd5; 14.Nxd5 exd5;
15.g4! Be6;
16.Nd4 Nxd4; 17.Bxd4 Rac8; 18.c3 Qc6; 19.Bd3 b5;
20.Kb1, "+/=" {D?}
White is clearly better here, he has King-side pressure, and also the better
pawn structure.
( Not </= 20.h4?, ('??') 20...b4; "/+" )
20...Bd7!?; {Diagram?}
White is only a tad better here, Soltis aptly states that Black leaves his QRP
hanging one move too long.
( Better was: >/= 20...a5!; "~" )
21.Bxa7, (Maybe
- '!') {Diagram?}
Taking this Pawn could be very dangerous, as it opens a key file to the White King.
But Spassky had a great sense of timing ... and always seemed to choose the right
time to ... 'mix it up.'
( I like: 21.Rhe1!?, "+/=" {Diagram?}
with maybe a slight edge
to White in this position. )
21...Ra8; 22.Rhe1 Be6!?;
{Diagram?}
Black is trying hard to untangle his pieces in this position.
( Maybe just: 22...Bf8!? )
23.Bd4! Ra6?!; (Maybe - '?')
{Diagram?}
Soltis does not comment here, but this strikes me as too slow and clumsy.
( Obviously, Black should play something like:
>/= 23...b4!?; "comp" {Diagram?}
with a fairly viable position. )
24.f4!!,
{Diagram?}
Soltis correctly notes that Spassky begins his assault only when his opponent's
{attack}
appears to be reaching monumental proportions!
( Also very good for White was:
24.Qc2! h6; 25.Qe2, '±' ("+/")
{Diagram?} with a fairly large advantage. )
24...Rda8;
{Diagram?}
This is the natural follow-up.
( It is a blunder to take on g4: </= 24...Bxg4??; 25.Qg3,
25...Qd7; 26.h3, "+/-" {Diagram?} and Black loses his
Bishop on g4 - since if he moves it, he will be check-mated
on the g7-square. )
25.f5 Rxa2!?;
{Diagram?}
A virtual admission of
defeat. (Black gives up a piece, thinking this is the
only way to continue his assault.)
( Or 25...Bd7; 26.Rxe7, "+/-" )
26.fxe6 f6;
{Diagram?}
This is virtually forced for Black.
( It is wrong for Black to try: </= 26...Qa6??;
(to further his own attack)
because of
27.Qxf7+, {Diagram?} and mate next move. ("+/-") )
Soltis gives White's next move only one exclamation point ...
I award it two - mainly for the fact that many of these variations
had to be calculated perfectly!
27.g5!! Qa6;
{Diagram?}
White must now be careful, as the second player threatens ...Qa4;
followed by mate on a1.
28.gxf6! gxf6!?;
{Diagram?}
I might have checked, but it didn't make much difference in this position.
( Black is still lost after: 28...Ra1+; 29.Kc2 Qa4+; 30.Kd2, "+/-" etc. )
29.Rg1+ Kf8;
{Diagram?}
This is forced, King in the corner loses routinely to a capture/check
on the f6-square.
Black now looks as if he might be escaping, and then his own attack might
make the difference ... but then comes
30.Qxf6+!!,
{Diagram?}
White could have won routinely with BxP/f6, but this is better ...
many of my students say it is downright shocking.
Black chose to RESIGN here! (1 - 0)
I wanted people to see this game, if for no other reason that it is a very
wonderful engagement!! It also bears a certain resemblance to the encounter
here between Anand and Timman.
(This game is NOT in most databases, I know - I checked about 20.)
GM Boris Spassky (U.S.S.R.) - IM Julius Kozma
(Czechoslovakia);
The Student Team Championships
/ Student Team Olympiade
Lyons, France, (FRA); 1955.
replay
See the book:
"The Best Chess
Games of (GM)
BORIS SPASSKY,"
by
IM Andrew Soltis.
(Game # 09, page # 34.)
Copyright (c) by the author.
(Andrew Soltis.)
First printed in 1973,
published by David McKay books.
(David McKay, Inc. of New
York, NY; USA.)
A great game by Spassky, who waits to launch his final assault only when
his opponent's attack has reached its absolute highest zenith.
( The following moves are all forced for Black.
30.Qxf6+!! Bxf6;
{Diagram?}
Black must capture here.
( </= 30...Ke8?; 31.Rg8+ Bf8; 32.Rxf8#. )
31.Bc5+ Qd6;
{Diagram?}
Sadly ... this is also forced.
( </= 31...Ke8?; 32.Rg8#. )
32.Bxd6+ Be7; 33.Rdf1+ Ke8;
34.Rg8+ Bf8; 35.Rgxf8#.
(Capturing with either Rook here resulted in mate.) );
]
************************************
Having examined a great game by one of chess's all-time best players,
we now return to the game at hand.
3.d4!?, (Maybe - '!')
The standard break here.
With this move, (d2-d4); the game enters the territory of the system known
as: "The OPEN Sicilian."
The open lines of the Sicilian actually includes a HUGE body of modern opening theory!
Some of the lines of the open are the most popular in master praxis, to include the Najdorf
Sicilian ... a favorite of both Bobby Fischer and Garry Kasparov.
(Just to name two stalwart adherents of this opening.)
The main idea of the 'open' lines are:
quick development, lots of open lines, and excellent piece play.
(Not to mention that White usually has more space in most lines than Black.)
Some of the drawbacks to the open lines are that White had to give up a center
Pawn for a wing-pawn. This gives Black more pawns in the center, a possible edge
in the ending, and also tremendous counterplay down the half-open c-file.
[ White could also play:
3.d3!?,
"=" {Diagram?}
and try to avoid the open lines of the Sicilian completely.
(The main drawback to this approach is that normally Black will
equalize without too many problems.)
]
Play now proceeds normally for this opening.
3...cxd4; 4.Nxd4 Nf6; 5.Nc3,
The most standard response for White ...
the first player applies all four of the basic, opening principles.
I tell many of my beginning students that the opening is a RACE ... i.e., that the player
who gets all of his pieces out - first ... wins!
[ Interesting is: 5.f3!?, "~" {Diagram?} hoping to get in c4 next move. ]
5...Nc6;
Transposing to the "Classical System."
(Called this by many authors because both players develop their Knights to "Bishop-three,"
{the square that most players of the classical period posted their 'horses'
to}; and also
because of this positions great age; over 150 years old, at least.)
This position ... "has been dubbed the "Classical Variation" for Black's {rather}
straightforward development, and for the want of a better name. There are three
serious responses for White."
- GM Nick de Firmian in
MCO.
(MCO-14, page # 317.)
The three main responses for White are 6.Bg5, 6.Bc4, and 6.Be2.
[ Of course the move:
5...a6!?; {Diagram?}
leads to the Najdorf Variation
... maybe the most popular of
all Sicilian complexes,
at least the master {plus} level. ]
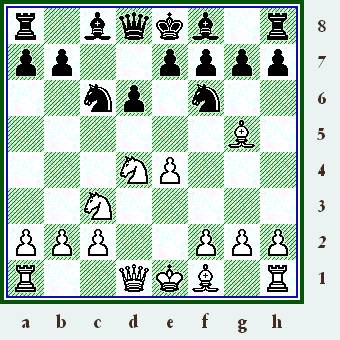
6.Bg5,
{See the diagram - just below.}
This begins the lines/system of play
known as: "The Richter-Rauzer Attack."
***************
|
|
***************
This is an extremely complex line.
Dozens of opening books have been written about the Richter ...
I own about 5-10 myself.
Some of the main ideas of this system is to put tremendous pressure on the second player,
and develop very quickly, usually castling on the Queenside.
When Black castles on the King-side, we often see some of the sharpest Sicilian play possible,
with both parties rushing to try and mate the opponent's King!!
[ With the move:
6.Bc4!?,
we enter another widely popular
system, Fischer's favorite
... "The Sozin System."
These lines run the gamut from quiet endgames to wild King-side attacks.
(See any good opening manual like
the 'Encyclopedia of Chess Openings,'
{ECO}; or MCO-14.)
]
Play proceeds normally for this particular branch of the Sicilian.
6...e6;
7.Qd2 a6!?;
With this move we enter the more modern branches of this opening system, the move ...Be7;
leads to the older lines of the Richter-Rauzer. (Both moves are fully playable.)
*************************
[
Black can also play:
= 7...Be7; ('!?')
8.0-0-0 0-0;
9.f4 Nxd4;
10.Qxd4 Qa5;
{Diagram?}
The most standard response here.
( Playable here is: 10...a6!?, "~" )
11.Bc4!?,
"+/=" ('!?')
{Diagram?}
and White has a slight advantage ...
although current theory regards this position as very close to being equal - Black's
results over the last five years from this position have been pretty good.
The
most recent example of this line
that I could find, at least in a game between
two players with a relatively high FIDE rating, was the contest:
Seymen I. Dvoirys
(2555) - Evgeny Alekseev
(2613);
The 56th National Champ. Tourn. / Krasnoyarsk, RUS; 2003.
{This was a very long game ... that was eventually drawn.
I also
suspect that
the score of the game is incorrect.}
( Interesting is the move: 11.Kb1, "+/=" )
11...Bd7; 12.e5!?,
{Diagram?}
This is the most aggressive move here, and according to the db,
it is also the line that is played the most.
( Also a good move for White is: 12.Bb3!?,
"+/=" {Diagram?}
with a small edge to White. {MCO-14, page 319; col. # 2.} )
12...dxe5!; 13.fxe5 Bc6;
14.Bd2 Nd7; 15.Nd5 Qd8;
16.Nxe7+,
16...Qxe7;
{Diagram?}
The end of the column.
17.Rhe1 Rfd8!?; 18.Qg4 Nf8;
19.Bd3 Rd5!?; {Diagram?}
Possibly preparing to double on the open d-file.
( Or 19...Rxd3!?; 20.cxd3 Qd7; 21.Bb4 Qd5; 22.Bxf8 Rxf8;
23.Kb1, "+/=" 23...Qxg2; "~"
)
20.Bb4 Qd8; 21.h4!?,
{Diagram?}
Aggressive ... but is it best?
( Also good is: 21.Kb1!, "+/=" {Diagram?}
with a slight advantage. Or 21.Qg3!?; or
21.Rd2!? )
21...Ng6; 22.Bxg6,
"+/=" 22...hxg6;
"~" {Diagram?}
(Black intends to meet h5 with the reply ...g5.
If then Bd2, then Black will probably play ...Rd4.)
I feel quite certain White has a small edge in this position, but whether or
not it will be enough to force home a tangible advantage is unclear.
GM Vassily Yemelin - GM Andrei Kharlov;
Russian National Championship / Minsk, Belarus; 1996.
(White eventually won this game
...
an interesting clash of opposite-
colored Bishops and Rooks in the end-game.)
[ See MCO-14, page # 319; column # 01, and also note # (e.). ] ]
*************************
8.0-0-0 Bd7;
We continue marching down the main line of the hallowed book.
But this is not the only move here, virtually any normal developing move
was probably playable in this position.
[ The move:
8...Be7;
{Diagram?}
could transpose back to the 'older'
methods of handling this variation for Black.
]
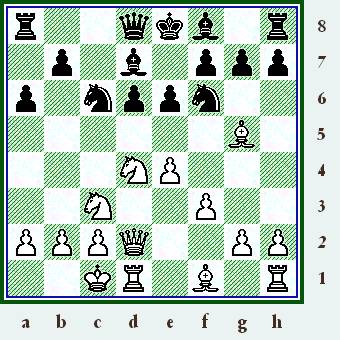
9.f3!?,
(Maybe - '!')
{See
the diagram ... just below.}
A seemingly tame move ... but as in the Spassky game, this move has real teeth.
(But it may take some time
before White's true intentions are revealed.)
{As a sub-note to the Spassky game, I found several older games in my library and
the db with White playing f3, and then starting an all-out King-side attack. The
Spassky game is easily one of the prettiest ever played.}
***************
|
|
***************
With f3, White anchors the center, and is free to pursue an all-out attempt to
go 'find' the Black King ... which Anand does in real style.
In the Spassky game, Black < talked White into this move,
> here it is played ...
... completely 'unprovoked.'
One new book devotes a whole new section on this move and the subsequent plans that
arise from this position. According to two reliable authors, this line started being played
at the GM level ... quite a bit ... in the early 1990's.
Probably the best book on this opening is the theoretical tome:
"The
Complete Richter-Rauzer,"
by GM Peter Wells
and also IM Viacheslav Osnos.
Copyright (c) by the authors, (and also the publisher, Batsford);
and first printed/published in 1998. ISBN: # 0-7134-7807-1
(This book has a whole chapter devoted to this particular system.)
[
More 'normal' is f4 here:
9.f4 Be7;
10.Nf3 b5; 11.Bxf6 gxf6;
12.Kb1 Qb6; 13.f5 0-0-0;
14.g3, "+/=" {Diagram?}
with a small advantage to White.
GM P. Leko - GM J. Timman;
ICT / All-GM Invitational
Wijk aan Zee, Holland, NED; 1995.
[ See MCO-14, page # 322; column # 7, and notes # (a. - g.). ] ]
9...Be7;
Black has to develop sometime.
[ Also possible is: 9...Nxd4!?, "~" ]
10.Be3!?,
A strategic withdrawal by Anand.
I like this idea - White could exchange, but usually any paring down of the
material favors the defender.
*************************
[
The standard line here is h4:
10.h4 b5;
{Diagram?}
The best move according to several different books on the
Richter-Rauzer.
( Also interesting is:
10...Rc8!?; 11.g4 Ne5;
12.Kb1, "+/=" 12...b5!?; "<=>" {Diagram?}
when Black may gain a measure of counterplay.
(- Wells & Osnos.) )
11.Kb1 0-0; 12.g4 Ne5;
13.Bxf6 Bxf6; {Diagram?}
Taking with the Pawn was an option, but I don't think it really
improves Black's position.
( </= 13...gxf6?!; 14.Qh6, '±' )
14.g5 Be7; 15.f4 Nc4; 16.Bxc4
bxc4; {Diagram?}
The end of the column.
17.f5 Re8; 18.Rhf1!? Rb8; "~"
{Diagram?}
... "with both sides attacking in this balanced position."
("=/+")
- GM Nick de Firmian.
Abreu - Rodriguez; Cuba, 1988.
[ See MCO-14, page # 322; column # 11, and also note # (v.). ] ]
*************************
10...Rc8;
A natural Rook move, putting this strong piece on the half-open file. This is a <standard>
move for Black in the Sicilian. (In fact if Black does not {eventually} take advantage of
his 'thematic' play down the c-file, he risks getting a bad game.)
*************************
[
I believe the normal and consistent move for Black was the try ...0-0;
but this does not guarantee Black complete safety:
(>/=) 10...0-0; 11.g4 Nxd4; 12.Bxd4 Bc6;
13.g5, "/\" {Diagram?}
with initiative for White.
S. Danailov - J.
Corral-Blanco;
ICT / Junior Tourn. (Eu-U20)
Groningen, NED; 1981.
**************************************
Black can also try:
10...b5!?; 11.g4 Nxd4;
12.Bxd4 b4; 13.Ne2 e5!?;
{Diagram?}
B. Jobava - D. Arutunian;
ICT / BCSA Open
Batumi/Georgia, RUS; 2003.
14.Be3, "+/="
14...a5;
"<=>" {Diagram?}
and although Black might be considered to have a measure of
counter-play in this position, (Wells and Osnos); White clearly
has a small but solid advantage here.
( I found only a handful of master-level games in the CB on-line db,
and White had won ALL of them! {After 14.Be3 "+/=".} )
( Black can also play: 14...Qa5!?; "~" {Diagram?}
in this position as well. {But Black has lost all 5 games
with this move, so I cannot recommend it!} )
]
**************************
11.g4!?,
(Maybe - '!')
At last Anand's real intentions have been revealed.
This move is the prelude to an all-out attack by White.
[
Interesting is: 11.Nb3!?,
"~" ("+/=") {Diagram?}
and White has (maybe) a slight
advantage in this position. ]
11...Na5;
('!?')
Black goes for some counterplay ... the Knight out-post on c4, and all that good stuff.
But meanwhile, Timman still has not yet castled.
[
Maybe just
11...Nxd4!?;
"~" {Diagram?}
with a fairly good game for
Black here.
***
Also Black must play:
11...0-0;
{Diagram?}
eventually ... and probably the sooner, the better.
]
12.Kb1,
(Possibly - '!')
{Diagram?}
This is usually a good precaution ... White's King is just slightly safer on this square
than on c1. Black is also given another move to declare his plan as well.
[ Another idea was:
12.h4!?,
"--->" {Diagram?}
gaining space ... and preparing
a possible (later) K-side attack. ]
Black continues with his expansion
on the Queen-side.
12...b5!?;
13.Bd3!?,
This looks like a waste of time, as after ...Nc4; the Bishop must move again.
(It also blocks the d-file, one of White's main trumps.)
Yet Anand is willing to spend a tempo in order to force Black to make a decision.
Meanwhile if Black does not play his Knight to the c4-square, White can play g5,
followed by transferring one of his own steeds to g3, via e2.
***************
[
Interesting is:
13.Qg2!?,
"~" {Diagram?}
with the idea of trying to transfer all of White's pieces to the K-side.
***
To be strongly considered was the move:
13.g5!?,
('!') "+/=" {Diagram?}
in this position. ]
***************
13...Nc4;
14.Bxc4 Rxc4!?;
Another idea here was to capture with the Pawn ... and try to make something happen
on the b-file. But then Timman would have a bad pawn structure for any ending.
This is a major decision ... the common
wisdom is that it is better to open the b-file, but
who knows what is best when your opponent is GM Anand?
[ Or
14...bxc4!?; 15.g5,
"+/=" {Diagram?}
and White has a small (but solid) plus in this position.
]
White's next move may be worthy of an exclam ... yet is also
extremely logical.
(White needs the pieces on the King-side for his attack. If White does not move this piece,
Black will be tempted to kick the Knight with the move ...b4.)
15.Nce2 0-0;
16.g5 Ne8;
Now this is forced for Black in this particular position. (After ...Nh5?; then Ng3 will open
lines on the King-side, as Black must play ...g6; or lose a piece.)
[ </= 16...Nh5?; 17.Ng3, '±' ]
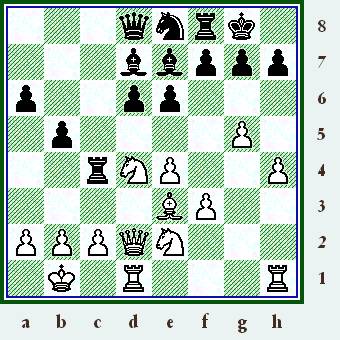
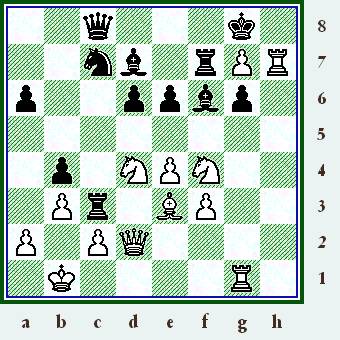
17.h4,
"+/=" (space)
{See
the diagram just below.}
White is clearly a little better in this position, he controls more territory, and his pieces all
occupy better squares than nearly all of their Black counterparts. The Bishop pair
will only
be a factor for Black if he survives to the ending.
***************
|
|
***************
This dynamic position definitely deserves a diagram here.
[ Possible was: 17.Rhe1 ]
17...Qc8;
Here the plan is to 'stack up' on the Queen-side, especially the c-file ...
but Anand's next move calls this into question.
*************************
[
To be considered was:
17...e5!?; 18.Nb3,
{Diagram?}
It is not clear what the best square for this Knight is.
( Interesting was: 18.Nf5!? "<=>" )
18...Be6;
{Diagram?}
gaining some central space, and trying to get his own Q-side play
rolling, but this procedure has drawbacks as well.
(Now just Nc3, "+/=". {Diagram?}
Black's dark-squared Bishop is bad in the end-game.);
*********************************************
Black could also play:
17...a5; 18.h5,
"--->" {Diagram?}
but White has a strong attack, and Black's counterplay looks
too slow to be effective.
("+/=") ]
*************************
18.b3!?,
(Maybe - '!')
A truly amazing and somewhat shocking move, beginner books always warn you about
pushing the pawns in front of your own King ... which also weakens a lot of squares in that
neighborhood as well.
But White is solidly better, Black's pieces now seem rather clumsy - and Timman is never
able to even try and begin to exploit Anand's weakened dark-squares in this game.
Maybe Anand, with the move b3, wanted to prevent a maneuver like ...Qc7;
...Ra4;
(followed by) ...Qa5; etc.
[
After the simple:
18.h5,
"+/=" {Diagram?}
or even
18.Rdg1,
"+/=" {Diagram?}
White has a small but solid advantage.
]
Black's reply looks to be forced.
18...Rc7;
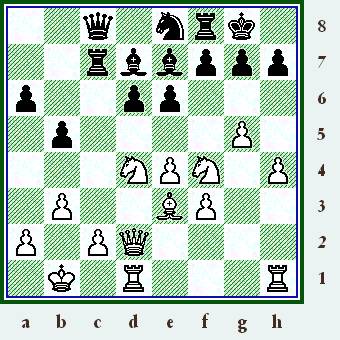
19.Nf4!!,
{See the diagram just below.}
An incredibly brilliant move, and one that almost looks like a blunder.
(Anand will ... 'let this ride' for a long time.)
***************
|
|
***************
Meanwhile White's two cavalry units appear to be begging for a Pawn fork!
***************
[
Not
</= 19.Rdg1?! e5!,
"=/+" ("/+") {Diagram?}
and White drops a Pawn.
***
A very viable possibility was:
19.f4!?
e5!?; "~" {Diag?}
with good play for both sides.
]
***************
19...Rc3!?;
(Maybe - '?!')
This looks like a waste of time to me, Black has got to get something
rolling on the Queenside, or his goose is cooked.
Time is of the essence, White is about ready for the final phase of the assault
on the King-side, and meanwhile Black has no real counter-play here.
**************************************************
[
Variation # 19B1.)
I
think it was better to play:
>/= 19...a5!;
"~" {Diagram?}
so that Black can open some lines to White's King. (...a4);
**********************************************
Variation # 19B2.)
Absolutely no good for Black was:
</=
19...e5?!; ('?')
20.Nd5 Bd8;
{Diagram?}
This is forced, Black must guard against NxB/e7+, forking both
the King and the Queen.
( Of course not: </= 20...exd4??; 21.Nxe7+,
{Diagram?}
and Black loses his Queen. )
21.Nf5!,
{Diagram?}
The best move.
( After the moves: (</=) 21.Nxc7!? exd4!; "<=>"
{Diag?}
Black gets more play than he really deserves. )
21...Bxf5; 22.Nxc7 Bxc7;
23.exf5, '±' (Maybe "+/-")
{Diagram?}
White has won an exchange
...
and should win without any problem.
(These tactics are like a
deep trap, and why Black did not immediately
play
...e5.) ]
**************************************************
20.Rdg1 b4!?;
21.h5 Nc7!?; ('?!')
Black plans ...Nb5; but this is just too slow, and besides that - White can simply exchange
when the Knight reaches that square.
This move might indicate that Timman
wanted to guard the d5-square ... so that he could
actually play ...e6-e5; and fork the two White Knights on f4 and d4. If so, he changed his
mind during the game, and for reasons only Timman knows.
[ Why not 21...a5!?; instead? ]
22.g6!,
(levers)
(levers)
As I have said over and over and over again ... when players castle on opposite
sides the strategy becomes very simple. (It is often just a matter of who gets to the
opponent's King first.)
While this might sound simple ... the implementation of such a strategy is often very complex.
Here the players were required to play a mixture of attack, defence, and waiting moves.
It is not at all 'easy,' as this game very amply demonstrates.
***************
|
|
***************
With g6 White is ready to begin to open lines ... the necessary step before the final charge
of the White army.
Very often I tell my students that the first player who opens a key line - be it a diagonal or
a file - in these types of situations is usually the winner.
[ Possible was: 22.Nd3, "+/=" ]
22...Bf6!?;
(hmmm)
The problem - at least in this game - is that Black's pieces are too ...
'bunched up' ... and never found any really effective squares.
The move of ...Bf6; is an attempt to guard the g7-square, and also defend the King.
But it is way too slow. The real problem for Black is that there may not be anything
that is clearly better.
**************************************************
[
Maybe Black should now play the ...e5 fork; it could hardly have been
worse than the game. I.e.,
= 22...e5!?; 23.gxh7+ Kh8;
{Diagram?}
This appears to be forced.
**************
( Obviously worse for Black was:
</= 23...Kxh7?!;
('?') {Diag?}
This allows a stunning tactical blow - which I am sure Anand
would have seen.
24.Ng6!! exd4;
{Diagram?}
Black may as well grab.
*******
( Of course not:
</= 24...fxg6?; ('??') 25.hxg6+ Kg8;
26.Qh2 Bh3; 27.Nf5, ("+/-") {Diagram?}
with an easily won game.
*******************************************
And after the moves:
24...Re8!?; 25.Nxe7 Rxe7; 26.Ne2,
26...Nb5; 27.Nxc3 Nxc3+; 28.Kb2, "+/-"
{Diagram?}
Black is also lost. )
*******
25.Bxd4 Bf6!?; 26.Nxf8+ Qxf8;
27.h6!, "+/-" {Diagram?}
and Black can resign here. )
**************
24.h6 g6; 25.Nd3 exd4;
26.Bxd4+ Kxh7; 27.Bxc3 bxc3;
28.Qxc3,
"+/=" {Diagram?}
White has a (tiny) material edge
...
and his attack will continue as well.
(This could be better than the game ... but its not at all clear.)
]
**************************************************
23.h6!,
(Maybe - '!!')
A truly great move ... perhaps worthy of two exclamation points. Material is not nearly
as an important a consideration as the opening of as many lines as possible.
Of course having maintained a VERY high five-year-rating average ... and having been
(FIDE) World Champion, Anand is now safely in the '50 Greatest Players ... who ever
lived' ... and he naturally understands all of this!
[
Also possible was:
23.Nfe2!? Rc5; 24.gxh7+ Kh8;
25.h6 g6;
26.f4,
"+/=" (Maybe - '±') {Diagram?}
and White has a clear edge. ]
23...fxg6;
{Box?}
(Capturing away from the center?)
This appears to be nearly forced, the alternatives are demonstrably worse for Black.
**************************************************
[
Possibly even worse was:
(</=)
23...hxg6!?; ('?!') 24.hxg7 Bxg7;
25.Qh2,
25...Re8!?; 26.Qh7+ Kf8;
27.Nxg6+! fxg6; {Diagram?}
Black must capture in this position ... it is the only legal move for Black here.
28.Qxg6! Re7; 29.Rh8+!,
("+/-") {Diagram?}
and mate next move.
(Qg8#);
*****************************************
But definitely not:
</= 23...gxh6?; 24.gxh7+ Kh8;
{Diagram?}
This is forced.
( But not: </= 24...Kxh7?!; ('?') 25.Rxh6+!!,
("+/-") {Diagram?}
and Black will be mated. )
25.Rxh6 Qd8!?; 26.Qg2! Bg5;
{Diagram?}
This is also completely forced.
( </= 26...Be5?; 27.Qg8+! Rxg8; 28.hxg8Q# )
Now White might win by capturing on g5, but he has much better.
27.Ndxe6!! Nxe6; 28.Nxe6 Rxe3;
{Diagram?}
Is this forced? If so, Black could easily resign.
( </= 28...Bxe6?!; 29.Bd4+ f6[]; 30.Qxg5,
"+/-" & mate in 4.
Or </= 28...fxe6?!; 29.Bxg5, ("+/-") {Diagram?}
and mate in five. Or </= 28...Bxe3???;
29.Qg7#. )
29.Nxd8 Bxh6?; {Diagram?}
Capitulation ... Black can avoid mate with ...f6; or by playing
... "give-away" but few players would care to play this way.
( >/= 29...f6; 30.Rxf6!, "+/-" )
30.Qg8+ Rxg8; 31.hxg8Q#. ]
**************************************************
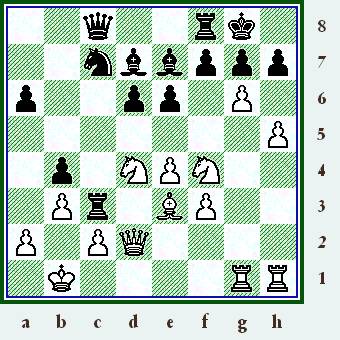
24.hxg7 Rf7!;
{See the diagram just below.}
A surprising defensive resource for Black in this position.
***************
|
|
***************
It is not at all clear what the easiest or the best way for White to continue his
attack from this position.
**************************************************
[
Variation 24B1.)
Bad for Black would be:
</= 24...Bxg7?!;
('?')
25.Qh2 Kf7!?;
{Diagram?}
Is this forced? (Maybe so.)
( </= 25...h5?; 26.Nxg6!, "+/-" )
26.Qxh7 Ne8[]; 27.Qxg6+ Ke7;
28.Rh7! Rxe3; 29.Rxg7+ Nxg7;
30.Qxg7+ Rf7; 31.Nf5+! exf5!?;
{Diagram?}
Otherwise the second player will have to forfeit large amounts of material
just to survive.
32.Nd5+ Kd8[];
{Diagram?}
This is absolutely forced.
( </= 32...Ke8?; 33.Qh8+! Rf8; 34.Qh5+ Kd8;
35.Qg5+, ("+/-") {Diagram?} and mate in 2 moves.
)
33.Qg5+! Ke8; 34.Qg8+ Rf8; 35.Qh7!,
("+/-") {Diagram?}
White has a devastating attack.
(...Rf7; Rg8+, and mate next move. Or ...Qd8; Qg6+!, Rf7[];
Rg8#.
Black can survive with ...Re1+, but even this 'suicide' will not help him
survive the onslaught.
ChessMaster says ...Qxc2+; here is forced, most
humans would resign before playing such a silly move!);
**************************************
Variation # 24B2.)
Also bad for Black would be the following natural-looking continuation:
</= 24...Kxg7!?; 25.Qh2 Rh8; 26.Nh5+ Kf7;
27.Nxf6 Kxf6;
28.Bg5+ Kf7; 29.Qxd6 Qe8; 30.Qxb4,
("+/-") {Diagram?}
and Black will lose an exchange. ]
**************************************************
Give Black two ... even one extra move ... and he could possibly defend his game ...
and defend it well. (With ...Rxg7.) But Anand will not allow Timman the time for defense.
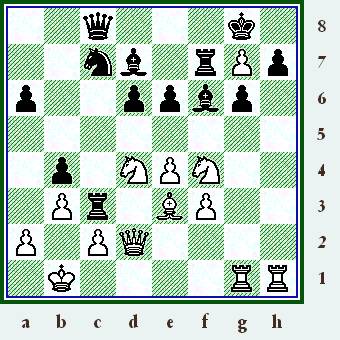
25.Rxh7!!,
(A pleasing sack.)
{See the diagram - just below.}
A brilliant stroke by Vishy Anand.
***************
|
|
***************
One of my {former} Internet students was watching this game on a chess server, and he
said he thought this might be a mistake. (His USCF rating is only around 1300.)
Almost needless to say, this is a very brilliant stroke ...
tearing open the cover of foot-soldiers around the Black King.
[ 25.Nd3!? Bxg7; 26.Nxb4 Ne8; "~"
(or) 25.Nxg6! Rxg7[]; 26.Nf4!, '±' ]
25...Kxh7;
Timman thought quite a while here, he probably thought he may as well
take ... and then pray for a mistake by the dynamic Indian GM.
*************************
[
Black could also play 'Rook-takes-on-g7,' but this would
not save him ... to wit:
(>/=) = 25...Rxg7!?;
26.Rxg7+ Bxg7;
27.Nxg6 Kf7; 28.Qh2!! e5!?;
{Diagram?}
Black might as well take a shot.
( Hopeless is: </= 28...Rxe3!?; 29.Qf4+ Bf6; 30.Qxe3, "+/-" )
29.Qh5! Qe8;
{Diagram?}
This looks to be forced.
( </= 29...exd4?; 30.Ne5+ Ke7; 31.Qf7+, & Bg5+, with mate next. )
30.Bh6 Bf6;
{Diagram?}
This is nearly forced.
( Bad for Black are:
</= 30...Bxh6?; 31.Nh8+! Ke7;
32.Qh4+ Kf8; 33.Qf6+, & mates.
And also bad was:
</= 30...exd4?; 31.Ne5+ Ke7; 32.Rxg7+,
32...Kd8; 33.Nf7+, "+/-" {Diagram?}
and White will win Black's
Queen or possibly give checkmate. )
31.Bf8 Bg7;
{Diagram?}
Once again ... this is close to being forced ... unless Black prefers to be mated.
( </= 31...exd4?; 32.Qh7+ Ke6; 33.Qg8+ Qf7;
34.Nf4+ Ke5;
35.Nd3+!! Rxd3[]; 36.Qg3+! Ke6; 37.Qxd6#.)
32.Bxg7 d5 [];
{Diagram?}
According to the box, this is forced to avoid an immediate check-mate ...
I believe I would prefer resignation to playing this move as Black.
( </= 32...Kxg7?!; 33.Nxe5+ Kf8;
34.Qh6+, {Diagram?}
and mate in 2 moves. (Qg5+, followed by Qg7#.)
)
33.Qh7!, ("+/-") {Diagram?} with a withering attack.
(I turned the computer off here, and calculated
{around} 5-10 minutes.
I do not think Black could last more than 10 moves from this position!);
{But
I could be wrong.}
*******************************************************
Black could also try:
</= 25...Bxg7!?;
('?!') {Diagram?}
Originally I dismissed this as very
weak, but one of my {former} Internet
students pointed out that it was not at all that easy.
26.Qh2!!,
{Diagram?}
Other moves are as not
as
convincing for White, of course this is brave -
White leaves the Bishop on e3 hanging as well
as continuing to ignore a
(possible)
Pawn fork on the e5-square.
( Interesting is: 26.Rgh1, '±' )
26...Nb5;
{Diagram?}
This could be forced.
*******
( Even worse would be:
</= 26...Rxe3?!; ('?')
27.Rxg6 Re1+;
28.Kb2 Kf8;
{Diagram?}
This appears to be forced.
( </= 28...e5??; 29.Rh8#. )
29.Rgxg7! Rxg7; 30.Ng6+ Ke8;
{Diagram?}
Once again, this looks forced.
( </= 30...Kf7?; 31.Qf4+! Kxg6; 32.Rh6#. )
31.Rh8+ Rg8;
{Diagram?}
Again this is forced.
( Or </= 31...Kf7?!; 32.Qf4+, {Diagram?}
and mates as before. )
32.Rxg8+ Kf7; 33.Qh7+ Kf6;
34.Qe7#. {Diagram?}
A very instructive mating sequence. )
*******
27.Rxg6! Na3+;
{Diagram?}
Black must pursue the attack.
( Not </= 27...Rxe3??; 28.Rh8#.
Or </= 27...Kf8?; 28.Rh8+! Ke7[]; 29.Qh4+ Bf6;
30.Nf5+!,
30...exf5; 31.Nd5+ Ke6; 32.Rxf6+!, ("+/-")
{Diagram?}
and mate next move. )
28.Ka1! Nxc2+; 29.Kb2! Rxb3+;
{Diagram?}
Otherwise Black will be mated ...
as in the variations above.
(White threatens Rh8# immediately,
and if ...Kf8?; then Rh8+!
will be decisive in all lines.)
30.axb3[] Qc3+; 31.Kb1,
{Box.} {Diagram?}
This is forced for White as well.
( Not </= 31.Ka2???, because of 31...Qa1#. )
31...Qa1+; 32.Kxc2 Qa2+;
33.Kd1 Qxh2; 34.Rxh2,
34...e5; 35.Nd5,
("+/-") {Diagram?}
White has a decisive material
advantage (+10) in this position
*******************************************************
Of course not:
</= 25...e5??; 26.Rh8+ Kxg7; 27.Rxc8, ("+/-")
{Diag?}
with an overwhelming material advantage for White.
]
*************************
26.Qh2+ Kxg7[];
No question ... this is 100% forced for Timman here.
[ 26...Kg8???; 27.Qh8#.]
27.Nxg6!,
White is down material here, so Anand still must play the most accurate move each time.
[ </= 27.Rxg6+!? Kf8; "=/+" ]
27...Rxe3;
{Box?}
Just about the only move for Timman in this position that I can see.
(Some of the alternatives are much, much worse.)
[ </= 27...Kg8?; 28.Ne7+ Kf8; 29.Nxc8, "+/-"
Or </= 27...e5??; 28.Qh6+ Kg8; 29.Ne7#. ]
28.Ne7+ Kf8;
29.Nxc8, ("+/-")
Either Timman saw Anand was going to make the time control, (easily!);
or he started counting up the points, {or both!}; ... ... ...
and decided it was high time to throw in the towel.
Black
Resigns, 1 - 0.
*************************
[
Black is definitely lost here. (For
example:)
29.Nxc8 Ne8;
{Diagram?}
This ugly move is forced according to the computer here.
( </= 29...Bxc8?; 30.Qxd6+ Re7; 31.Qf4! Rf7; 32.Qxe3, "+/-" )
30.Qh6+ Rg7; 31.Qxe3 Rxg1+; 32.Qxg1,
"+/-" (material) {Diag?}
and Black is ... suffering from a terminal lack of wood!
]
*************************
A brilliant, brilliant, brilliant game by GM Viswanathan Anand
...
many times the computer did NOT immediately spot the move Vishy would play!!
Anand also showed that a lay-off he had a year or two back has not adversely affected
his chess ... in fact he may have spent a lot of time studying the openings!
With his stellar win at this tournament, Vishy also will probably take over the number
two spot in the rating list.
********************************************************************************
Copyright (c) A.J. Goldsby, 2003.
(I used some material from an opening repertoire I finished last year on this opening.)
Copyright
(©) A.J. Goldsby, 2004. All rights reserved.
***********
All
games - HTML code (originally)
...........
Generated with
the program,
ChessBase 8.0.
All diagrams on this page were generated with the program, Chess Captor, 2.25.