GM
Vishy Anand (2786) - GM Petar Leko (2749)
|
|
|
"GAME OF THE MONTH," February, 2005.
Undoubtedly
an important game - it {eventually} decided the winner of this year's
big CORUS tournament.
(From the LCC / TWIC #
532.) (GM
Nigel Short looks at
this game.)
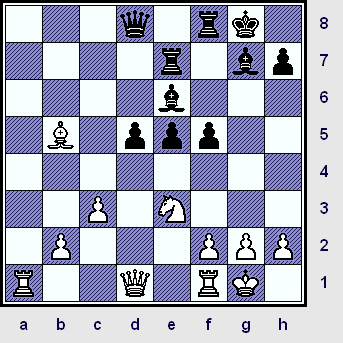
1.e4 c5;
2.Nf3 Nc6; 3.d4 cxd4; 4.Nxd4 Nf6; 5.Nc3 e5;
('!?' ... Maybe - '!')
{Diagram?}
The wild, unconventional ... and very
complex "Sveshnikov Sicilian." (Or
... the Lasker/Pelikan/et al.)
(Right now this line is all the rage
at the highest levels of GM chess.
The tournament at Linares, 2004;
featured this opening in six different
games!)
Leko has been playing this line since Leon, 1996 - a loss to GM Veselin Topalov.
I would bet that Leko had to study this
system a lot in his preparations for his
World Championship Match
with Kramnik
in 2004. (He probably did not want to let
all that hard work go to waste!)
I would also remind the reader that it
was a loss in this opening as White,
(vs. GM V. Kramnik); that basically
cost Leko first place in Linares, 2004.
{History repeating itself?}
The latest book on this very complex
system would have to be: "The Complete Sveshnikov
Sicilian,"
by GM Yuri Yakovich. D.O.I. (c) 2003.
Published by Gambit Books, London.
(UK) / ISBN: # 1-901983-71-4
[ The move, 5...d6; leads to a fairly standard Sicilian. ]
6.Ndb5 d6; 7.Bg5 a6; 8.Na3 b5!; 9.Bxf6!,
The modern way of playing this line ...
three different books award this an
exclam!
(I played this way once in a
tournament in the early 1970's ...
a master told me that this was a
bad move.
This shows just how much
opening theory has changed!!!)
[ For MANY (!!) years, the most
popular line - and the one that
many books said was
best
for White - was:
9.Nd5!? Be7; 10.Bxf6 Bxf6;
11.c3 0-0; 12.Nc2 Rb8!?;
Played with ...a5 and ...b4 in mind.
(The 'book' move here today - in
the current position - would be for
Black to play 12...Bg5.)
13.Be2 Bg5; 14.0-0 Be6!?;
15.Qd3 Qd7!?; {Diagram?}
Several pundits praised this move.
( Maybe >/= 15...f5!; was a little better. )
16.Qg3!, ("+/=")
{space}
{Diagram?}
White has a solid edge ... and went
on to win a nice game in 55 moves.
GM A. Karpov - GM S. Dolmatov;
IBM (super) Masters Tournament
Amsterdam, Netherlands; 1980. (White won a nice game, 1-0, in
55 total moves.) ]
9...gxf6;
10.Nd5 f5; (hmmm)
('!?' maybe - '!')
{Diagram?}
For quite some time, this move
has been considered the main
line for Black. However, many young
players today (Radjabov) enjoy the
extremely complex positions that
arise from the move of 10...Bg7.
[ Black can also play ...Bg7 here.
For example:
10...Bg7!?;
{Diagram?}
Some books refer to this game
as ... "The Novobirsk Variation."
(Is this really a good line ... or is this
just the latest fad in opening theory?)
11.Bd3 Ne7; 12.Nxe7 Qxe7;
13.0-0 f5!; {Diagram?}
led to an extremely complex game
- that was eventually drawn.
GM P. Leko - GM T. Radjabov;
ICT / Super-GM Event
Linares, ESP; (Spain)
2004.
[ See also MCO-14, page # 337;
columns # 05 & # 06,
and all the
notes that accompany these two
columns. ]
*** There are whole books that
are completely dedicated to the
examination
of this one variation. ]
11.c3!?,
(square-control)
A very normal move in this
particular position. (White keeps
a BN off the d4-square and
prepares to bring
the Knight on a3
back into the game via the
c2-square. Additionally, White has
a Q-side majority ... this move
makes
it easier to get in a later break ...
like a2-a4 ... to utilize this asset.)
According to several opening books, the
main line here is Bd3, "+/=" However, some
players do not like this move,
probably
believing that it is one-dimensional and
somewhat limits White's choices.
[ Maybe better was:
(>/=)
11.Bd3!? Be6; 12.Qh5!?,
{Diagram?}
Several newer books recommend that
White play castles in this position.
*** *** *** *** *** *** *** *** *** *** *** *** *** *** ***
( GM Yuri Yakovich recommends
the following continuation for
both sides
from the above position: 12.0-0 Bxd5; {Diagram?}
This was not mandatory here, the
second player could also play the
Bishop
to the g7-square here.
13.exd5 Ne7; 14.c3! Bg7; 15.Qh5 e4; 16.Bc2 Qc8!;
{Diagram?}
Black has good play in this
position, white must proceed
very carefully and accurately.
Searching several different databases, I found close to 300 games with this particular position.
Maybe the most recent game that
I could find ... that was well played
involved masters, was the contest:
GM Andrei Sokolov (2587) -
GM Luke McShane (2546); TT / Bundesliga / GER; 2002.
{A long game that was drawn.}
** ** ** ** ** ** ** ** ** ** ** ** ** ** ** ** ** ** ** ** ** ** ** ** ** ** ** ** ** ** ** ** **
GM Yuri Yakovich gives the following games from the above position:
# 1.) Nijboer - Krasenkow; Wijk aan Zee, NED; 2002.
# 2.) Bologan - Fillipov; National Tournament Championship / Tomsk, RUS; 2001.
# 3.) Konguvel - Harikrishna; National (adult) Championships / Nagpur, India; 2002.
# 4.) Z. Almasi - M. Krasenkow; Malmo, SWE; 1995. (Or 1994?)
You should study all of these
contests - carefully
- to get a real
feel for the current state
of theory;
at least as concerns this line. )
*** *** *** *** *** *** *** *** *** *** *** *** *** *** ***
******* ******* ******* ******* ******* ******* ******* *******
(Returning here to the main line
of the analysis of this opening.)
12...Bg7; 13.0-0 f4; 14.c4 bxc4;
{Diagram?}
This is considered to be forced.
( Black probably should not play his Pawn to b4:
</= 14...b4?!; 15.Nc2 a5; 16.Rfd1 0-0; 17.b3,
"+/=" {D?}
When White gets around to
playing a2-a3, the first player
will
enjoy a significant edge.
(analysis) )
15.Bxc4 0-0; 16.Rac1 Kh8;
17.Rfd1 Rb8; {Diagram?}
The end of the column here.
18.b3 Qd7; 19.Qh4 f5?!;
REPEATED computer analysis has
led me to believe that this move is probably {highly}
inaccurate - and
quite possibly a mistake ('?') in this position for Black.
( Better would be: >/= 19...Bxd5[]; 20.Bxd5,
"+/=" 20...Nd4!; "~"
Black has a reasonable position.
{White keeps a slight edge in this
opening, it almost does no matter
what line the second party uses. If
this bothers you ... then you
should
not play this system of the Sicilian!} )
Now White finds a way to exploit the
fact that all of Black's pieces are not
really adequately protected.
20.Nxf4! exf4; 21.Bxe6 Qxe6;
22.Rxc6 fxe4?;
{Diagram?}
A somewhat obvious mistake, Black
definite should play the QR to the
d-file to protect the Queen's Pawn.
( The move 22...Rbd8[]; {D?} was practically forced in this position. )
23.Rcxd6 Qe8;
(inferior?)
{Diagram?}
...Qf5 was probably a little better.
24.Qg4,
(hmmm)
{Diagram?}
This leads to a solid edge for White,
but ...
( >/= 24.Nc4!, '± ' is clearly better. )
24...e3;
This might not be the best move
in this position for Black.
( The tricky >/= 24...Rg8!;
"<=>" {Diagram?}
was a little better than the move
actually played
in the game here. )
Now the (seemingly) obvious Re6
begs to be played here.
25.Qf3!?,
"+/=" (Probably "+/")
{Diagram?}
... "leaves Black little compensation
for the Pawn." - GM Nick de Firmian
GM T. Ernst - NM H. Holmsgaard;
/ Peer Gynt International
Gausdal, Norway; 1993.
(White won, 1-0, in 51 moves.)
[ See MCO-14, page # 337; column # 01, and note # (f.). ] ]
---> NOTE: Many friends, fans, and students have asked me to go back and take a look at this continuation.
I
gave a lecture on one big server one night. (NOT
ICC.) It was very well received, and I received many e-mails as a consequence.
I felt (and said) that many of these moves were somewhat questionable, many hours
of computer analysis now back this up.
Both sides continue to develop in
a fairly normal manner.
11...Bg7;
12.exf5!?,
After this capture, Black gets a
position that is fairly easy to play.
[ Maybe (>/=) 12.Bd3, instead?
[ See Chapter 10 of the book:
"The Complete Sveshnikov Sicilian,"
by GM Yuri Yakovich.
(Page # 146.) ] ]
12...Bxf5;
13.Nc2,
As advertised. (See the note to
White's 11th move in this game.)
[ 13.Bd3!? e4; 14.Bc2 0-0; 15.0-0, "~" (Maybe "=") ]
13...0-0;
14.Nce3 Be6; 15.Bd3 f5; ("=")
{Diagram?}
I think it is no exaggeration to say
that Black has equalized - the second
player has traded off
the doubled Pawn
on the f-file, nearly completed the
development of most of his pieces,
and
even mobilized his Pawn duo.
16.0-0,
(hmmm)
{Diagram?}
Is this one of those rare moments
when castling is incorrect?
(GM Y. Yakovich recommends that
White play Qh5! in this position.
See Chapter 12, page # 189.)
[ Instead of this, maybe Anand should
think about playing: (>/=)
16.Bc2!?,
with the idea of f4
(!?) on his next turn? ]
Now ...f5-f4?! ('?') is rather risky, and even dubious, especially in the face of the reply of Qh5! by White.
Black to move ... what would you pick as the best move for Black in this particular position?
16...Ra7!!;
(Yes, but why?)
{Diagram?}
A nice Rook luft, this piece heads over
to the King-side in a hurry.
(This idea
also involves a Pawn sacrifice by Leko.)
I received several e-mails ... persons
who thought that this move might be
new to opening theory.
However, a
search of the database quickly reveals
that this has been played almost 150
times ...
prior to this encounter! (There are dozens of interesting
games in this particular variation.)
(For example, see the contest: GM Vassily Ivanchuk - GM Vladimir Kramnik;
ICT / PCA / Intel Grand Prix /
London, England (GB/UK); 1994.)
[ If 16...e4!?; then simply 17.Nf4!, "~" (unclear) {D?}
*******
The quiet move of 16...Kh8!?;
"~" (Maybe -
'!') {Diagram?}
also led to victory for Black.
GM J. Polgar - GM M Illesacas;
ICT / Dos Hermanos,
ESP; 1999.
{The game went over 60 moves, but Black eventually won a very
tough, hard-fought game.}]
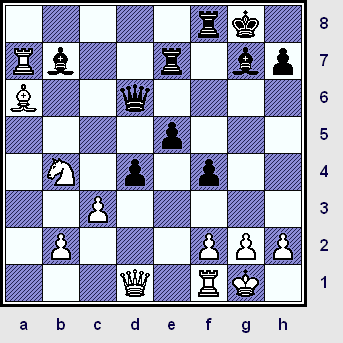
17.a4! Ne7!;
18.Nxe7+ Rxe7; 19.axb5 axb5; 20.Bxb5 d5; {See
the diagram ... just below.}
Black has some compensation for
the Pawn here ... but is it enough?
(Leko has a big center, lots of open
lines for the attack, and the two
Bishops. Anand has an extra button.)
********************************************
|
|
********************************************
The critical point of the game has
arrived. In such positions, I tell my
students it is extremely important
to have a clearly defined plan!
21.Ra6 f4!?;
(hmmm)
Is Leko making a thoughtful gamble
here? ... ... ...
This seems to allow
Anand a huge opportunity to sack
on e6 on the very next move.
[
(Maybe >/=)
21...Kh8;
"~" (Box?)
{Diagram?}
was both thematic for this whole
line ... and probably a heck of a
lot safer.
(The move of 21...Kh8;
is also the first choice of several
strong computer
programs as well.)
]
22.Nc2!?,
(dubious?)
(TN?)
Either Anand missed the sacrifice
on the e6-square, or he decided
against playing it,
(for reasons that
I do not fully comprehend).
I don't believe - AFTER missing this
one tactical idea - that White ever
again has a real
chance at gaining
the advantage in this struggle.
This was the first use of this move
that I found in MASTER level chess!
(There are a couple of games in
the db with this move, however,
they involve lower-rated
or untitled
players.)
[ White could have played sharply:
>/= 22.Rxe6!,
{Diagram?}
This is NOT even a new idea here ...
there are about a dozen games
in the database with this move.
[
See: H. Staudler - K. Hohm; World Champ. (Corres. 19
- q04); 1999. ]
22...Rxe6;
{Diagram?}
This is completely forced.
( </=
22...fxe3?; 23.Rxe7 exf2+; 24.Rxf2 Qxe7;
{Diagram?}
Completely forced, if Black plays
...RxR/f2??; White calmly responds
with RxB/g7+, winning a piece.
25.Qxd5+ Kh8; 26.Rxf8+ Bxf8; 27.g3, "+/-"
{Diagram?}
White's two-pawn advantage
should be more than enough
to win from this position. )
23.Qxd5 Qxd5; 24.Nxd5 f3!?;
25.b4!, "~"
("+/")
{Diagram?}
Three different programs rate this
position as nearly winning for White. ]
Now White has a slight edge ... but
Black keeps good play.
(Which is
typical of the types of positions that
both sides reach - when using this
particular opening system.
And after
Leko plays ...Bc8; - - - - -
we are finally out of book!)
22...Bc8; ('!' TN?)
23.Ra8 Qd6; 24.Nb4 Bb7;
25.Ra7!? d4!;
Black increases the energy of his
pieces with this move.
26.Ba6?!,
(Maybe even - '?')
{See the diagram given, just below.}
White's game goes sadly downhill
after this very inappropriate move.
(Of course, hindsight is 20-20!)
********************************************
|
|
********************************************
Now Leko finds a very attractive
combination, however, there is no
way a player of Anand's caliber
should miss an idea like this.
(Of course, this should make the
average chess-player feel better ...
even the world's best players are
only human sometimes!)
[ White seemingly had to play:
>/= 26.Qb3+ Kh8; 27.Bc6 Bxc6;
28.Rxe7 Qxe7;
29.Nxc6 Qd7; 30.Qb5 f3!?;
(Maybe - '!')
{Diagram?}
Black steps up the pressure.
( ...dxc3; is a viable alternative for
Black - but would reduce the second
party
to playing only for a
draw. )
( Not (</=) 30...Rc8?; 31.Nxd4!, '±' and White wins a Pawn. )
31.Nxd4!! Qg4!; 32.Nxf3! Rxf3[];
{Diagram?}
What now?
33.Qe2! e4; 34.Re1! h5!?;
{Diagram?}
It is difficult to find a good
move here.
( Or 34...h6; 35.Kf1 Rf4; 36.Qxg4 Rxg4; 37.g3 Kh7;
38.h3 Rg5; 39.Rxe4, "~" )
35.Kf1! Rd3!?; 36.Qxg4 hxg4;
37.Rxe4 Rd2; 38.Rxg4 Rxb2;
39.Rc4!? Rc2; 40.h4,
"+/=" (Unclear?) {Diagram?}
It is impossible for me to imagine
White losing from this position.
(In fact, Black will have to work
pretty hard to secure the draw.)
Analysis by - LM A.J. Goldsby I
*******************************************************
ChessMaster, 10th Edition prefers the move, Qd3 in this position.
For example:
(>/=) 26.Qd3!? f3; 27.Bc6 fxg2;
28.Re1 Bxc6;
29.Rxe7 Qxe7; 30.Qc4+ Kh8;
31.Qxc6, "~" {Diagram?}
This position is roughly equal.
{This continuation is also a big
improvement over the course
of the actual game.} ]
26...Bxg2!!;
(boom!!)
{Diagram?}
What?!?!? You could not have
possibly expected Leko to play
something very mundane ...
like "...Rook-to-b8;" or did you?
While Leko did not play these moves
in an extremely rapid manner, one
suspects that this idea could have
been prepared in advance - and
almost certainly with the help of the
best computer programs. (Of course,
it is entirely possible that Leko found
all of this over the board, after all ...
he is one of the best players in the
whole world!!!)
[ </= 26...Be4?!; 27.Rxe7 Qxe7; 28.Re1, "+/=" (Maybe - '±') ]
27.Bc4+,
(forced?)
By now, Anand probably realized
that he had been duped. However,
there is nothing that the great Indian
super-star can do. He can only try
to wiggle a lot, play for tricks ...
and pray for a miracle!
[ Not
</= 27.Rxe7?,
as after: 27...Qg6!!;
{Diagram?}
and White might win a ton of material,
but eventually get mated! ("-/+")
{Note that Bc4+?? is met by ...Bd5+!;
with a rapid mate to follow.}
( For example:
27...Qg6!!; 28.Rxg7+!? Kxg7!; 29.f3 Bxf3+;
30.Kf2 Qg2+; 31.Ke1 Bxd1; 32.Kxd1 Qxb2; {Diagram?}
Black wins ("+/-") ... and rather
easily so from this position. ) ]
27...Kh8;
28.Ra6,
White rescues his Rook ... AND prevents the deadly threat of
...Qg6 by Black.
[ Not </= 28.Re1?, as 28...Qg6!; ("-/+") wins easily for Black. ]
28...Qc5;
This is good, as was playing the
Black Queen to the c7-square.
29.Kxg2 f3+;
{Diagram?}
This is quite playable, and perhaps
even good. But Leko could have also
waited (a little) on
this move here. {See the variation just below.}
[ Leko could have tried:
(>/=) 29...Qxc4!?; 30.Rc6 Qb5;
31.Qd3!?, {Diag?}
The first choice of Fritz 8.0.
( Or 31.f3!? e4!; "/+" )
31...f3+; 32.Kh1 Qxd3!;
33.Nxd3 e4; {Diagram?}
Black has a "Pawn roller"
... that is just crushing.
34.Nc5 e3; 35.cxd4 e2; 36.Re1 Bxd4; ("-/+") ]
It is fairly obvious that White can't
capture the f-Pawn here, so Anand's
next move is relatively forced.
(The King moves into the corner,
where it should be safe ... at least
for the next 2-3 moves.)
30.Kh1 Qxc4;
31.Rc6 Qb5; 32.Rd6 e4!; 33.Rxd4[],
White feels compelled to try and
break down Black's huge phalanx
of infantry in the middle of the board.
(If 33.Rg1? then 33...e3; is immediately
decisive, the lowly pawns - triumph.)
The strong computer program, ...
Fritz 8.0, ... ... ...
confirms that the capture
on d4 was completely forced for Anand.
[ Not
</=
33.Nc6?,
as then the Queen
fork with
33...Qc5;
{Diag?}
wins
("-/+") on the spot for Black.
(White loses at least a piece here.)
********************************************************
Also less than best (for White)
was the continuation of:
</= 33.Rd5?! Qc4; 34.Rg1 dxc3;
35.bxc3 e3!; ("-/+")
{Diag?}
and Black wins without any real
problems from this position. ]
33...Bxd4;
Now Anand is probably lost.
(White is down an exchange.
Anand had to take on d4, Black
was threatening all kind of nasties,
to include ...e4-e3; when Black
has a winning pawn duo ... the
infantry is on the sixth rank, and
only two squares from a glorious
and triumphant promotion.)
[ Or 33...Qh5; 34.Rd5 Be5; "/+" which is also good for Black. ]
34.Qxd4+ Qe5;
35.Qxe5+ Rxe5; 36.Nc2 Rb8; 37.Ne3 Rc5; 38.h3!?, (hmmm)
This is virtually an admission of
defeat for Anand, once the Q-side
falls apart, its over.
[ >/= 38.Nd1[], 38...Ra5; "/+" or "-/+" ]
38...Rxb2;
39.c4 Rg5; 40.Kh2 Kg8;
The King is a powerful piece and
should always be gainfully
employed in the endgame.
[ Maybe 40...h5!?; first? ]
The next portion of the game is not
that interesting to me, one would hope
that a player rated
over 2700 has
pretty good endgame technique!
41.h4 Rg6;
42.Kh3 Kf7; 43.Nf5 Rc2; 44.Ne3 Rd2; 45.c5!? Ke6;
46.c6 Rg8; 47.c7!?,
(hmmm)
{Diagram?}
This is not pretty, but with the King
nailed to the edge of the board and
the White Rook stuck
on f1, (to guard
the f-pawn); White is running out of
ideas ... and moves.
[ The alternative would have been
for White to play:
47.h5!?,
{Diag?}
but this weakens the defenses of
the position of the White King. ]
In the next phase of the game, Leko
neutralizes Anand's c-Pawn, and
continues
to try and improve his
overall position.
47...Rc8;
48.Kg3 Rxc7; 49.Kf4 Rd4; 50.Ra1 Rf7+; 51.Kg3 Rd8;
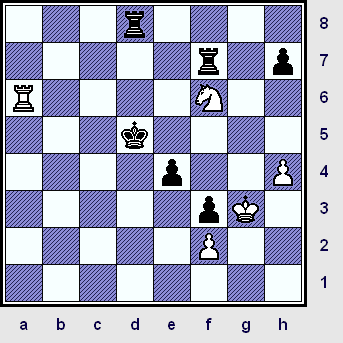
52.Ra6+ Ke5;
53.Ng4+ Kd5;
54.Nf6+!?, {See
the diagram - just below here.}
With the benefit of analysis, maybe
Anand should not have played this
move in this position.
[As long as
the material stays on the board,
especially the tricky Knight, White
has a chance
to defend ...
however small.]
********************************************
|
|
********************************************
Now the game has turned into a chess problem: "Black to move and win."
[ After the moves:
>/= 54.Ra5+!?
Kd6; "/+" or "-/+"
{Diagram?}
Leko still has a won game. (Yet the
second player still has to demonstrate
exactly how he will get out of all the
checks here - & there are still many
Knight forks that Black must avoid!)
There is a common, well-known
principle about defense. "When you
are behind
in material, exchange
Pawns ... NOT PIECES!!!" This is
because every swap makes
it
easier for the player who is ahead
- on the material count - to reach
a winning endgame.
By trading
infantry at every opportunity, you
will increase - statistically - the
likelihood of
a draw. (It has also been
my experience that most players in
a tournament game are NOT
prepared to meet a tough, active
defense. Very often a player facing
"stiff resistance," will
wear down
mentally ... and they will eventually
commit some type of error.) ]
54...Rxf6!;
(nice)
Black has a won ending ... as Capa
showed in his games, you should
not hesitate to return material
to
reach an easier ending. (Simplify!)
55.Rxf6 Ke5;
56.Rh6, ('?')
{Diagram?}
Its hard to call anything a real
mistake when you have such a lost
game, but Fritz shows that Anand
might have had a slightly better
defense. (It also did not {really}
matter, nothing was going to save
Anand as White. However, it is my
duty as a commentator to let you
know when one player makes
a move
that adversely affects the computer's
evaluation of the position by several
points!)
Anand - IF he wished to continue the
struggle - had to stay on the key line
in this position.
(I show and explain
win in a complex and detailed
variation ... given just below.)
A mini-rook-endgame course.
[
Possibly
(>/=) 56.Rf7!?, instead?
(This is much better than Rh6,
because the Rook stays behind
the potentially passed f-Pawn!)
---> Black still wins by playing the following continuation:
>/= 56.Rf7 Rg8+; 57.Kh3 Rg2; 58.Re7+ Kd5;
59.Rd7+ Ke6; 60.Rxh7,
(forced?)
{D?}
White may as well capture here.
(Or if 60.Rd4!?, then 60...Ke5; {D?} followed by ...Rxf2 wins for Black.)
60...Rxf2; 61.Rh8 Kf7!;
This is not an easy move for a
human to find, but the computer
spots it instantly.
(The idea of this
almost hidden retreat is to prevent
the White Rook from getting
to the
f-file, BEHIND Black's most
dangerous Pawn! Black also gains
a tempo
with this very subtle King
maneuver.)
62.Rh7+ Kf6; 63.Ra7,
{Diagram?}
The Rook operates best when it
is far away, and cannot be attacked
or harassed
by the Black King.
( Or the continuation: 63.Rh8!? e3; 64.Kg3 Rf1; "-/+" and Black wins. )
63...Rg2!;
(thematic)
{Diagram?}
What has all this maneuvering
brought about?
A.)
White's King is nailed to the
edge of the board;
B.)
White's Rook is unable to get
behind either Pawn;
C.)
If White checks ... Black can
'walk' his King up to the protected
harbor of the f4-square;
D.)
White is unable to effectively try
and prevent the triumphant march
of Black's passed pawns.
*** *** *** *** *** *** *** *** *** *** *** *** *** *** *** *** *** ***
The rest of this analysis should be
very easy to follow.
64.Ra4,
Attacking the Pawns from afar.
(The best place for a Rook is to
be BEHIND a passed Pawn, but
Black has prevented that.
Unable
to attack the infantry from the rear,
White settles for the approach
that is clearly second best.)
( White could also try:
64.Ra8 Rg7!; 65.Rf8+ Rf7; 66.Rxf7+ Kxf7; 67.Kg3 Kg6;
The King-and-Pawn ending is
easy for Black to win. ("-/+") )
64...Kf5; 65.Ra8 e3;
66.Ra3 Ke4; 67.Ra4+ Kd3; 68.Rf4,
{Diagram?}
The White Rook has finally
managed to achieve the ideal
position, and has gotten behind
Black's Pawns. However, it has
cost White far too much time
to accomplish this!
*******
( The alternative would be:
68.Ra3+ Ke2; 69.Ra2+ Kf1; 70.Ra1+ Kf2; 71.Ra2+ e2;
and Black wins easily.
{The box is already seeing a
checkmate in White's future!} )
*******
68...Ke2; 69.h5 Rg1;
70.Kh2 Kf2!; 71.h6,
{D?}
White may as well play this.
*** *** *** *** *** ***
( Even worse is:
</= 71.Rxf3+? Kxf3; 72.Kxg1 e2; 73.h6 e1Q+;
and now it is mate in two.
After the following moves: 71.Ra4 Rg2+; 72.Kh3 e2;
Black also wins easily. )
*** *** *** *** *** ***
71...e2; 72.Re4 Rg6!;
("-/+") {Diagram?}
Black wins easily from this position,
the computer now sees a mate in
only six or seven moves.
{This analysis was generated over a
period of several days ... and was
checked with about half-a-dozen
different, strong chess programs.
I also went to great pains to explain
the moves, so that even a player
who has a low rating or not much
experience, would be able to
follow and understand this line.} ]
56...Rg8+!;
57.Kh3 e3!; ("-/+")
White Resigns, 0-1.
(The first party will be unable to
stop Black's Pawns from this position.)
********************************************
|
|
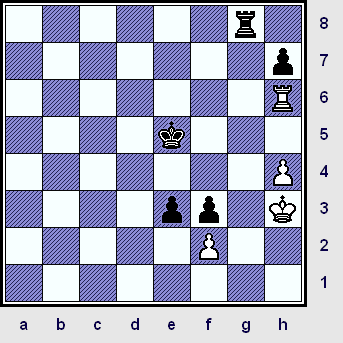
The final position, after 57...e3! in this amazing game.
********************************************
[ If you still need to see the proof, then I present this continuation:
57...e3!; 58.Rh5+ Ke4!;
59.Ra5 e2!; 60.Ra1 Kd3; 61.Ra3+,
{Diag?}
Any other move also loses.
(With White's stuck far away,
completely out of play, the
first party is unable
to offer any
meaningful resistance. Please
note that on move 59, Black left
the White f-Pawn on the board.
The second player was planning
ahead, this
gives the BK a good
square to hide on ... away from
lateral checks by the WR.)
( 61.h5!? Kd2; 62.Ra2+ Ke1; 63.Ra5 Kxf2; 64.Ra2 Kf1, "-/+" )
61...Kd2; 62.Ra2+ Ke1;
63.Ra1+ Kxf2; 64.Ra2 Kf1;
("-/+") {Diagram?}
It is now obvious that White will
lose his Rook after Black promotes
a Pawn here.
(The box sees the
end in sight ... in less than ten
moves from the current position.) ]
A fantastic game by Leko ... but a bit of a let-down by the world's number-two rated player.
Copyright (c) A.J. Goldsby, 2005. All rights reserved.