GM Peter Svidler (2747) -
GM Alexander Rustemov (2585)
|
|
|
****************************************************************************
A.J.'s
"Game of The Month."
(For the month of March, 2004.)
****************************************************************************
It is practically a status symbol, and most any chess players' dream ... to be able to play in the National German Team Competition. (Commonly known as "The Bundesliga.") Every winter the tough Germanic peoples pass the long, cold winter with chess. Not your average chess either, but red-hot chess ... where if you take too many short, "GM Draws," ... you WON'T be invited back the next year to participate!
American players like Nick de Firmian and Larry Christiansen have played in this event, Larry used to have an apartment in that country for his time spent there during the competition's main season.
Here is a very sprightly game played by
GM Peter Svidler, the Russian National
Champion ...
who also plays first
board for the Stuttgart team.
Black plays the tough "French Defense," a line almost every KP-player has had trouble with at one time. Svidler wins, in the end - he overwhelms his opponent with a wealth of tactical and strategical ideas.
*************************
(Short opening repertoire included.)
1.e4 e6;
2.d4 d5; 3.e5, ('!?')
{Diagram?}
The Advance Variation ... a favorite
of the great hyper-modern player,
GM Aaron Nimzovich.
For many years this particular variation
was considered a little weak and somewhat eccentric,
but not anymore. (The {former} U.S. Champ ... GM Joel
Benjamin used to use this line almost
exclusively as I recall.)
Today's GM's, in their hunt for lines that
are not as well-mapped out as the main
lines of the French
Defense, are striking
out on these lines ... perhaps in an
effort to get 'booked-out' players out of
known territory and force them to think
for themselves.
[
White could play:
3.Nc3 Bb4; 4.e5 c5; 5.a3 Bxc3+;
6.bxc3, "+/=" {Diagram?}
which is the main line of:
"The Winawer Variation."
***
OR ... White could play:
3.Nd2 dxe4; 4.Nxe4 Nd7; 5.Nf3 Ngf6;
6.Nxf6+ Nxf6; 7.Bd3, "+/="
{Diagram?}
which is one of the main
lines
of: "The Tarrasch Variation."
]
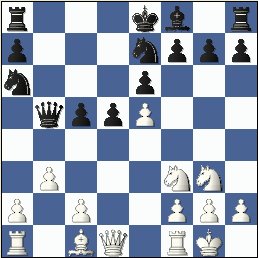
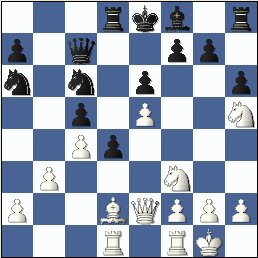
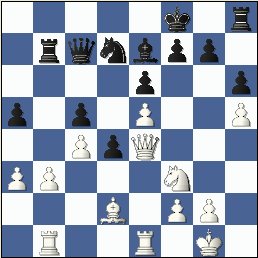
3...b6!?;
(dubious?)
{See the diagram, just below.}
Black obviously wishes to take care
of his "problem child."
(Nearly every
player who has ever tried the French
Defense knows that
Black's QB is
very often bad ... right into the ending.)
Here Black decides to do something
about this problem without any delay.
One on-line website (and NIC) was
billing this, as ... "the line which will
solve all of Black's problems and
guarantee the second player easy
equality."
(As this game amply shows,
all of Black's troubles are NOT solved!)
The move "... pawn-to-b6" might
enable the second player to trade
off the troublesome piece.
But it loses
time, weakens Black on the light-squares, (on the Q-side); and the
exchange also
leaves Black's
Queen-Knight on a very poor square.
{It takes several tempo for this piece
- the BN left on the a6 square - to
find ...
a really effective square!}
*************************
|
|
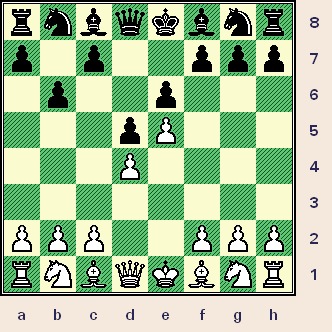
(The position in the game immediately after Black plays 3...b6.)
*************************
Black will get rid of his "problem child," but does it really help him?
************
[ The main line here is definitely ...c5; for Black at this point.
For example:
3...c5;
('!')
4.c3 Nc6; 5.Nf3 Qb6!?;
{Diagram?}
A logical move that is played the
most often here. (Main line.)
The second player will focus all
of his energies on the d4-square.
( Also interesting is: 5...Bd7!?;
{Diagram?}
which is also a very playable
and popular line for Black. )
6.a3!?,
{Diagram?}
Most books give this as the main
line, personally I am not wild about
this move ...
and much prefer the
simple and direct Be2.
( Maybe better is: (>/=)
6.Be2, "+/=" {Diagram?}
and White retains a very small ...
but relatively solid edge. )
6...c4!;
7.Nbd2 Na5!?; 8.Be2 Bd7; 9.0-0 0-0-0!?;
10.Rb1!? Qc7!?;
11.Re1!? Bc6!; 12.Nf1!? h6;
{Diagram?}
The end of the column.
13.Ng3!? Qd7; 14.Nh5 Ba4;
15.Qd2 g6; 16.Nf6 Qc7!?;
"~" {Diag?}
MCO calls this equal, ("=")
I would
lean towards a slight advantage
for
Black ("=/+")
in this position. (It is highly probably that there are
many
improvements in this line ...
for BOTH sides!!)
Dabrowska - Peng;
ICT / Masters Open
Jakarta, Indonesia; 1993.
[ See MCO-14; page # 200, column # 02, and also note # (k.). ] ]
************
4.Nf3,
('!')
(King-side)
{Diagram?}
Simple development is always a good
idea ... at least in my book.
This one move hits key central squares,
develops the KN, and also prepares a quick castling
for White on the King's
side. Additionally, the Black Queen is
prevented from coming out to
any
square near the White King. (For
example, after Ne2, the Black Queen
could {later}
consider a raid to the
h4-square.)
[ Possible was: 4.f4!? ]
4...Ne7!?;
(why?)
{Diagram?}
I am not sure what this move
accomplishes or even why Black
played this Knight play.
It does develop a piece ... but it blocks
in the KB. Maybe it is headed for f5,
to complement
an attack of Black's
pieces on the d4-square. But I am
not sure that this Knight move fits in
well with the plan of 3...b7-b6.
[ Usually Black plays ...Qd7; here ... at least in this particular line.
For example:
(>/=) 4...Qd7!?; 5.c4 Bb7;
6.Nc3 Bb4; 7.cxd5 Bxd5;
8.Be2 Ne7; 9.0-0,
"+/=" {Diag?}
and White only has a small
advantage.
See the contest:
F. Zeller - R. Vaganian;
Team Tourn. / Bundesliga 9596
/ Germany, 1995. ]
5.Nc3!?,
(hmmmm)
{Diagram?}
This is just a rather straight-forward
developing move, and of course there
is nothing wrong with that.
Since one of the main ideas of this
whole defence is for Black to play
the pawn advance ...c7-c5;
and
undermine White's center - I fully
expected White to play c3 here.
But The Knight move is not bad and
it also allows White to keep his position
very elastic and
almost all of his
options open.
***************
[ {seemingly} More logical was the
following continuation:
(>/=) 5.c3!?,
(Maybe - '!')
{Diagram?}
A strong dose of preventative
medicine here. (protects d4)
White also prevents Black from
developing his QB as planned.
5...Nf5;
{Diagram?}
Clearing the Knight and getting
to the f5-outpost.
*******
( But NOT: 5...Ba6??; {Diagram?}
This fails to a common tactic. 6.Bxa6 Nxa6; 7.Qa4+,
("+/-") {Diag?}
and White has won a piece.
***
Also possible was: 5...c5!?; 6.Bd3 Nbc6; 7.0-0 Nf5;
"~" {Diag?}
when Black's position is somewhat
odd, but perhaps not untenable. )
*******
6.Bd3 Be7; 7.0-0,
"+/=" 7...0-0;
"<=>" {Diagram?}
White has a slight advantage in this
position ...
but Black's position is
probably playable. (analysis) ]
***************
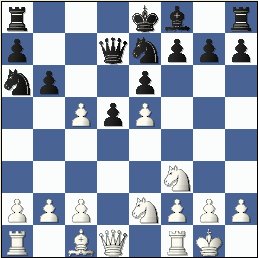
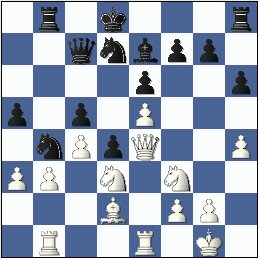
5...Ba6!?;
{See the diagram ... just below
here.}
Black "executes" on his plan, and I
see no reason why the second player
should not be consistent with his
third move.
*************************
|
|

*************************
This is an odd ... but maybe effective
method ... of Black dealing with his
most problematic piece.
(My question
would be is: "Did this method create
as many problems and/or weaknesses
as it solved?")
Something else of note:
Some guys are always yakking it up
about how chess is played out, the
openings are used up, etc.
But after
only five moves we have an extremely
rare position.
(Only TWO real,
master-level games in this line!)
*******
[ Maybe 5...Nf5!?; "~" {Diagram?} was possible?
***
Also possible was:
5...a6!?;
{Diagram?}
with
maybe the idea
of the pawn
break ...c7-c5; on the next move.
{A very radical idea.} ]
*******
White now exchanges on a6 ... mainly because it is the most
expedient way of
improving the
first player's position.
6.Bxa6N ,
(hmmm)
{Diagram?}
While perhaps the most
straight-forward move for White,
this is not the only move
for the
first player in this position.
***************
[
The only other master-level game
that I could find in this line was the
following contest:
6.Nb5!? Nc8;
7.Ng5!?,
{Diagram?}
Attractive ... and extremely
aggressive-looking ...
but not
necessarily the best for White.
( The simple Be2 would have
definitely been better:
>/= 7.Be2 Qd7!?; 8.a4 c6; 9.Nc3 Bb4; 10.0-0 Bxc3;
11.bxc3 Bxe2; 12.Qxe2, "+/="
{Diagram?}
and White clearly has a very
solid edge in this position.
{analysis} )
7...h6;
8.Qh5 g6; 9.Qh3 Qd7; 10.c4 Bxb5!?;
11.cxb5 Bb4+;
12.Kd1 Bf8!;
13.Bd3 Bg7; 14.Nf3 a6; 15.a4?!;
{Diagram?}
This move is definitely
... "less than best," as opening
books are apt to say.
( Better was: >/= 15.Ke2; "~" ('!')
{Diagram?}
and White should be OK. )
15...axb5;
16.Bxb5 c6; 17.Bd3 c5; "=/+"
{Diagram?}
Black already has a small advantage
and went on to win in 44 moves.
(0-1 in 44.)
Mark Tseitlin
(2435) -
Alexander Shabalov (2470);
GMA Qualifying Tournament /
Podol'sk, U.S.S.R; 08.1989 ]
***************
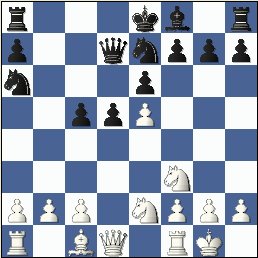
6...Nxa6;
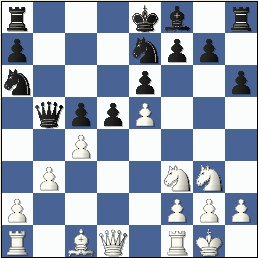
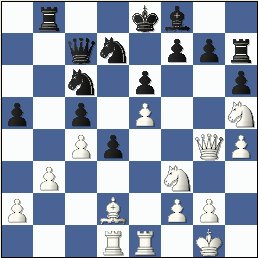
7.0-0 Qd7;
{See the diagram ... just below.}
Black obviously wants to expand on
the Queen-side, but first wants to
control the
light squares. This type of
play is both common and thematic for
this whole variation.
(See the note after Black's fourth
move.)
[ Maybe
7...Nf5!?; "~"
{Diagram?}
in this position? ]
*************************
|
|

(The position in the game after Black plays 7...Qd7.)
*************************
8.Ne2! , (re-deployment)
{Diagram?}
I like this idea. White will transfer
this piece over to the King-side.
In the meantime White's Q-side
pawns are free to protect the base
of his pawn chain
with c3 if Black
plays the standard pawn advance of
...c7-c5.
[ Also possible was:
8.Qe2 Nb8; 9.Bg5,
"+/=" {Diagram?}
with just a small advantage for
White in this position. ]
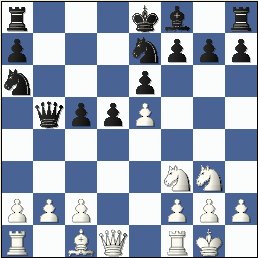
8...c5!?;
(lever) {Diagram?}
The standard break on White's center
by Black ... yet the second player is
not usually so
behind in development
as Rustemov is here. Maybe Black
should have delayed this idea
until
he could catch up to White in the
race to get the pieces out.
[ Some programs prefer that Black
first play ...Nf5; and this seems
like a fairly reasonable idea:
(>/=)
8...Nf5!?; 9.Ng3!? Nxg3;
10.fxg3 Be7;
11.Bg5, "+/=" {Diagram?}
and White is just slightly better
in this position. ]
9.dxc5!?,
(Maybe - '!')
{See
the diagram just below.}
Svidler borrows an idea from the
great Paul Morphy in this position.
(Morphy
knew the best way to
exploit an opponent's failure to
develop properly during the
opening
is to open the game up. Usually the
player who has failed to bring their
pieces out
cannot cope with the
sudden increase in open lines and
the resultant piece activity that goes
along with it.)
Svidler fully shows that he not only
knows 'book' ... and the ideas that
go along
with opening theory - - - he also clearly demonstrates that
he can think
creatively as well.
*************************
|
|
*************************
(I was once told by a master
in the
late 1960's ... ... ...
that White NEVER plays a move like
P/Q4xP/QB4! Probably because it frees
up Black's position a great deal.)
[
The expected move was for White to
protect the base of his pawn chain
with c3 - a very common idea in
the French Defense. This also would
have
lead to a small - but clear -
advantage for White. For example:
9.c3 Ng6!?;
{Diagram?}
One IM on one chess-server told
me ... that this was the ONLY move
in this
position. (NOT!!)
{I had to pay five bucks on a credit
card for this information.
This person
was supposed to spend an hour with
me, I think I got 15-20 minutes ...
and
then he logged off for lunch. I never
saw him again that day. When I asked
him
about it a week or two later, his
response was that I took up too much
of his time ...
and he could not
understand why I wanted to look at
this game in the first place.}
( The move 9...Nf5!?; {Diagram?} might be just as playable as
the
move ...Ng6; in this position. )
10.Be3 Be7; 11.Qd2,
"+/=" {Diagram?}
and White retains a solid edge in
this position as well. ]
9...bxc5;
(towards the center)
{See the diagram - just below.}
Re-capturing with the Pawn looks
positionally forced; if Black were to
take with
the Knight, White's pieces
might benefit from the use of the
available d4-square.
*************************
|
|
*************************
Black's position - while not yet completely hopeless - makes a very odd impression here.
[
Maybe 9...Nxc5!?;
10.Ned4, "+/=" {Diagram?}
with a slight pull for White ...
but at least the Knight on a6
as found a measure of play. ]
***************************************************************************
***************************************************************************
In positions with a Pawn on e5,
White has a nearly permanent
space advantage on the Kingside.
GM A. Soltis - in his landmark book
called: "Pawn Structure Chess" - explains that in such
positions, the
first player will always have organic
piece activity and play on the right-hand side
of the board. Therefore
the Russian Champion, P. Svidler
logically begins transferring his
pieces
to the vicinity of the chess-board where he can expect events
to develop. (in his favor)
Also to be recognized in this position is
that if Black routinely plays moves like
...Ng6; ...Be7;
and then ...0-0; then
Svidler will have a nearly automatic
King-side attack. (This might explain
why Black avoided castling for such
an extended period of time.)
*** *** *** *** *** *** *** *** *** *** *** *** *** *** ***
10.Ng3,
(Maybe - '!')
{Diagram?}
While I applaud this move, it was
not the only way to play this position
for White.
Moves like b3, c3, c4!?,
and Nf4, were also interesting ...
and held some measure of promise
for the first player here.
[ One student suggested h3, with
the following interesting idea:
10.h3!? Nb4; 11.a3!? Nbc6;
12.Bf4!? Ng6; 13.Bg3 Rb8;
14.b3, "~"
(Maybe - "+/=")
{Diagram?}
with an unclear position ... but
one that is probably playable for
both sides here. ]
10...Qb5!?;
(Probably - '?!')
{Diagram given - just below.}
I understand this move completely ...
Black discourages Qd3 attacking
Black's wayward
Knight on a6. The
second player also thinks to keep
White from moving the White QB,
(If White moves his QB, then QxP/b2.);
and Rustemov also believes that he
is preventing
Svidler from playing
c2-c4 as well. All-in-all, this appears
to be a pretty good deal for Black.
*************************
|
|
*************************
But in the meantime, the Black Queen move costs Black at least one tempo.
Additionally this move disregards the
overall poor state of the second player's
development,
and may lose even more
time. (Note that beginner's books are
always warn us about bringing
out the
Queen too early in the game. Here a
young GM flagrantly flouts this sage
advice.)
*******
[ I did a joint analysis on-line of this game at one popular server.
One master (GM?) there instead
recommended that Black play
the following continuation:
>/= 10...Ng6;
('!') {Diagram?}
(There is no doubt in my mind that
this must be better than the text.)
11.Re1!? Nb4!?; 12.a3!?,
{Diagram?}
This is very interesting ... but it is
not the only move for White here.
( Very playable was: 12.Nh5!? )
12...Nc6; 13.Nh5 Qc7;
14.Qe2!? Rb8; 15.b3!? a5!;
"~" {Diagram?}
and here the same master claimed
that Black was better, but the (chess)
program Fritz, awards a slight edge
to White. (I think its unclear.)
***
Black has the very difficult problem
of how he can develop his pieces
that are
asleep on the King-side. But
to be equally candid, a quick and
easy way to improve
White's side of the game is not apparent either. ]
*******
11.b3!, (why?)
{See the diagram, just below here.}
This is not at all an obvious move,
many students want to play Re1
or
a4 in this position.
*************************
|
|
*************************
In the meantime, White's position
increases dynamically in the various
possibilities open to
the first player.
And there is a hidden side to this
move that even most experts miss.
(The idea of a later Ba3 in some
lines for White.)
[ Or
11.Nh5 Nb4; 12.b3!?,
"+/=" {Diagram?}
with only a slight edge for White. ]
11...h6?!;
(Maybe - '?')
{Diagram?}
Black further ignores his development,
(wastes time); and also creates even
more weaknesses as well.
(Black mainly wants to prevent White
from playing Bg5. And while Bg5 ...
and ALL {!!} the dark squares ... are rapidly becoming critical for Black,
the second player simply does not
have the time for this rather
frivolous and
extraneous move.)
[ Black had to try something like:
>/= 11...Nc6; 12.Be3 Rd8;
13.Nh5, "+/=" (space & development)
{Diagram?}
and while White maintains a very
solid advantage in this position,
I think Black's game
is not
completely devoid of play. ]
12.c4!,
(Maybe - '!!')
{See the diagram below.}
The other sneaky side to b3, it
allows White to blow the game wide
open with
this very inventive Pawn
sacrifice.
*************************
|
|
*************************
To show that this idea is NOT all that
easy to find, I tested this position on
about seven players chosen on the
Internet more or less at random.
(I tried to get an average rating of
about 1400 - 1600 in range.)
Of the players tested, just about all
said that they saw the move c2-c4
in this position ...
but did not think
the Pawn sacrifice was sound.
[ Good was: 12.Be3!?, "+/=" ]
12...Qb7;
{Box?} {Diagram?}
Apparently Rustemov felt that he
could not accept the (sham) Pawn
sacrifice in this position.
***************
[ It is not advisable for Black to open
the game even more by taking the
White Pawn on c4:
</= 12...dxc4?!,
('?')
13.Qe2!,
{Diagram?}
A nice in-between move ... missed
by many of the players that I showed
this game to. Note that White brings
out the Queen ... and takes full
advantage of the pin and the fact
that Black's Queen on b5 is not
protected in this position.
( Taking with the Pawn is not good: </=
13.bxc4!? Qxc4; 14.Be3 Nd5;
15.Qd2 Qa4; 16.Rfc1 Rb8; "~"
{Diagram?}
and Black could even be slightly
better ("=/+") in this position. )
13...Rd8; 14.Be3! Ng6;
15.bxc4 Qa5; 16.Rfd1,
'±' {Diagram?}
White is clearly much better in this
position. Most notable is the fact
that Black is badly lagging in his
development. Additionally his King
is in the center, it takes at least
two more moves before the second
player can castle from this position.
And the very poor state of Black's
Knights - both of which are on bad
squares - must be taken into
account here. ]
13.Qe2!?,
(Maybe - '!')
{See
the diagram - just below.}
Svidler does not rush, but very
calmly improves his position ... ... ...
develops his Queen, and also
protects the c4-square.
*************************
|
|
*************************
And While this is good for White,
I wonder if the Russian GM might
have actually had
something that
was even better!
***************
[
I prefer to blow the position wide
open and play c4xd5 here:
>/=
13.cxd5! Nxd5;
{Diagram?}
Is this close to being forced
for Black? (Taking with the
pawn allows White many things,
like
a <possible>
later Re1 and
then e5-e6.)
( </= 13...exd5?!; 14.Be3, '±' )
14.Ne4 Rd8!?;
{Diagram?}
One player on the Internet thought
this actually won for Black.
( Maybe 14...Nab4!?; 15.a3!? Nc6; 16.Qc2 Rc8;
17.Bb2!, "+/=" {Diagram?} with a very solid edge for White.
)
15.Nfd2!! Qb8!?;
{Diagram?}
Black targets the e-Pawn
... perhaps thinking it is weak.
(Maybe better was ...Be7.)
( Or 15...Nac7; ('?!') 16.Nc4, '±'
{Diagram?}
and White is clearly better. )
16.Nc4! Ne3!?;
{Diagram?}
Black has a terrible game ... he
may as well try something like this.
17.Bxe3! Rxd1; 18.Rfxd1 Be7;
19.Ned6+ Bxd6; 20.Nxd6+ Kf8;
21.Rac1 Kg8!?; 22.Rc4! Qc7;
{Diagram?}
Black must do something.
( </= 22...f6?; 23.exf6 gxf6; 24.Rg4+ Kf8; 25.Rg6, "+/-" )
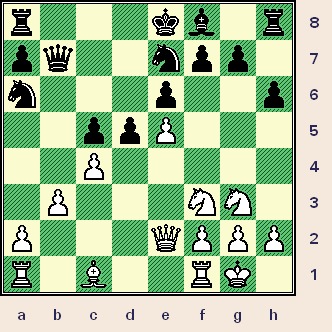
23.Rdc1 Kh7; 24.Bxc5,
'±'
{See
the diagram given below.}
and White probably has won
position here ...
Black cannot
successfully coordinate his forces. ]
***************
*************************
|
|
(Analysis Diagram - in the line above ... just after 24.Bxc5.)
*************************
13...Rd8;
{Diagram?}
I am not sure what Rustemov wishes
to accomplish with this move. I
would suggest ...Ng6
and ...Be7;
in (at least) an attempt to castle
and get his King to safety.
[ Possibly 13...Nb4!?; {Diagram?} here? ]
14.Be3 Nc6;
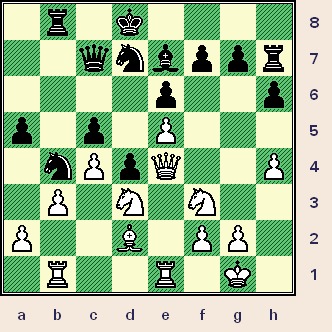
15.Rad1 d4; 16.Bd2 Qc7; 17.Nh5, ('!')
{See the diagram below.}
Now White will have constant threats
to Black's g-pawn, and the second
player
will find it impossible to really
ever finish the development of his
King-side pieces.
*************************
|
|
*************************
This is an interesting position and one that fully merits a diagram here.
[ Interesting was:
17.Qe4!?,
"+/=" {Diagram?}
with also a solid edge for White.
]
17...Nab8;
18.Rfe1 Nd7; 19.Qe4 a5; 20.h4!?, {Diagram?}
This gains space on the King-side
and keeps Black's pieces off the
critical g5-square
(in some lines),
yet I prefer the sharp Qg4 in this
position for White.
I am sure that Svidler saw this
idea, but simply wanted to (first)
prevent Rustemov from
playing
...g7-g5; which could be considered
a minor victory for Black.
[ What looked good for White
the immediate: (>/=)
20.Qg4,
('!') 20...g6; 21.Nf6+!? Nxf6; 22.exf6,
"+/=" {Diagram?}
and White has a solid edge.
]
20...Rb8;
21.Qg4! Rh7?!;
{See the diagram - just below.}
To me this is clearly a dubious idea,
a Rook on h7 will be out of play
for
a very long time. (Maybe just - '?')
*************************
|
|
*************************
While Black avoids the weakening of
his Pawn structure with this move,
Black will never castle
K-side.
(Rustemov also never finds a good
method to introduce this Rook into
the game.)
***************
[
Variation # 21B1.)
Also bad for Black was:
21...Ndxe5?!;
{Diagram?}
Incorrect, according to principles
of defense. (The player who
is
worse usually seeks to avoid the
opening of more lines!)
22.Nxe5 Nxe5;
23.Qg3! f6; {Diagram?}
This has got to be forced.
( </= 23...Bd6??; 24.Qxg7, "+/-" )
24.f4 Nc6;
25.Qg6+! Qf7; 26.Rxe6+ Ne7; 27.Qf5!,
'±' {Diagram?}
White is clearly better, Black
can move almost nothing here.
********************************************************
Variation # 21B2.)
Maybe Black had to bite the bullet
and play the following continuation:
(>/=)
21...g6!?; 22.Nf4! Bg7;
23.Nd3, "+/=" {Diagram?}
and although Black's position is
not pretty, the second player is
not yet
completely busted. ]
***************
22.Nf4 Kd8!?;
(Probably - '?!')
{Diagram?}
This looks terrible. (And UN-natural.)
[ Maybe (>/=) 22...Rh8!?; 23.Nd3, '±' ]
23.Nd3 Be7;
24.Rb1 Nb4; 25.Qe4,
{See
the diagram ... just below.}
Svidler is practically daring his
opponent to capture some material,
and thus open more lines.
Note that White gains a tempo off
the Rook which should have never
been placed on this
square to begin
with! (opinion)
[ Or
25.Bxb4 axb4;
26.Ra1, '±' {Diagram?}
and White is much better. ]
*************************
|
|
*************************
25...Rh8;
26.a3!?, {See
the diagram just below.}
Immediately evicting the intruder,
with quite a bit of advantage.
*************************
|
|
*************************
And while this was very, very good
for White, ... Svidler had almost a small
host of different
ways to play this
particular position.
[ Another idea was to play: (>/=
?)
26.Nc1!? Kc8; 27.a3 Nc6;
28.Nd3, '±' {Diagram?}
to prevent Black from exchanging
any pieces here. ]
26...Nxd3; 27.Qxd3 Ke8!?; {Diagram?}
This is practically admitting that the idea to run to the Queen-side was a complete failure.
[ Even worse
was the following continuation:
</=
27...g5?;
28.hxg5 hxg5; 29.Bxg5 Rh5; 30.Bf4,
"+/-" {Diagram?}
and all Black has managed to
do is drop a Pawn. ]
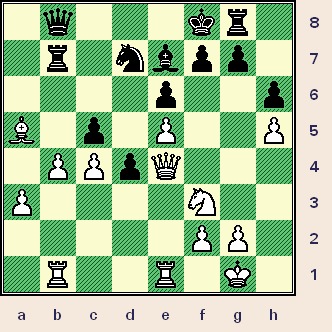
28.h5! Rb7!?;
29.Qe4 Kf8?; {See
the diagram, just below.}
This mistake (or blunder) was almost
assuredly the result of severe problems
with the chess
clock. (Otherwise I cannot
rationally explain how a high-rated
player makes such a horrible oversight!)
*************************
|
|
*************************
Black's position is truly hideous to behold after ...Kf8? (See the diagram just above)
[ Black simply had to play:
>/= 29...Rb8;
{Diagram?}
here in this position.
But after a simple move like:
30.Red1,
'±' {Diagram?}
Black will probably
lose his d-pawn sooner or later. ]
30.Bxa5! Qb8!?;
{Diagram?}
A retreat to this square - or c8 -
was almost certainly forced.
[ </= 30...Qxa5??; 31.Qxb7, "+/-" ]
31.b4! Rg8?;
{See
the diagram just below.}
Another blunder, probably caused by
the lack of cogitation time as well.
*************************
|
|
(The position immediately after 31...Rg8?)
*************************
[ The only move was >/= 31...Qc8. {Box.} ]
32.bxc5!, ("+/-") {Diagram?} Black --- RESIGNS.
It would not be correct for Black
to continue now.
The second player's position is definitely hopeless, and I
am sure that a player of Rustemov's
caliber perceived this right away.
A marvelous game by Svidler
... he
made a relatively quick defeat of a
near 2600-player look
almost easy
and routine. A real masterpiece of
chess strategy here.
*****************************
Copyright
(c) A.J. Goldsby, 2003.
( I used some material from an opening
repertoire that I finished last year. )
Copyright
(©) A.J. Goldsby, 2005.
(All rights reserved.)
***********
All games - HTML code (originally)
.................
Generated
with the
program,
ChessBase 8.0.
All diagrams on this page were generated with the program, Chess Captor, 2.25, or ChessBase 8.0.