Peter
Svidler (2723) - Alexander Morozevich (2679)
|
|
|
***************
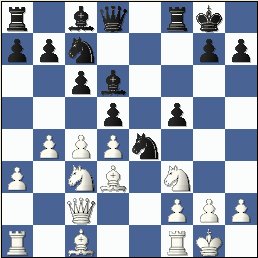
(r1bq1rk1/ppn3pp/2pb4/3p1p2/1PPPn3/P1NB1N2/2Q2PPP/R1B2RK1 b - 12)
N. Gaprindashvilli (first) played it in a (ladies) Soviet Championship in 1973, and won quickly.
White gains some nice space on the Queenside.
[ A standard reference instead gives
the following continuation:
12.c5 Be7;
13.Ne2 Ne6; 14.b4 Bf6; 15.Bb2 a6!?;
{Diagram?}
To prevent b5.
( RR 15...Bd7!?; "~")
16.a4 g6;
17.Ne5, "+/=" {Diagram?}
White is just a little better.
(According to MCO, anyway.)
Kasputin - Kuzenkov; Correspondence, 1986.
[ See MCO-14; page # 96, col. # 5, and note # (s.). ] ]
12...a5!,
The most challenging move by
Morozevich ... who clearly wants
a fight.
[ After the continuation:
12...Nxc3;
13.Qxc3 dxc4; 14.Bxc4+ Be6; 15.Re1,
"~" {Diagram?}
White maintains an annoying
initiative, and Black really misses
his light-squared
Bishop. But
it is not clear if White would have
enough to win the game.
*******
Or Black could try:
12...Bd7; 13.Bb2, Ng5; 14.Ne5, Bxe5; 15.dxe5,
f4;
16.f3, Kh8; 17.Rfd1,
Qe8; as in the game:
GM Peter Leko - GM Alexander Morozevich; Dortmund, GER; 2002. ]
13.b5!, {Diagram?}
(TN?)
The most thematic move here. (Working on the base of Black's
pawn chain.)
"An interesting novelty." - GM Alexander Baburin and V. Barsky.
The above authors go on to comment that Morozevich had studied this position very carefully at home ... but had difficulty recalling all of his analyses. Apparently even Super-GM's are human!
[ Also possible was:
13.c5 Be7;
14.bxa5, "+/=" {Diagram?}
and White is a shade better.
]
13...Bd7;
Black develops a piece and gets
ready to connect his Rooks.
This looks like a very tame reaction by Morozevich. Both the moves ...Nxc3 and ...Qf6 were to be considered here.
*******
[ After the continuation of:
13...Nxc3!?;
14.Qxc3 dxc4; 15.Bxc4+ Nd5;
16.bxc6 bxc6;
17.Re1, "+/=" {Diagram?}
White is a tad better, but is it
enough for a tangible advantage?
***
Maybe Black could try: 13...Qf6!?;
14.Re1, "+/=" {Diagram?}
but White is still a little better.
***
It was not wise for Black to play the continuation:
</= 13...cxb5?!; 14.c5 Be7;
15.Nxb5, "+/=" {Diagram?}
and White is clearly better.
- GM Robert Byrne ]
*******
14.Rb1!?,
White must have had at least
five different moves that looked
promising. While this does give White a small advantage, I am not
convinced it is the very best move
at this particular point.
An interesting note is that we are already out of the 'book' on this line - which is pretty amazing for GM chess in the year 2003.
********
[
Also good were:
# 1.)
14.bxc6 bxc6;
15.c5, "+/=" {Diagram?}
with a small edge to White.
Or # 2.)
14.c5 Be7;
15.Na4!?, "+/=" {Diagram?}
and again White is better.
( Is 15.a4!?, "~" {Diagram?} possible here? )
Or maybe the best line was:
# 3.)
>/=
14.b6! Ne6!?; {Diagram?}
Other squares seem worse.
( I.e., </= 14...Na6?!; 15.c5 Be7; 16.Ne5,
"+/=" {Diagram?}
and White is clearly better. )
15.cxd5 cxd5;
16.Nxd5, "+/=" {Diagram?}
and White is very clearly better
in this particular position. ('±' ?) ]
*******
14...Kh8;
This is not exciting nor attractive,
but the alternatives may have
been even worse.
*******
[ After the moves:
</=
14...cxb5!?; 15.c5! Be7;
16.Nxb5,
16...Nxb5; 17.Bxb5,
"+/=" (Maybe - '±')
{Diagram?}
... White is clearly better.
***
Black might should consider:
14...Nxc3!?;
15.Qxc3 cxb5; 16.cxb5 b6;
"~" {Diagram?}
and while Black may not have
completely equalized, he may be
better off than he was in the
actual game. ]
*******
White now finds a way to change
the pawn structure an try to keep
Black in a passive mode for a very
long time.
15.c5! Be7; 16.bxc6 bxc6; 17.Bf4!?,
Svidler must have determined that
this was the most active approach. (Again - Na4, "+/=" looked good here.)
[ Another approach was:
17.Re1 Ne6;
18.Ne2 Qc7;
19.Bd2 Rfb8;
20.Qa4, "+/=" {Diagram?}
with a small - but solid - advantage
for White in this position. ]
Black now re-deploys the Knight ... which had been on a6 (for Black) on move nine.
17...Ne6; 18.Be5,
"The opening has gone well for White, who has a strong Bishop on
e5 and control over the open b-file. As Svidler said, if in this line Black doesn't check-mate (White)
on the King-side, he has serious positional problems." - GM Alexander Baburin and
V. Barsky.
18...Be8!?,
Obviously Black wants a full-fledged
brawl ... and is not content to simply
trade pieces here. (Does Black plan
the maneuver, ...Be8-h5?)
[ Maybe 18...Bf6;
{Diagram?}
was worth a try in this position?
(Or even on the following move?)
]
19.Rb6,
Preventing ..Bh5. Possibly Svidler
is preparing to double on the file, as well.
The drawback to this move is that in some lines Black might play something like ...Bd8. (After Alex moves his Queen, of course.)
*******
[ Not
</=
19.Ne1?! Bf6!; "~" {Diagram?}
Maybe a little better for Black?;
***
Also good for White was the
very simple: 19.Rfe1,
"+/=" {D?}
and the first player holds a small,
(but obvious); advantage here. ]
*******
Now it looks like Black is preparing
the move, ...Bishop-to-d8; but
possibly changes
his mind. (This is usually a sign that something has gone wrong - when a player starts
constantly changing his plan.)
19...Qc8!?; 20.Nd2,
White is probably preparing to try
and evict the horseman on e4 ... doubling on the b-file looked
good as well.
[ The natural 20.Rfb1!, "+/=" was certainly worthy of deep and careful consideration. ]
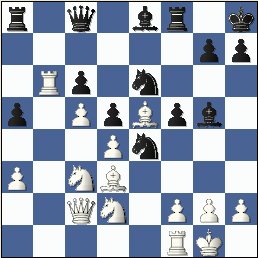
20...Bg5!;
{See the diagram just below.}
Black seems on the verge of
untangling his pieces.
***************
|
|
***************
(r1q1br1k/6pp/1Rp1n3/p1PpBpb1/3Pn3/P1NB4/2QN1PPP/5RK1 w - 21)
The game will soon reach a crisis
point. The depth of the tactics both
sides now
unleash
will peg the meter ... right off the end of the scale!!!
Here f4, ("+/=") comes under consideration,
but "Peter, the Wolf" has an entirely
different strategy worked out. (And
after Nb3, Black should {again} have
considered ...Bd8.
OR! - even
some other move - than what was
actually played.)
[
It is not advisable for Black to play the continuation:
</= 20...Bd8!?;
('?!') 21.Na4!
Bxb6?; 22.cxb6,
"+/=" {Diagram?}
... "and the far-advanced
b-pawn is worth its weight in gold." {compensation}
- GM
Robert Byrne. ]
21.Nb3 Bh5!?;
Playing for piece activity.
"Here 21...a4!? was worth considering." - GM Alexander Baburin and V. Barsky.
[
The continuation of:
21...Nf4!?; 22.Na4!? Nxd3;
23.Qxd3 f4; 24.f3 Nf6; 25.Qc3 Nd7!?;
26.Bd6 Rf7; 27.Nxa5,
"+/=" {Diagram?}
... "puts Svidler a pawn
ahead with a solid grip on the position."
- GM
Robert Byrne. ]
22.a4,
(Maybe - '!?/?!') {Diagram?}
I guess this has been Svidler's plan
all along. (Basically transfer his all
his pieces to the Q-side to take
advantage of the weak squares
there, and the fact that Morozevich
- due to his limited mobility - has
difficulty in following suit.)
But Svidler misses a very nice tactic ... that is fairly well-hidden in this position, and one that would have given him a definite advantage.
***************
[ The best line for White definitely began with Na4! here. For example:
>/= 22.Na4! Bg6!?; {Diagram?} Seemingly the most solid try.
(Also possible was: 22...Nf4!?; {Diagram?}
but White still plays f3 with a
healthy advantage.)
23.f3! Nf6!?; 24.f4! Bh6;
25.Qc3!?, "+/=" {Diagram?}
and it does not appear that
Black can prevent the eventual
loss of his QRP here. ('±' ?)
(The move 25.Bd6!?, {Diagram?} also merited attention, and may
lead to a fair
advantage for White.);
***
It is also possible that the truly
simple, but elegant move:
22.Rb1!?,
"~" {Diagram?}
will yield White a very small edge. ]
***************
Now Black should play ...Bd8;
or even ...Nf4. (I am not really
sure what the logic behind Black's
next move.)
22...Qe8?!; (Probably - '?')
{Diagram?}
I guess Morozevich either did not
sense the danger ... or simply
assumed that he was worse - no
matter what line he played at this
point of this critical chess contest.
(Or perhaps he was counting on a
surprise tactic {against e5} to give
him the advantage here?)
It seems that Black had to play ...Bd8! at this juncture of the game. I am sure that unless he was already in time pressure, he saw this move. But your guess is as good as mine as to what line that he envisioned in his mind's eye, that steered him away from the correct move here. (He may have not liked the idea of White having a far-advanced, passed Pawn on the b6-square.)
*******
[ After the continuation:
</=
22...Bf4!?; 23.Bxf4 Nxf4;
24.f3 Nxd3; 25.Qxd3, "+/=" {Diagram?}
White also gains a (small) edge.
***
The best line was: >/=
22...Bd8!; 23.f3!? Bxb6;
{Diagram?}
This
could be best.
(
Instead, Black could try: 23...N4xc5; 24.dxc5 Nxc5; 25.Nxc5
Bxb6;
26.Ne2 Rf7; 27.Nf4 Qe8; 28.Bd4, "+/=" {Diagram?}
White maintains "the upper hand." - GM Robert Byrne.
)
24.cxb6, "~" {Diagram?}
with a radical and very unbalanced
position for both sides. {Unclear?} ]
*******
Now its fun to play White, three
completely different ideas/moves
seem to yield the first player an
advantage in this position.
[ # 1.) Nd1 - so the Knight on e4
cannot be exchanged - followed by
f3. And ... # 2.) Simply
Rb1. ]
23.f3!?,
Good enough ... for at least a small
advantage for White. The main idea
now is if Black plays the passive
...Knight/e4-to-f6; White simply plays
Bishop-takes-Pawn on f5 ... ... ...
with a tremendous position.
*******
[ Was
>/=
23.Nd1!?, "+/=" {Diagram?}
was better than the game?
(I think so. Why allow Black to
exchange his Knight on e4?);
***
The move: >/=
23.Ba6, "+/=" {Diagram?}
also could be a small improvement
over the game.
For example, (after Ba6 by White):
23...Ra7;
24.f3 Nxc3; 25.Qxc3 Qa8; 26.Bd3 Be3+;
27.Kh1 f4;
28.Rb1, "+/=" (Maybe - '±') {Diagram?}
and White is definitely better. ]
*******
23...N6xc5!?;
This looks good ... but is it really
the absolute best move for Black
in this particular position?
"Black tries to solve his problems tactically." - GM A.
Baburin and V. Barsky.
(They recommend that Black try 23...Nxc3;
24.Qxc3 Nf4; 25.Re1.)
***************
[ I am almost sure that the best
continuation is: >/=
23...N4xc5!!; {Diagram?}
Black obviously could have inverted
the order of his first two moves in
this
particular line.
24.dxc5,
{Diagram?}
This could be best.
( Alternatively: 24.Nxc5 Nxc5; 25.Re1 Ne6;
26.Nxd5!, "+/=" {Diagram?} and White is a little better. )
24...Be3+!;
25.Kh1 Nxc5;
{Diagram?}
The correct follow-up. (Black
has a discovered attack on the
Bishop on e5.)
(Not </= 25...Bxc5?; 26.Rb7, '±')
26.Bd4!? Bxd4;
27.Nxd4 Qe3!; "~" {Diagram?}
and Morozevich has reached a
kind of dynamic equilibrium. ("=")
{Black will certainly regain his
lost piece.}
***
After the moves:
23...Nxc3; ('?!') 24.Qxc3,
'±' ("+/") {Diagram?}
Black's a-pawn appears to be lost
no matter what move Morozevich
plays in this position.
***
Also possible was: 23...Be3+!?;
24.Kh1 N4xc5; 25.Nxc5 Nxc5;
26.Bxf5 Nd7; 27.Bxd7 Qxd7;
28.Nd1, '±' ("+/") {Diagram?}
but White looks to be clearly better
in this position.
(Variation by -
GM R. Byrne.) ]
***************
GM Alexander Baburin and V. Barsky award White's next move an exclam.
24.Nxe4!?, (Maybe - '!')
Other than simply going for shock
value ... and MASSIVE complications,
I am not sure what this move really
does for Svidler. (The position is so
complicated, even Deep Blue might
get lost in the thickets of different
lines and variations!! And even after
5-10 minutes of machine time, several
different programs give vastly differing
and conflicting evaluations of the
various key positions!)
*******
[ After the continuation of:
24.fxe4!? Nd7;
25.Ra6 Nxe5; 26.dxe5 fxe4;
27.Rxf8+!? Qxf8;
28.Rxa8 Qxa8; 29.Be2 Qa7+;
"~" {Diagram?}
Black seems to have good play.
(Maybe "<=>")
It is NOT clear whether this is really
preferable to what was played in the
actual game, or not! (I would have
been tempted to try it, if Black makes
an error, the extra piece will probably
come in handy!);
***
Also to be considered was the
fairly simple continuation of:
24.Nxc5!? Nxc5;
25.Re1!, "+/=" {Diagram?}
when I think White is just a little
better in this position. ]
*******
24...Nxe4?;
Black, nearly lost in a vast sea ... an endless morass of fathomless
choices ... (almost understandably) - goes astray.
[ It seems that Black had to play:
>/= 24...fxe4
[]; 25.Nxc5 exd3;
26.Qxd3,
"+/=" (Maybe - '±') {Diagram?}
but White remains with a fairly
solid edge in this position.
"The position remains
difficult for Black." - Baburin and Barsky. ]
25.Rb7!?,
Good enough for a large advantage
for White. (25.g4!? was also worth
a look as well.)
GM A. Baburin and V. Barsky give this move an exclam here.
[ I would have (probably) injected
Re1 first ... for example:
25.Re1 Bh4;
26.Rb1, "+/=" {Diagram?}
and White is clearly better.
(Maybe - '±');
***
The move: 25.fxe4,
'±' ("+/") {Diagram?}
immediately - - - almost
certainly gives White a large
advantage as well. ]
25...Bf6!?; (Maybe - '?!')
I think Black already made the
decision NOT to withdraw his Knight
from e4.
[ It looked like Black had to retreat
his Knight (back to f6), but after
the relatively simple moves:
>/=
25...Nf6!?;
26.f4 Bh6; 27.Bxf5,
"±" {Diag?}
(and) White is clearly better.
("+/") ]
The next series of moves looks to
be relatively forced.
(Although getting
the Rooks off the board - for Black -
at move 30 was a consideration.)
26.fxe4 Bxe5; 27.dxe5!? fxe4;
28.Rxf8+ Qxf8; 29.Be2 Bxe2;
30.Qxe2 Qf5!?; {Diagram?}
"If Black could keep the Queens on, he would have had decent
compensation. Unfortunately for him, White can now force the
exchange." - GM Alexander Baburin and V. Barsky.
GM A. Baburin and V. Barsky award White's next move a full exclamation
point.
31.Qf2!?, (Maybe
- '!') {Diagram?}
Maybe good enough. But NxP/a5
and having the White Rook
run down the Black c-Pawn first ... could have been better.
[ Maybe
>/=
31.Rc7!, "+/="
instead? {Diagram?}
(White is clearly much better here.)
]
31...Qxe5; 32.Qg3, ('!')
{Diagram?}
This forces the exchange of the
Queens, after which Black's Pawns don't look so impressive.
[ </= 32.h3 e3!; "=/+"
Or = 32.Qc5!? Qb2; 33.h3!, "+/=" ]
32...Qxg3;
This is completely forced.
[ Definitely NOT:
</= 32...Qf6??;
33.Rb8+, ("+/-") {Diagram?}
and Black loses. ]
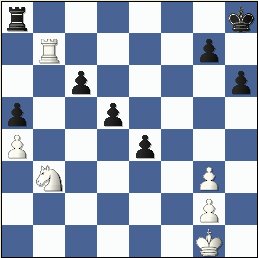
33.hxg3 h6;
{See the diagram - just below.}
White threatened Nxa5, and if
the Rook captures the N on a5,
Rb8 would have been mate ... so the King needed an escape hatch.
***************
|
|
***************
(r6k/1R4p1/2p4p/p2p4/P3p3/1N4P1/6P1/6K1 w - 34)
Its time to try and evaluate this endgame. "Who stands better?"
Material is equal - Black has three connected and passed pawns for the lost Horseman. And White's remaining pawns are doubled. But the real story here is that all of White's pieces are much better placed than their counterparts. So with correct play, White should win.
34.Kf2!,
A good practical decision. Once
White's King has been activated, Black's cause is nearly hopeless.
"Black's passed pawns are not going anywhere now, and the rest is clear." - GM Alexander Baburin and V. Barsky.
[ 34.Rb6!?, '±' ]
In the final phase of this game, poor Morozevich desperately tries to whip up some counterplay, but Svidler's technique really gives Black absolutely no chance.
34...Rf8+; 35.Ke2! Rf6;
36.Nxa5 Rg6; 37.Kf2 Rf6+; 38.Ke1! e3!?;
39.Re7! d4; 40.Nb3 c5; 41.a5!?, (Maybe - '!')
{Diagram?}
Aiming for an exciting finish.
[ Or 41.Nxc5!? Rc6; 42.Re5, "+/-" ]
Now Black will pick off the remainder
of White's cripples on the King-side ... but it does him little good.
41...Ra6; 42.Ke2! Rg6!?; 43.Nxc5 Rxg3; 44.a6 Rxg2+;
45.Kd3 Rd2+; 46.Kc4 Kh7; 47.a7! Ra2; 48.Kb5! d3; 49.Na6!, ("+/-")
Black Resigns. (1-0)
(If ...d2; then 50.a8{=Q}, and if 50...d1{=Q}; ... now 51.Qe4+, and Black is mated.)
Perhaps one of the most complicated
and interesting games of the entire
year. It was also the critical game that
{eventually} landed GM P. Svidler his FOURTH Soviet/Russian Championship!!
(A feat that has NO parallel in post-Soviet {chess} history!)
*************************
Copyright (c) A.J. Goldsby I. Copyright (c) A.J.G; 2003
*************************