All
the |
(Navigation bar
directly below.)
*******
© A.J. Goldsby, 2015.
(All rights reserved.)
****************
Click HERE
to see my
Chess Items.
****************
![]()
****************
Buy a book
from Amazon.com
(And help me out as well!)
****************
Click HERE
...
to see a list of the businesses that help to sponsor all of
my chess efforts.
|
|
|---|

![]()
![]()
![]()
Endgames Lessons and Challenges
This is a page designed to teach you and entertain you.
Hopefully/eventually I will have a few examples of just about all of the basic endgames. These positions will range from the fairly easy to the VERY difficult! I hope to eventually cover ALL types of endings here. When this page is finished, I hope to have something to teach the average player (for sure) ... and perhaps even something that is extremely complex that might baffle even a Master. (Maybe, maybe not.) I also plan to delve into my library a little and try to show you a lot of different ideas. I made a list, and I have identified OVER 60 books that I could pull problems from!! So stay tuned!
You will definitely need a board and set to follow this page!
I also plan to have dozens of pages like this, all connected to my "Training Page." The vision I had when I started this project was to have a page that would help you to determine basically how much time you were going to train and to select the training program that was right for you. Then you could go to a separate page to see problems to study and solve.
***
(See my "Chess Archives" Page for a site where you can download - for free! - problems to study. Or whole books converted to electronic format that you can download and then read on your computer!!)
***
ALL
MY STUDENTS NOTE:
The first few endgames on this page
are required study.
***
(When I get done, I plan to have one of each of all the basic types of endings here. Learning these endings thoroughly will be a necessary FIRST STEP for any person wishing to take lessons from me. If you are even planning on taking lessons from me, you should go over every one of these endings 2-3 times with a board and set!)
***
You should also go ahead and purchase: "Winning Chess Endings," by GM Y. Seirawan.
Even though I have just started this, (as of late Dec. 2001); you should definitely check out MY ENDGAME SCHOOL. I started with Rook-and-Pawn endgames, probably because these are the most common, some of the most difficult, and easily some of the least understood end-games ... at least among average players!
Eventually ... if I get the time and resources, I plan on having this as the largest and best single source of endgame instruction available on-line!! So stay tuned!
____________________________________________________________
(1) K + P Endgame Course - King & Pawn
Endings
Position # A (1),
29.12.1999
[A.J.G.]
MODEL ENDGAME
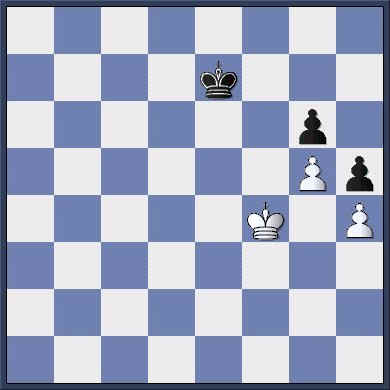
(A simple K+P endgame. White to move and win.)
***
(Position check - White King at f4; White Pawns at h4 and g5.
Black King at e7; Black Pawns at g6 and h5.)
***
This endgame has
all the features of basic King and Pawn
endings.
WHITE to move and win.
***
(May
11, 2001. My apologies to all the people - about 2 dozen -
who tried to solve or analyze the WRONG initial position!)
***
(It
is original, as far as I know. I composed this ending to be very simple and
basic, but
yet cover as many of the fundamental principles of King and Pawn
endings as possible.)
***
This
one endgame position covers all of the following fundamental K+P concepts:
All the different types of opposition, better king position, outflanking/bypassing,
squeeze-play, pawn promotion, space advantage, weak square(s), etc.
Careful study of this one
example will help you to master King and Pawn Endings.
1. Ke5!,
The vertical (on a file) Opposition.
[
Not 1. Ke4?? Ke6; 2. Kf4 Kd5; 3. Ke3 Ke5; 4. Kf3 Kf5;
5. Kg3 Ke4; 6. Kg2 Kf4; 7. Kh3 Kf3; 8. Kh2 Kg4; and Black wins. ]
1...Kf7; The Black King must stay as close to his pawns as possible.
[Not 1...Kd7??; 2. Kf6, and the White King gobbles up all the pawns.]
2. Kd6!, Outflanking.
[ 2. Kd5 Ke7; 3. Ke5 Kf7; just repeats the position. ]
2...Kf8; Diagonal opposition.
3. Ke6 Kg8; 4.Kf6 Kh7; 5. Kf7, Lateral or horizontal (on a rank), opposition.
Note that Black cannot play ...Kh6; because that square is controlled by the
pawn.
If the g-pawn were on g3, instead of g5 as here, the position would be a
draw!
---> [Space advantage.]
[ 5. Ke6 Kg8; 6. Ke7 Kg7; 7. Ke6 Kg8; and White is not making progress. ]
5...Kh8; 6. Kxg6 Kg8; 7. Kxh5, White wins easily.
I.e. 7...Kg7; 8. Kg4 Kg6; 9. h5+ Kg7; 10. Kf5 Kf7; 11. h6 Kf8;
12. Kf6 Kg8; 13. g6 Kh8; Now there is a trap here, so watch out!
White must beware of 14. h7?? This would be a draw. Stalemate!
14. g7+ Kg8; 15. h7+!,
Sacrifice.
White needs only to promote 1 (one) pawn to win!
15...Kxh7; 16. Kf7, This is Pandolfini's "Squeeze Play."
16...Kh6; 17. g8Q Kh5;
18. Qg3!,
A nice move.
White cuts off the Black King's escape and forces him back to the White King
where White can enforce checkmate.
18...Kh6; The only move. 19.Qg6#
1-0
(HTML page initially generated with ChessBase
8.0.
Click HERE
to go to the ChessBase web site.)
(25)
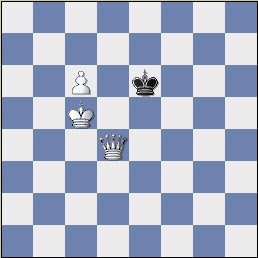
Winning Chess Endings - King and Pawns vs. K & P(s)
Chapter Two; Diagram # 37 (2.13), 15.03.2000
[A.J.G.]
***
A slightly more difficult example than the one above.
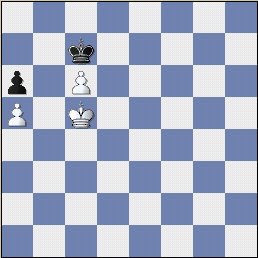
(White to move and win.)
***
White
to move and win.
(Exercise in triangulation.)
***
(Originally
I had written: "I
am not sure if the above position is an actual position,
{from a game} or if it is
a composed end-game study."
I had also written any interested parties could contact
me with the correct info.)
***
So a reader/web-surfer sent in the following info: (May 11, 2001.)
<<
The second problem,
(White pawns at a5 and c6, King at c5; Black pawn at a6, King at c7. White to
move.)
comes from the game H. Fahrni - S. Alapin, 1917;
according to the book, "The Secrets of Pawn Endings." >> [By which author(s)?]
***
My
own research into my library found that this is position # 19 on page #
11,
of the book, "Pawn Endings," by Y. Averbakh and I. Maizelis.
(They do not give who the players are, nor do they credit the source.)
***
Knowing the name of the contestants allowed me to verify game position.
This
is position # 1027 in the book,
"The Encyclopedia of Chess Endings."
(King and Pawn.)
The contestants were indeed H. Fahrni (as White) and S. Alapin. (as Black)
***
I
also attempted to find this game in my database. I pulled up all the games by
Simon Alapin.
The computer found well over 400 games stretching from the year
1875 to the early 1920's.
(Seymon Zinnovievich Alapin was born in 1856 and died in 1923, according to the "Oxford's Companion To Chess." The book I have is by David Hooper and Kenneth Whyld, hard-back cover edition. © 1992. They also list the player, Hans Fahrni who was a Swiss player born in Prague. He lived from 1874 to 1939.)
From the over 400 games of Alapin's, I could not find the game between that player and Fahrni. Then I pulled up all the games of Fahrni's. Over 120 examples. The only game that occurred between him and Alapin was Karlsbad, (Carlsbad) 1911. It ended in a draw after more than 80 moves.
So
now I have another request. Can anyone send me the actual score of the above
game that results in
this position that is given above? Maybe someone could send
me the cross-table of the event also.
***
[Also]
From
the book "Winning Chess Endings," by Y.
Seirawan.
(page # 31, diagram # 37.)
***
I
want students to note I first saw this endgame position over 30 years ago.
It
did not originate with Seirawan. I have also shown this position to MANY
Master
and Experts, MOST of whom have failed to solve this position correctly.
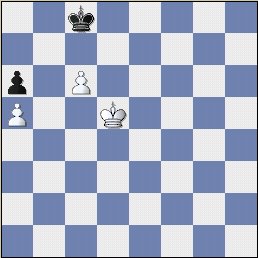
1. Kd5!, Kc8!;

(The position after 1...Kc8!)
Its
WHITE to move. The goal is for White to create the EXACT, same position
as we
have now; but with BLACK to move!
[
1...Kd8; ('?') 2. Kd6 Kc8; (2...Ke8?; 3. c7; and the pawn
promotes.)
3. c7 Kb7; 4. Kd7, and White wins ... as he promotes his Pawn. ]
2. Kd4!!,
[ Not 2. Kd6 Kd8; 3. c7+? Kc8; 4. Kc6, ("=") which blows the win. (Its a stalemate.) ]
2...Kd8;
[ 2...Kc7?; 3. Kc5 Kc8; 4. Kb6, wins for White. ]
3. Kc4! Kc8; 4. Kd5,
(The position after 4. Kd5.)
The same position as earlier, but it is Black to move!
4...Kc7; 5. Kc5! Kc8; 6. Kb6 Kb8; 7. Kxa6 Kc7; 8. Kb5 Kc8; 9. a6,
There are several ways to win now.
[
9. Kb6 Kb8; 10. a6 Ka8; 11. Kc7!,
(
Not 11.c7?? which is stalemate. ) 11...Ka7; 12. Kd7 also wins.
]
9...Kb8; 10. Kc5 Kc7;
[
A sneaky try is: 10...Kc8; 11. a7 Kc7; 12. a8Q?? Stalemate!!
(12. Kb5 Kd8; 13. a8Q+ wins.) ]
11.a7,
{Diagram?}
Now white has an easy win.
11...Kd8;
{Diagram?}
There's not much Black can do here.
[ 11...Kc8; ('?') 12. a8Q+ Kc7; 13. Qb7+ Kd8; 14. Qd7#]
12. a8Q+ Ke7; 13. Qa4 Ke6; 14. Qd4, "+/-" {See the diagram, just below.}
and White will win. (Easily!) 1 - 0
(HTML page initially generated with ChessBase 8.0. Click HERE to go to the ChessBase web site.)
A new look ... at this particular endgame.
HERE is a lesson that I did (on another website ... It's called "The World Chess Academy.") on K+P endgames ... it was voted as the best (on-line) endgame lesson of that year by that State's Chess Organization. (My lessons and annotated games there - on that website) are also very good! Many thanks to Dan Thomasson for his support ... over the years! Many people have said that the games and lessons on his website was some of my best work!)
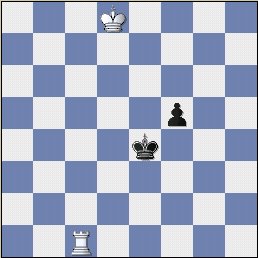
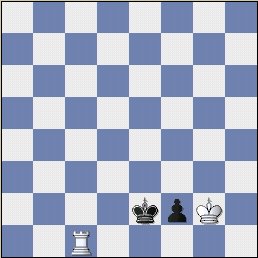
(1) Basic Endgame Course - King & Rook vs. King &
Pawn
Position # 1 (1a), 10.02.2000
[A.J.G.]
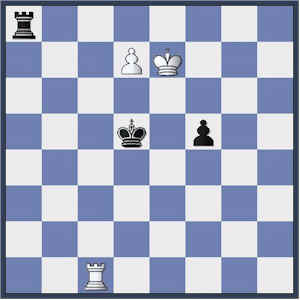
(White to move.)
***
(Position check: White - Ke7, Pd7, Rc1. Black - Kd5, Pf5, Ra8)
***
(WARNING! Its not as easy as it looks.)
***
Basic Endgame Course, Essential Knowledge; K+R vs. K+P, Position #1.
***
Click HERE to see this ending in a java-script re-play format!!
***
(
Cross-reference GM Yasser Seirawan's Book, "Winning Chess
Endings."
Chap. # 4; 'Rook Endings.' Especially study the section that begins
on page 66. )
***
This is an actual excerpt from one of Max Euwe's games. (Euwe is a former World Champion.) Max was White. Knowing how to deal with a King and Pawn when you have only a King and Rook is a basic endgame for Student's of the game to learn. Witness the following example.
"White to move and win."
1. d8Q+,
***
[ Start of sub-variation. Sometimes its easy to assume when you are studying the games of a GM, especially when the games are that of a former World Champion, (!!!); that the great player always made the best move. But that is NOT the best teaching method. I was teaching this position (Sat, Apr. 28; 2001) to one of my local chess students, (Daniel Schindler); and he asked, " Why not play the Rook to last rank and then just promote the White Pawn?"
Indeed. Why not? So: 1. Rc8?, (Maybe - '??')
{Analysis Diagram after 1. Rf1.}
This
move looks very plausible,
for if Black now plays 1...RxR/f1??; then
2. PxR/f1=Q, wins easily for White. Unfortunately the move is an error.
Notice also that White just
REMOVED
his Rook from controlling the (all-important) promotion square
and it will now require an extra
move to place the White Rook [again] in a position to where it can capture the
Black Pawn if it promotes!
1...Ra7[]; [Box, or only move.] 2. Ke8 Rxd7; 3. Kxd7,
and
now it is BLACK to move. Simple counting shows it takes 5 (FIVE) moves
for Black to get to his IDEAL position.
(The ideal position for Black = King on the 7th rank, {8th?} protecting and supporting the Pawn; and the Pawn should be on the 7th rank ready to promote. The ideal position for White is on the 7th rank - on the OPPOSITE side of the pawn from Black's King; and his Rook should be controlling the Pawn's Promotion Square. Ideally the best place for the Rook to control the promotion square is from BEHIND the Pawn!)
Counting shows it takes White 6 (SIX) moves also (using the most direct path) to get to his IDEAL position. But Black can also [possibly] interfere with the White King's advance. Since White is at least one move behind on the count and ... since Black moves FIRST - this would make the game a draw.
3...f4; 4. Rf8,
***
(
OR: {Two possible alternatives are -}
Var. # 1.) 4. Ke7, Ke4;
5. Kf6, f3; 6. Kg5, f2; 7. Rf8, Ke3;
8. Kg4, Ke2; 9. Kg3, f1Q; 10. Rxf1, Kxf1; draw.
***
Var. # 2.) Many of my students think
it is a simple matter to win by cutting the Black King
off from his Pawn,
(By using the Rook to keep the King and Pawn separated by one file.);
but this is
not sufficient either.
4. Re8, Kd4; 5. Kd6, f3;
6. Re7, Kd3; 7. Kd5, f2; 8. Rf7, Ke2;
(See the diagram just below.)
{Analysis Diagram.}
and again it is a drawn position. )
***
4...Ke4!;
Black must not lose time!
5.
Ke6, f3;
Now notice the position of Black's King is INTERFERING with White's
King in the pursuit of the Black Pawn. White's most direct path is K-f5-g4-g3-g2.
But he is prevented from going to c4 by Black's King.
6. Kf6, f2; 7. Kg5, Ke3; 8. Kg4, Ke2;

{Analysis Diagram.}
and the game is a draw. THE PROOF? 9. Kg3,
(
Or: 9. Re8+,
Kd2; 10. Rf8!, (10. Kg3??, f1=Q wins for Black.)
10...Ke2; 11. Re8+, Kd2; 12. Rf8, Ke1; 13. Kg3,
White tires of the perpetual check. 13...f1=(Q); 14.
Rxf1+ Kxf1; Draw. )
9...f1Q;
10. Rxf1, Kxf1; (The position is equal, "=".)
Just two Kings left on the board is as drawn as a
position gets!
End of sub-variation. ]
***
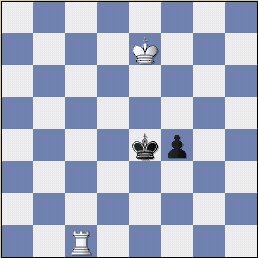
1...Rxd8; 2. Kxd8, Ke4;
(The position after 2...Ke4.)
***
The
first thing to note is we now have the position that I desired to teach you
about:
A King and a Rook, vs. a King and a Pawn.
The second thing to note is that these positions usually arise from an ending where both sides have a King, Rook, and one or more Pawns. This type of ending, [K+R vs. K+P] normally will appear on the board after one side promotes his or her Pawn first. In other words, then ending of K+R vs. K+P normally arises after a ...
Pawn race!!
The opponent will be forced to capture the Pawn, (after it
promotes); leaving the kind
of ending we have
now. (A Rook-plus-King {only} vs. a King-plus-Pawn, {only}.)
Most people think these endings are very complex (they can be), and that GM's calculate 10-20 moves ahead to solve such positions. (They usually do NOT.) I am going to teach you a very SIMPLE technique that involves COUNTING. If you can count, you can usually figure out whether it is a win or a draw with a very high degree of accuracy. (Don't get too cocky, however. This method is not fool-proof. I could get out a few of my endgame books and show you at least two positions where this method will not help you.)
This
endgame has several unique characteristics. The side with the King and Pawn must
naturally try to escort the pawn in as quickly as possible. The side with the
King and Pawn must also never be separated by more than 1 square.
(Normally if the King gets two squares away from the pawn, the enemy Rook can
simply move over, attack the pawn and win it.) The side with the King and Rook
must constantly be on the watch for an opportunity to win the pawn and/or
coordinate their forces to prevent the opposing side from promoting, and/or
reaching the ideal position.
Both sides also rush to set up their respective,
"Ideal Position(s)," as quickly as possible!!
The
position we now have is similar to Seirawan's diagram # 74, page # 68 of
"Winning Chess Endings." (Except the White Rook is on c1 instead of
a1.) The "ideal" position for the side with
the King and Pawn, is "King on the seventh, Pawn on the seventh rank."
The ideal position for the side with the King and Rook is, "King one
square away from the Pawn, (usually on the 2nd/7th rank, next to the Pawn) and
your Rook controlling the promotion square - either vertically or
horizontally." Now it is a simple matter of counting.
If the
stronger side moves first, (K + R) and can reach the ideal
position in the same number moves as the opponent; or even one extra
move, - the stronger side wins. In other words, it takes White six
(6) moves to reach his ideal position. [Ke7-f6-g5-g4-g3-g2.] It takes
Black five moves to reach his ideal position. [Say King to e4-e3-e2 (2
moves) and the Black Pawn from f5-f4-f3 (3 moves) for a total of five
moves.]
So in other words, White wins. The Proof?
(What follows now is an extract from one of Euwe's games.)
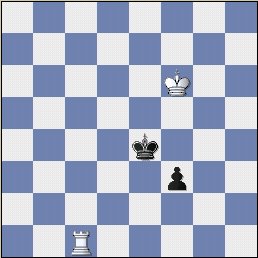
3. Ke7, f4;
(The position after 3...f4.)
Black
must push the pawn as quickly as possible. Remember its a race to
reach the ideal position for each side. Tempo is essentially critical for the
side with the K & P.
If Black dawdles here, White's superior force
will win easily!
4. Kf6,
It sounds dumb to say this, but many of my students have NOT found this point. In order to catch the pawn, (the side with the K+R); that this King must approach the pawn from the OPPOSITE SIDE that the opposing King is on. While this may be stating the obvious, it is an important point to note.
4...f3;
(The actual position in our study after 4...f3.)
Run little pawn, run!
[ Slower is 4...Kf3; 5. Kf5 Kg3; 6. Rc3+ f3; 7. Ke4, and White wins the pawn. ]
5. Kg5, f2;
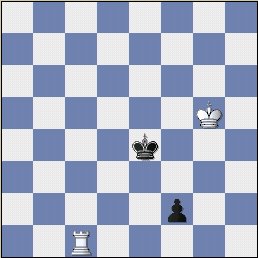
(The position in our endgame study after 5...f2.)
The pawn continues to advance.
[ Or 5...Ke3; 6. Kg4 f2; 7. Kg3 Ke2; 8. Rc2+, and White wins easily.]
6. Kg4, Ke3; 7. Kg3, Ke2; 8. Kg2, ('!?')
(The position in our endgame study after 8. Kg2.)
Actually this move is a slight error.
[
Euwe missed 8. Rc2+ Ke1; 9. Rxf2; winning one move quicker. He probably
missed
this because he already had the winning position firmly fixed in his
mind. ]
8...Kd2; 9. Rf1, Ke2; 10. Rxf2+,
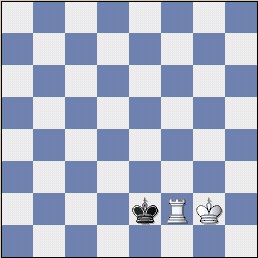
(The final position in our study. Black raises the white flag.)
and Black Resigns. 1-0
(Just a note on COUNTING and the endgame. MANY endgames can be solved by using the "counting technique" mentioned above. For instance, lets say you have a hypothetical ending, where your King can zoom down and capture some pawns, push one of your pawns, then promote to a Queen. But you are not sure if the result is correct and you cannot calculate -- with a high degree of certainty -- that far ahead. Simply count out the moves. I.e., {If you said to yourself:} "It takes six moves to get my King there and capture his Pawn, then I have to move my monarch once more to get out of the way of my own pawn. Then it takes three more moves to promote the pawn, for a total of 10 {ten} moves. It takes my opponent twelve moves to do pretty much the same thing, so I win this pawn ending easily." An example of this happened just last night {Thurs; May 04, 2001.} at chess club. My student, with more than enough time on the clock, took a draw in a K+P ending. Several players wanted to argue and say that the student had done the correct thing, because you could go wrong by trying to calculate such a difficult line in a TOURNAMENT game. But I showed, how using the counting method, I was able to explore close to a half-dozen different approaches to the ending and I did the whole thing in like 15-30 seconds. With just a little practice, you can do exactly the same thing! This is an extremely valuable technique to learn, (!!) and once you master it you will be able to win DOZENS of end-games with it.)
(Html
code and browser page initially generated with ChessBase
8.0.
Click HERE
to go to the ChessBase web site.)
***
(Note: The day after I first posted this page, a [former] Russian GM sent me an e-mail and said this was some of the best endgame analysis he had seen on the Internet.)
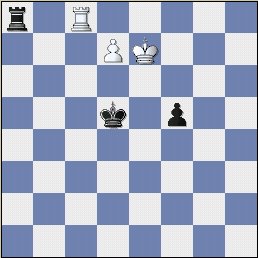
The "Vancura Position."
White to move. Black should hold the draw.
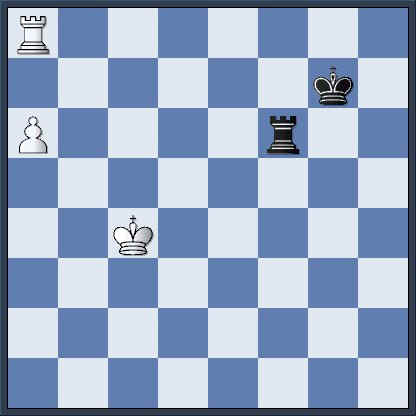
(Position check: White to move.
White King is on c4, White Rook is on a8, & the White Pawn is on a6.
The Black King is on g7, and the Black Rook is on f6.)
Knowledge of this position - and the positions it can lead to
- are fundamental
and essential endgame knowledge. Can you draw this position as Black?
Are you sure?
( Also see "Winning Chess Endings," Chapter # 4. (Esp. beginning on page # 88.} )
If you are not sure, then click on the diagram and study this ending!!!
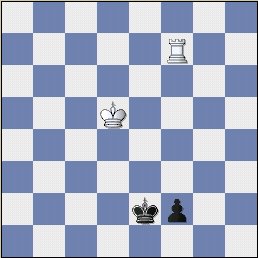
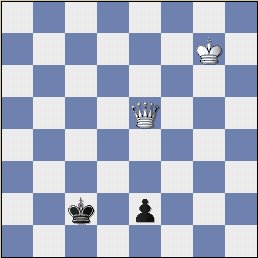
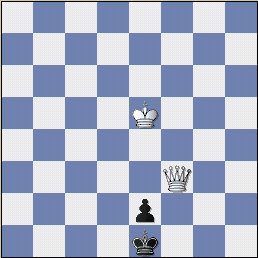
(1) Basic Endgames - K & Q vs. K + P
Position # 1 (1a), 16.02.2000
[A.J.G.]
A.J.'s BASIC ENDGAME COURSE
(from my list of files in my Q+P vs. K+P database)
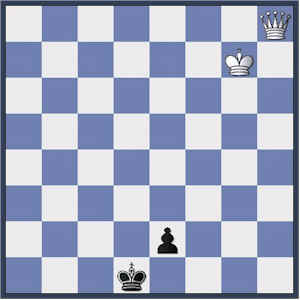
(White to move and win.)
***
(Position check - White: Kg7, Qh8. Black: Kd1, Pe2.)
***
Basic endgame knowledge.
King and Queen vs. King and Pawn on the 7th rank. Do you know this technique?
It is one
of the more basic of all Queen and Pawn endings. It usually results
from a pure K+P
ending [pawn race!], where one side promotes one or two moves
before the other
side.
White to move and win.
(And its about the worst
possible position for White's pieces to be in.)
1. Qd8+ Kc2;
If the
King moves in front of his Pawn, then White will simply move his King
one square
closer.
[ 1...Ke1?; 2. Kg6!, etc. ]
2. Qc7+ Kd2;
The King cannot
stray too far from the pawn.
[ I.e., 2...Kb1?; 3. Qe5, "+/-"
The pawn will now fall. ]
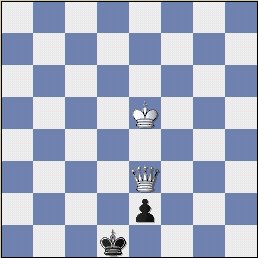
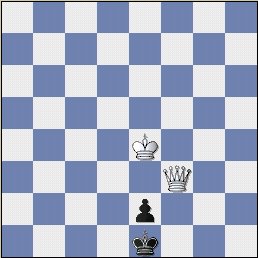
3. Qd6+ Kc2; 4. Qe5, {See the diagram just below.}
This move attacks the pawn.
[ 4. Qc5+ Kd2; 5. Qd4+, achieves the same result. ]
4...Kd2; 5. Qd4+ Kc2; 6. Qe3!, {See the diagram, just below.}
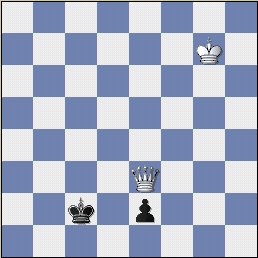
This is a substantial improvement over the way I learned this ending.
( I learned
you always had to maneuver the Queen with check. This is not true.)
6...Kd1; 7. Qd3+ Ke1;
After much jockeying of position, White has accomplished his goal of
forcing the
enemy King in front of his Pawn.
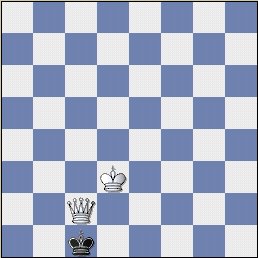
8. Kf6, {Another Diagram - just below.}
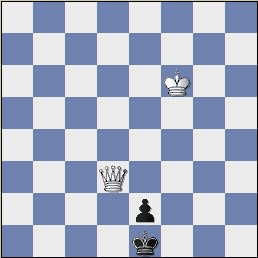
The White King steps a little closer.
8...Kf2; 9. Qf5+ Kg2; 10. Qe4+
Kf2; 11. Qf4+ Kg1; 12. Qe3+! Kf1; 13. Qf3+ Ke1;
{See the diagram just below.}
Black is boxed in again.
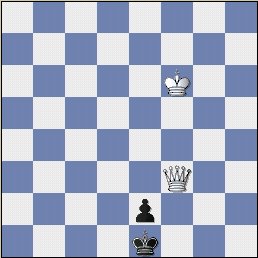
14. Ke5, {Diagram?}
And again ... the White King inches closer.
Step right up. Are you beginning to notice a pattern?
These steps are repeating themselves.
What are they?
The steps are:
#1.) The
Queen checks and moves, getting closer to the opposing King all the while.
#2.) The Queen eventually forces the enemy King to step in front of its own pawn.
#3.) With
your opponent's King blocking his own Pawn,
your King
steps one square closer.
#4.) Keep repeating these steps until your King is
close enough to assist your
Queen in stopping or capturing the other guy's pawn.
***
14...Kd2; 15. Qf4+ Kd1; 16. Qd4+ Kc2; 17. Qe3! Kd1; {Another Diagram, just below.}
You should be able to see by now that the White King is,
slowly but inexorably, (!) making its way across the board.
18. Qd3+ Ke1; 19. Ke4 Kf2; 20. Qf3+ Ke1;
White to move. What move would you make?
If White wanted to be flashy, he could announce a mate in three.
21. Kd3! Kd1; 22. Qxe2+ Kc1; 23. Qc2#
White wins. A useful technique to learn.
The rule of thumb is: The
stronger side will almost always win
the ending of
King and Queen vs. the King
and Pawn on the 7th rank; as long as the weaker
side has a center
pawn,
(King-Pawn or Queen-Pawn); or a Knight Pawn.
You generally can only draw
against a Rook Pawn or Bishop Pawn on the 7th rank.
(See the next examples in
this database.)
[If you are curious and would like to buy a book that covers this endgame in
great detail, I
recommend that you purchase "Winning Chess
Endings," by GM Yasser Seirawan.]
(From the Microsoft Press series.)
Of course there are exceptions to the above rule of thumb, and that is why the game of
chess fascinates us so much!
1 - 0
(HTML
code and browser page initially generated with ChessBase
8.0.
Click HERE
to go to the ChessBase web site.)
(2) A.J.'s Rook Endgame Course - R + P Endings
Position # 6, 2000.
|
|
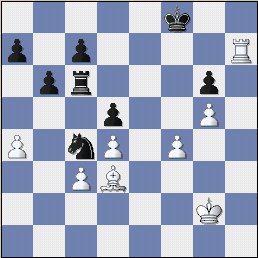
Jose R. Capablanca - Savielly G. Tartakower;
Tournament Game. New York, 1924.
(The position just before Black's 32nd move.)
(Position check: White = Kg2, Rh7, Bd3,
WP's - a4, c3, d4, f4, & g5.
Black = Kf8, Rc6, Nc4, BP's - a7, b6, c7, d5, & g6.)
One of the greatest Rook and Pawn endgames ever played. (Maybe in the 10 greatest?)
Study this ending VERY carefully. Its technique is an eye-opener for most of my students.
***
32...Ne3+; 33. Kf3! Nf5; Looks can be deceiving. Most of my students -
when asked to
appraise this position - say Black may be winning here. (How does
White guard his QBP?)
34. Bxf5 gxf5; Many computer programs, at least initially, will
evaluate this position as
[nearly] winning for Black!
Capa must have foreseen the following sequence far, far in advance.
(He reportedly turned down a draw offer around here.)
In an endgame where pawns are worth their weight in gold, Capa gives up two
of them,
..... BOTH WITH CHECK!
35. Kg3!! Rxc3+; 36. Kh4 Rf3; 37. g6 ('!') Rxf4+; 38. Kg5 Re4; 39. Kf6! Kg8;
Note how the combination of White's King on the 6th row and his Rook on the 7th
rank are both impressive and deadly. By not capturing the Black Pawn on f5,
White can now use this unit as a shield from checks from the Black Rook.
40. Rg7+! Kh8; 41. Rxc7 Re8[]; 42. Kxf5 Re4; 43. Kf6 Rf4+; 44. Ke5
Rg4;
45. g7+ Kg8; 46. Rxa7! Rg1; 47. Kxd5 Rc1; 48. Kd6 Rc2; 49. d5 Rc1;
50. Rc7 Ra1; 51. Kc6! Rxa4; 52. d6 Rc4+; 53. Kb7! b5; 54. d7 Rd4;
55. Rc8+ Kxg7; 56. d8Q Rxd8; 57. Rxd8 b4; 58. Rd6 b3; 59. Rb6 b2;
60. Rxb2, 1 - 0
Easily one of the best and most instructive Rook and Pawn Endgames ... ever played!
It demonstrates how piece activity is of paramount importance, even in
the endgame.
It also shows how a Rook on the 7th rank, containing an opponent's
King on his first
rank, can be a dominating position for the player with the
"Pig on the 7th." It also
shows the importance of King activity in the
endgame.
(One of the basic principles of ALL endgames.)
If you would like to study this game, annotated in great depth, contact me.
You can also go to ChessLab and download this game in PGN format.
Fans should definitely check out the book,
"The Most Instructive
Games of Chess Ever Played,"
[62
Masterpieces of Chess Strategy]; by Irving Chernev.
(I consider this one of
the "Ten Greatest Chess Books Ever Written.")
You can find this game
... PLUS 61 MORE!!! ... in this book.
(HTML code initially generated with
ChessBase
8.0.
Click HERE
to go to the ChessBase website.)
***
Page last updated: Sunday; December 19th, 2004. Last edit or save on: 01/25/2015 .
Click
HERE
to see maybe the greatest Rook-and-Pawn end-game ever played.
(This is a WHOLE game. But I pay special attention to the ending.)
Keep watching this page for more additions!
Click HERE to go to my web page on the "Lucena Position."
Click HERE to go to my second page of "Endgames - Lessons & Challenges."
Copyright (c) A.J. Goldsby I
Copyright
(©) A.J. Goldsby, 1985 - 2014.
Copyright © A.J. Goldsby, 2015. All
rights reserved.
|
|