GM Sergey Rublevsky (2671) - IM Andrei Volokitin (2600)
[B52]
|
|
|
A.J.'s "Game of The Month" for May, 2004. (From TWIC # 495.)
I tell my students all the time ...
"It does not matter how brilliant your
idea is, you simply must complete
your development BEFORE trying
anything like an attack." (Or any other
middlegame idea, for that
matter.)
Here a player with a FIDE 2600 rating
ignores this advice, launching a full-scale assault almost from the very first
move. The end result is a predictable loss, a good object lesson, and my
game for this
month!
********************************************************************
[ After I had been working on this game every day for almost a week, (doing opening analysis, spending many hours with the computer - investigating some of the key positions, and doing multiple searches of the databases); I began to actually regret choosing this game! In fact, after I had worked on this game for several days straight, I had come to believe that I had bitten off more than I could possibly ever chew!! It also renders my introduction to this game almost moot, but I left it in ... just to show that sometimes even a Master does not fully grasp all the ramifications of what happened in a game.]
** ** ** ** ** ** ** ** ** ** ** ** ** ** ** ** ** ** ** ** ** ** ** ** ** ** ** ** ** ** ** **
The ratings are accurate, and are actual FIDE ratings.
*******
{They were already part of the game score when I downloaded this file from "The Week In Chess" web site. Of course the game was totally UN-annotated at that point!}
1.e4 c5;
The ultra-aggressive Sicilian, usually
a sign Black would like to try to win.
The Sicilian does not try to equalize
like the move of 1...e5. Instead it is
an asymmetrical opening
that seeks
imbalances from the very start.
The positives are that Black does get
to play for a win. (One only has to
think of all the brilliant wins
by Garry
Kasparov and Bobby Fischer in this
opening to know that Black does have
good chances
to play for the full point.)
The drawbacks are that White,
especially in an Open Sicilian, often
has better development,
more space,
and a mobile Pawn center. This can be
an explosive combination - if Black is
not
careful, he can be swept right off
the chess board.
(Look at a few of the many books on miniatures in this opening, like the
series of books ...
by SM Bill Wall.)
[ Black can also play: 1...e5; at this point as well. (Ruy Lopez ... anyone?) ]
2.Nf3 d6;
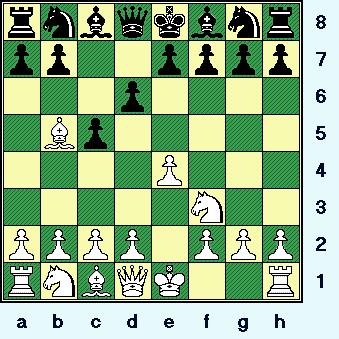
3.Bb5+!?, {See
the diagram ... just below.}
Here it is, an off-beat branch of
the Sicilian. (This was very popular
for a while back in the 1980's.)
Strangely - I am not sure if this
line even has an adequate name.
("The Boleslavsky Bb5+ Variation?")
{Eric Schiller - in SCO - calls this
"The Canal Variation." Whether this
is correct or not, I have no
idea ...
I never heard it called this by this
name - at least, not before I picked
up Eric Schiller's
book.
There was a CD pamphlet that was
being sold in the 1970's or the 1980's,
and this line was
referred to as:
"The Anti-Sicilian System," ...
or something like that. GM J. Nunn,
in his excellent book, "Nunn's
Chess Opening's,"
(NCO, pg. # 199); refers to this opening as:
"The Moscow Variation." It seems like
every
reference work that I pick up
gives this system a completely
different name!!}
*************************
|
|
*************************
While this variation is similar to the
Rossolimo Variation, (1.e4, c5; 2.Nf3, Nc6; 3.Bb5);
this line has its
own unique challenges and problems
for Black here.
It is also easy to assume that this
variation is innocuous and not play
energetically. It is then that
you will
find that this system has real teeth!
{I am speaking from experience!!}
Probably the main drawback to this
system is that Black can - and often
does - obtain a quick
and full equality.
But unless you are in a "must-win"
situation, this should not be a large
deterrent
from playing this system.
(White plays for a win - with little or
no risk, and avoids the bulk of his
opponent's preparation as well.)
GM Nick de Firmian ... in MCO-14;
confirms that this system has a
reputation as a drawing line,
at
least at the highest levels.
Apparently this system is a line that
Rublevsky uses fairly regularly, I
found close to 20 examples
of this
player using this line in the database.
[ More often played is the
following continuation:
(>/=) 3.d4!
cxd4; 4.Nxd4 Nf6;
5.Nc3, "+/="
{Diagram?}
which can lead to literally dozens of
different branches
of the Sicilian.
(See previous installments of my column on the ... "Game of The Month.") ]
3...Bd7;
(best?) {Diagram?}
This is the most popular response
for Black in this line. (The other main
choice is ...Nd7; here.)
*********************
[ One respected reference book
gives the following alternative line:
3...Nd7!?; 4.d4 Ngf6;
5.Nc3 cxd4; 6.Qxd4 e5!?;
{Diagram?}
This looks like it fixes the pawn-structure too early for my taste.
*****************************************************************
( One of my tournament games
against an Alabama master went
something like:
>/= 6...a6!;
{Diagram?}
I think theory says that it is best
for White to take
on d7. I like that
line for Black as well.
7.Be2!? b5!?; 8.0-0 e5!;
9.Qd1!? h6!?; 10.a3!? Bb7; 11.Bd3 Rc8!;
12.Be3!? Nc5!; "="
{Diagram?}
and Black had an easy game,
and went
on to win in just under
fifty moves from here. (Birmingham, 1988.
I wrote
down the guys rating, but left the slot
for the name blank! I think I know
who
it was, but it is better not to
guess - in case I get it wrong.)
*** *** *** *** *** *** *** *** *** *** *** *** *** *** *** *** *** ***
Not to be recommended is:
</= 6...g6!?; ('?!')
7.e5! dxe5; 8.Nxe5 Bg7;
9.Bg5! 0-0; 10.0-0-0! Qa5!?;
11.Nc4! Qc7; 12.Rhe1! Qxh2?!; 13.Rxe7,
13...Qxg2?; 14.Qh4!,
'±' (Maybe "+/-") {Diagram?}
and White is clearly much better.
GM Jan Timman - GM Joel Lautier; ICT /
Hoogovens (Masters
Invitational)
Wijk aan Zee, NED; 1997.
[ See MCO-14, page # 353; column # 06, and also note # (w.). ] )
*****************************************************************
(We return to our study of the
main line of book.)
7.Qd3!? h6!?;
8.Be3 Be7; 9.Bc4 a6; 10.a4 Qa5!?;
{Diagram?}
The end of the column.
11.0-0 Nc5; 12.Bxc5 Qxc5; 13.Nd5
Nxd5; 14.Bxd5 0-0; 15.Ra3 Rb8;
16.Rd1 Kh8!?; 17.Rc3 Qa5;
18.Qc4 f5; "~" {Diagram?}
White seems to have a slight edge,
according to several programs, but
MCO
(and de Firmian) calls it
even ... so I choose to split the
difference.
(Maybe {now} 19.h3, "+/=" here.)
GM L. Yudasin - GM Z. Kozul;
ICT / European (men's) Team Championships
Pula, CRO; 1997. (0-1, 37
moves.)
[ See MCO-14, page # 353; col. # 06, and see also note # (x.). ]
******************************************************************
******************************************************************
According to MCO, ...Nc6; is probably playable - but seldom seen.
(</=) 3...Nc6!?; 4.0-0
Bd7; 5.Re1 Nf6; 6.c3 a6; 7.Bxc6
Bxc6;
8.d4!? Bxe4; 9.Bg5 Bd5;
10.Nbd2 c4; "~" {Diagram?}
with a very unclear position.
{White has some "comp" for the Pawn, but it is not clear if it will be enough or not.}
S. Byrnell - GM I. Rogers;
ICT / Lloyds Bank Open /
London, ENG; 1990.
(This game was drawn in
only 39 moves.)
[ See MCO-14, page # 353; column # 5-6, & also note # (u.). ] ]
*********************
---> Be sure to study the January "Game of The Month!" (That opening is very similar to this one.)
*****************************************************************************************
(After a brief look at theory, we return
to the game at hand. It is no good to
retreat the Bishop ...
this just loses a
tempo. So the first player almost
always exchanges on the d7-square in this
position.)
4.Bxd7+ Qxd7!;
{Diagram?}
This is considered the correct move
by almost all the theoretical manuals.
(This is because the best square for
Black's QN is still on c6.)
[
Possible is:
4...Nxd7!?;
{Diagram?}
with a playable game for Black.
See the {historic} contest:
I. Kan - G. Lisitisin; The 22nd U.R.S. Championship
Moscow, U.S.S.R; 1955. ]
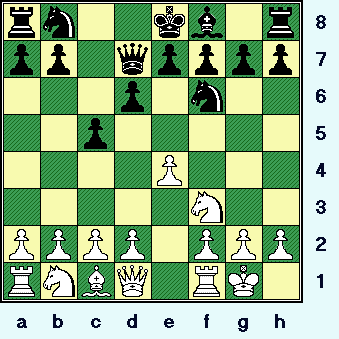
5.0-0 Nf6!?;
{See the diagram ... just below.}
This is all still pretty much book,
although ECO and MCO prefer that
Black use the other Knight here.
*************************
|
|
*************************
There were almost
1000 games in the
database with this position. The earliest
example I could
find was the following: GM I. Boleslavsky - GM M.
Najdorf; (FIDE) Candidates Tournament /
Budapest, Hungary; 1950. {This game was quickly drawn in
only 22 moves.}
*******************************************************************************
[
Black can also play:
(>/=) 5...Nc6!?; 6.c3!? Nf6;
7.d4!?, {Diagram?}
Offering a pawn gambit, which
Black declines.
*************************************************************
( Safer was: >/= 7.Re1!, "+/=" 7...e6!?;
8.d4!? cxd4; 9.cxd4 d5!?;
10.e5 Ne4, "=" {Diagram?}
Milorad Knezevic -
Robert J. ("Bobby") Fischer; Skopje, Yugoslavia; 1967.
{This game was drawn in
47 carefully played moves.}
[ See MCO-14; page # 353; col. # 05, and also note # (t.). ] )
************************************************************
(Returning to the main stem
game/analysis-line here.)
7...e6!?; 8.dxc5!?,
{Diagram?}
This is too lax and easy-going.
*******
( White should definitely try to
punish Black with: >/= 8.d5!, "+/=" {Diag?}
when the first player should
keep a solid space advantage.
(My opponent - after the game -
said he avoided this, as he did
not like
closed positions.) )
*******
8...dxc5; 9.Qe2! Qc7;
10.Bg5!?, "+/=" {Diagram?}
White has a small, but solid edge
here - in this position.
Rex Demers - A.J. Goldsby I;
2nd Annual (city)
Open
Orlando, FL;
{USA} 1994.
(0-1, 39 moves.) ]
*******************************************************************************
To be considered in this position was both the simple d3, and also the very natural move of Nc3 here.
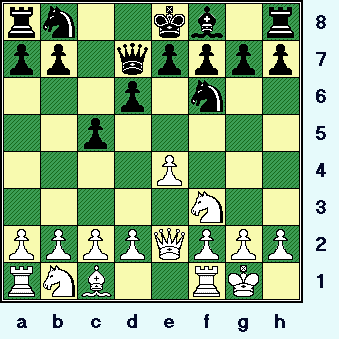
6.Qe2!?,
(hmmm)
{See the diagram - just below.}
This is not a bad move, in fact it
is completely logical.
(It is not yet
clear where the Rooks should be
deployed.)
*************************
|
|
*************************
The 'book' move here is Re1, but
there is no guarantee of an absolute
advantage from
this line ... so this
move (Qe2) certainly looks worth a try.
************
[ With the following moves:
6.Re1!? Nc6; 7.c3!?,
{Diagram?}
Trying to build a big center.
( White can also try: 7.b3!?, "~" {Diagram?}
but this looks too slow to me. )
7...e6; 8.d4!? cxd4;
9.cxd4 d5; 10.e5 Ne4;
{Diagram?}
we transpose to a variation where
Black has pretty solid equality.
(See the analysis, above.) ]
************
6...Nc6;
7.c3, {squares} {Diagram?}
This move is both natural and good.
White prevents ...Nd4 by Black, as
well as preparing
a <possible> later
pawn push in the center. (d2-d4)
[ White can also play b3 in this
position. For example:
7.b3 g6;
{Diagram?}
This fianchetto makes sense here.
For example, see the contest:
GM Zhang Zong - GM V. Akopian;
6th Ubeda Open, 2001.
( The move of: 7...e6!?; {Diag?} is solid, but less ambitious. )
After the further moves:
8.c3!? Bg7; 9.d4 cxd4;
10.cxd4 Rc8;
11.Bb2 0-0; 12.Nc3 d5;
13.e5 Ne8; "~" {Diagram?}
Black should be OK.
{Analysis line.} ]
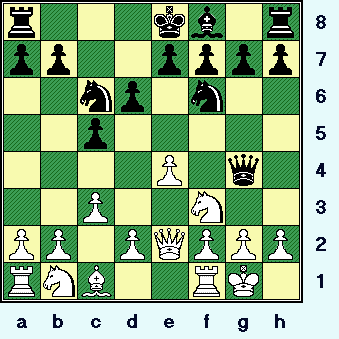
7...Qg4!?;
(attack?)
{See the diagram ... just below.}
An overtly aggressive move ...
I thought this would have been
new to theory, but it was definitely
not a new move ...
not by a long shot!
*************************
|
|
*************************
While not unsound, I greatly prefer
the move of ...e6; in this position for Black.
(While somewhat staid, Black will
not get blown away after such a solid
move - there are hundreds
of games
in the database after 7...e6; and
the second player wins his fair
share of these contests.)
[ Or
>/= 7...e6; 8.d4!? cxd4;
9.cxd4 d5; 10.e5 Ne4;
"~" {Diagram?}
when Black has few real
problems to deal with here.
For example, see the game:
GM E. Rozentalis - GM A. Chernin;
URSch-FL, Lvov, USSR; 1987.
(Black won, 0-1, in like 75 moves.) ]
8.d3, {Diagram?}
This is probably the simplest
answer here for White.
[ The other try here was: 8.Re1, "~" ]
8...Ne5!?;
(hmmm) {Diagram?}
This move is the first try of most
computer programs, but I don't
like it. Before Black begins
engaging
in any middlegame operations, he
should complete his development
and castle.
(Good chess principles.)
[ After simple moves like:
>/= 8...g6; ('!')
9.h3 Qd7; 10.Bg5 Bg7;
11.Nbd2 0-0;
12.Qe3,
"+/=" {Diagram?}
when White keeps a small, but
solid edge ... but with
correct play
Black should probably equalize.
{analysis} ]
White's next move is virtually
forced. (Not NxN/e5??, Qxe2.)
Otherwise, White gets doubled
Pawns in front of his King.
9.Nbd2 Nh5!?;
{Diagram?}
Again ... this move is the first choice
of several computer programs that
I tested this position
on ... (Fritz 8.0,
Deep Junior, and CM9000); but what-ever happened to the concept of ...
"getting out all your pieces, and then
castle as quickly as possible." ???
(The quote is from Emanuel Lasker's
"Manual of Chess.")
[ Maybe Black could try something
like:
9...e6; 10.h3 Qh5;
11.Re1,
"~" ("+/=") {Diagram?}
when White might have a slight
edge ... but not a whole lot more. ]
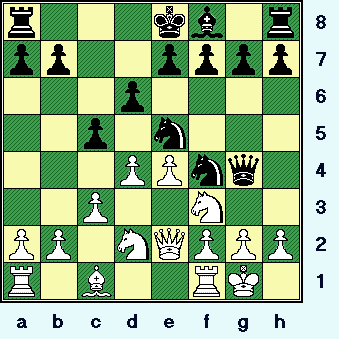
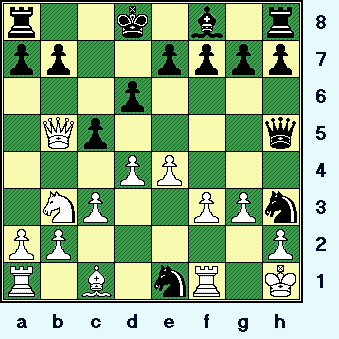
10.d4! Nf4;
(a mating attack???)
{See
the diagram ... just below.}
According to the laws of positional
chess - as I understand them - an
attack like this by the
second player
is ONLY feasible when the first has
made some fundamental error.
(I don't believe White has made any
mistakes; his moves - according to all
the principles that
I teach all of my
students - have been thoroughly
sound.)
In the meantime, it is hard to believe
that a three-piece attack ... with the
rest of Black's forces
sitting on their
original squares ... will refute White's
entire opening set-up!!
*************************
|
|
*************************
The position is interesting, and certainly is worthy of close study. (And maybe a diagram as well!)
[ Or
10...0-0-0!?; 11.Qe3,
{Diagram?}
This is probably best.
( Not </= 11.dxe5??; as 11...Nf4;
{Diagram?}
wins the house for Black. ("-/+")
{White has no reasonable way
to meet the threat of mate,
and
also the Knight's attack on the Q.} )
11...Nf4; 12.g3 Nxf3+;
13.Nxf3 Nh3+; 14.Kg2,
"+/=" (wild!) {Diagram?}
with a very unbalanced and unusual
position ... but White only has a
small - but
(a)
fairly firm - advantage.
This could be an improvement over
the actual course of the game ...
but I am NOT (!)
certain, so I will
only offer this continuation ...
and
allow the student to make his own
choice in this position. ]
******************************************************************************
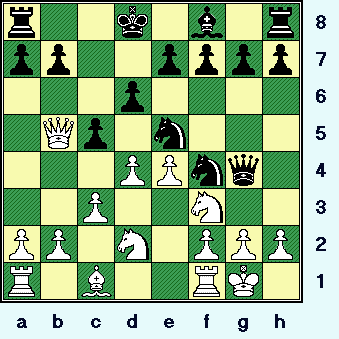
White's next move is forced. (If the silly Qe3???, then just Qxg2#.)
11.Qb5+
Kd8!?N;
{See the diagram - just below.}
This appears to be the first original
move of this game - Black varies
from the Horvath - Utasi
encounter
given just below. (Several programs
choose this move ... and rate the
position as
being completely equal.)
*************************
|
|
*************************
In my opinion, this move stinks. The
simple visual impression is horrible.
(If Black's attack fails, he will certainly
have a very rotten game.)
But this may not be the losing move,
or at least not according to the boxes.
(I think it could be the losing move,
but also ... I am NOT 100% sure.)
************ ************
************ ************
************
************
************ ************
************ ************
[ A previous game had gone:
(>/=) 11...Nc6;
12.Ne1!?, {Diagram?}
This is probably inferior. ('?!')
( I don't understand why White
avoided the very simple:
>/= 12.g3!, ("+/=") {Diagram?}
as it appears to give the first player
a fairly decent advantage. )
12...0-0-0; 13.f3 Qh5;
14.d5 Ne5; 15.Nb3?,
('??')
{Diagram?}
A bad move or even {effectively}
a blunder ... the White Queen very
quickly runs out of useful squares.
( After the plain: >/= 15.Rf2, "=" {Diag?} White has nothing to fear! )
15...a6!; 16.Qb6!? Ne2+;
17.Kf2[],
(urgh)
{Diagram?}
It is ugly to have to drag your
King out into the open, but this
move is
completely forced.
( </= 17.Kh1? Nc4; 18.Qa7 Ng3+; 19.Kg1 Nxf1; etc. ("-/+") )
17...Nc4; 18.Qa7 Nxc1;
19.Nxc5?; {Diagram?}
Piling errors ... on top of errors.
( >/= 19.Rxc1[], 19...Qxh2, "/+" )
19...dxc5!?;
('?') {Diagram?}
Black fails to take advantage of
White's mis-step!
****************************************************************
( Much better was: >/= 19...Qh4+!;
20.g3[] Qxh2+; {Diagram?}
Putting White in a terrible bind.
Now White only has ONE legal
move ... according to the rules
of chess!
21.Ng2 dxc5; 22.Qxc5+ Kb8; 23.Qxc4 Rc8;
24.Qd4 e5!!;
25.Qxe5+ Ka8; 26.Raxc1 Bc5+; 27.Ke1 Qxg2; ("-/+")
{Diagram?}
with an easy win for Black.
Of course this combination is very
long ---> 17 ply, in fact! It also
contains
many subtle and hidden
points, so it is very easy to see why
even a strong
player would not be
able to calculate such a sequence
over the board. )
****************************************************************
20.Qxc5+ Kb8; 21.Qxc4 Qh6!?;
"/+" (Maybe "-/+") {Diagram?}
Black went on to win from here.
T. Horvath - T. Utasi;
National Championship Tournament
(Budapest?), Hungary; 1984.
(Black won, 0-1, in 44 moves.)
I annotated this game ... at least
the important part ... mainly because
I am
sure many players wanted to
repeat Black's success in this game.
But, as you can readily see from the
above analysis, repeating a game -
just because of the result - can be
an extremely risky business!!
( Better was: >/= 21...Rc8!; "-/+" );
*************************************************************
*************************************************************
Black could take a crack at:
(>/=) 11...Nd7!?;
12.g3 Rb8; 13.Kh1 a6;
14.Qa4 Nd3;
"~" {Diagram?}
with a crazy position ... but I don't
think that Black is losing here. {analysis} ]
************ ************ ************
************ ************
************
************ ************
************ ************
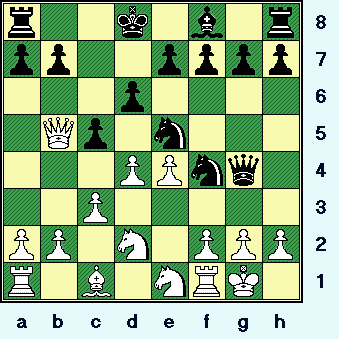
12.Ne1!!;
(Maybe - '!!!') (search horizon)
{See
the diagram ... just below.}
The computer says that this move
is incorrect, and the scores almost
immediately begin
to favor Black
by nearly half a pawn. (Or more!)
Editors
note: I repeated the above experiment on (at least) five different
computers, to include several
of my students' computers as well. We also used chess engines from CB,
(Fritz, Junior, Shredder, etc.);
programs like Crafty and Rebel, and many others - like ChessMaster 9000.
One program that one of
my students uses - I forget the name of the engine, but I think it is one
you can download for free off
the Internet - says that Black is WINNING after 12.Ne1. (By nearly two or
three points.)
*************************
|
|
*************************
But my experience is that if the final
outcome {of any sequence of moves}
is more than
5-7 moves in advance, {and also has many sidelines}; [then] the computer may
not
be capable of
fully comprehending all of the
consequences of the combination.
********************************************************************
Therefore I will ignore the computer's hastily drawn conclusions.
********************************************************************
[
Maybe poor Volokitin only expected
a continuation something like:
12.g3!? Nh3+; 13.Kg2[],
{Diagram?}
Putting the King in the corner
only manages to drop a piece.
( Not </= 13.Kh1?? Nxf3; "-/+" )
13...Nf4+; 14.Kg1 Nh3+;
15.Kg2 Nf4+; ("=")
{Diagram?}
with an obvious and simple draw
by repeating these moves ...
over
and over again. ]
************************************
************************************
************************************
************************************
From here - - - until Black's play
of 16...Qh5; all of the moves
appear to be forced ... for both sides!
{I have been through this sequence
around 25 times ... with many different
analysis engines. This
only seems to
confirm the above statement.}
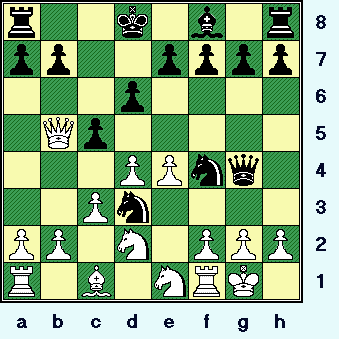
12...Ned3;
(why?)
{See the diagram ... just below.}
This combination - from Black's
point of view - is based on the possibility of decoying
the defender
of the heart of White's position,
(the WN on e1); away from the
defense
of the vital g2-square.
*************************
|
|
*************************
I wonder if Volokitin thought he was winning in this position? (It is possible!)
13.f3[],
('!')
{Diagram?}
This is completely forced.
[ Of course not: </= 13.Nxd3 ???, because of 13...Qxg2#. ]
|
I went over to a friend/student's house Saturday; May 14th, for a few hours. We spent quite a bit of time looking at this game on his brand new lap-top. (Less than 2 weeks old.) It has a Pentium IV processor, (I forgot to check his RAM); and has Fritz 8.0 loaded into it. Strangely, when we reached the position for White's 13th move, his computer wanted to investigate 13.Qxb7, and 13.Ndf3. I have no rational explanation for this, unless his laptop has one of those scaled-down processors (Celeron?) that I believe that many laptops and computers of this type use. Curious and curiouser. I had already begun formatting this page - I have already spent at least two days on this task, so it was much too late to try and change the ChessBase document and begin anew. Any comments or analysis would be appreciated! -----> {I BRIEFLY analyzed both of the above moves ... they seem to favor Black.} |
13...Qg5;
{Box?}
{Diagram?}
Fritz 8.0 confirms that this move
is forced (or best) here.
[ The move,
13...Qg6!?;
"~" {Diagram?}
was possible ...
whether it was any
good or not is a different story. ]
14.Nb3 Nxe1;
{Diagram?}
Now it almost appears that White
could be lost in this position.
{I gave - just this position, not the
entire game score; or even the
names of the players
involved - to
a couple of my lower rated students.
I asked all of them to evaluate the
position, and I asked them NOT to
use a computer of any kind. 5 out
of 6 persons
surveyed (via e-mail) concluded
that White's position was lost here.}
15.g3[],
Zwischenzug
{Diagram?}
A cute in-between move that
manages to hold White's game
together - at least for now.
[ If </= 15.Rxe1????, then 15...Qxg2#. ]
15...Nh3+;
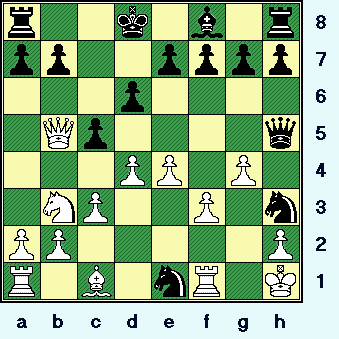
16.Kh1 Qh5; {See the
diagram ... just below.}
This move is also forced or best,
at least according to Deep Junior.
*************************
|
|
*************************
After a long period, (during the combo);
where most commercial programs
thought that Black
was better, ... ... ... Professor Shredder ... after a little over five minutes of
cogitation ...
now sees a very solid
edge for White in this position.
[ Much worse would
be: </= 16...Qf6?!;
('?') 17.dxc5!, {Diagram?}
This is probably
best.
( Interesting was: 17.Qxb7!?, "+/=" )
17...Nc2; {Diagram?}
This is probably forced, ...
17...Rc8?; 18.Qe2, '±' would be a whole lot worse for
Black.
18.Rb1 h5!?;
{Diagram?}
The only interesting try,
passive defense with ...Kc7; is surely doomed to fail from
here.
19.Na5 h4; 20.Nxb7+! Kc7;
{Diagram?}
This is forced, after ...Kc8??;
Black is rapidly mated.
21.cxd6+ exd6; 22.Na5! Rb8;
23.Qc4+ Kd7; 24.Qa4+ Kc7;
25.g4! d5; 26.Qxc2 Qa6; 27.Kg2!
Qxa5; 28.Kxh3, ("+/-") {Diagram?}
White is two Pawns up, (for
which the second player has zero compensation);
and Black's King is completely
exposed in the final position of this analysis line. ]
*****************************************************
At first glance, both dxc5 and also
Na5 look attractive here for White.
17.g4!?,
(good ... or bad?)
{See
the diagram ... just below.}
I have no idea what to say here.
*************************
|
|
*************************
I have worked on this game for days,
and I am still not sure whether this
move is correct or not.
Many good
programs ... like CM9000 ... seem to
prefer a different move in this position.
[ Literal days of effort seems to
confirm that that is possible,
even probable, (!)
that the move
d4xc5 was better here.
For example:
>/= 17.dxc5! Nxf3;
{Diagram?}
It is hard to come up with a better
move for Black.
( </= 17...dxc5??; 18.Nxc5, "+/-" )
18.Qe2 dxc5; 19.Rxf3! Kc7;
{Diagram?}
This appears to be forced.
( </= 19...c4??; 20.Rd3+! cxd3; 21.Qxh5, "+/-" )
20.g4!! Qxg4; 21.Qg2 Qxg2+!?;
{Diagram?}
According to the computer, this
is forced - the alternatives are
all clearly worse!
( Or 21...Qxe4!?; 22.Nxc5 Qc6!?; 23.Nb3 Rd8; 24.Be3, "+/-" )
22.Kxg2 c4; 23.Na5 f6!?;
24.Kxh3 b5; 25.b3,
'±' {Diagram?}
Although Black has two Pawns
for a piece, the win is only a matter
of technique; IMO. (Maybe
"+/-")
In all fairness to Rublevsky, I took
many, many hours of time on this
contest ...
and was always assisted
by a good chess program. He had
no such help, and may
only have
had a matter of minutes to make
his move choice in this position.
******************************************************************
Of course NOT: </= 17.Rxe1??, ('????') 17...Qxf3#. ]
*******************************************************************************
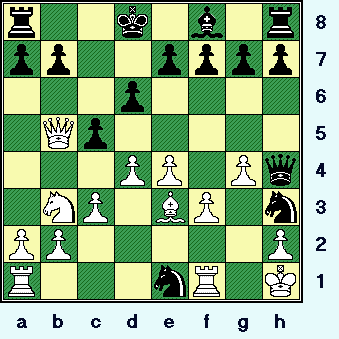
17...Qh4;
{Box?}
{Diagram?}
Once again ... according to all the
boxes, this move is forced.
[ </= 17...Qg6?; 18.Rxe1, '±' ('±±') ]
In this position, many programs
want to play Nxc5!? or Qxb7.
(Remember - White is a Knight
/piece down in this position.)
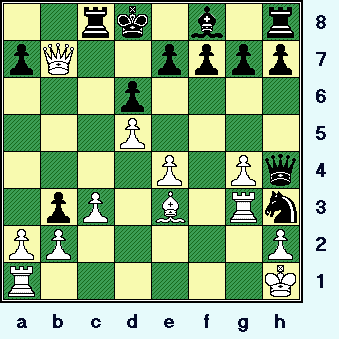
18.Be3!!,
(hmmm)
{See the diagram - just below.}
This move is NOT about getting the
piece back - in fact, White is about
to sacrifice another
piece here. (This move also protects White's
crucial f2-square.)
*************************
|
|
*************************
The way in which White calmly ignores
taking a piece and serenely mobilizes
the last remaining
forces is a very
attractive idea ... and reminds us of
the great Mikhail Tal at his best.
[ But not:
</= 18.dxc5?? Nf2+;
19.Kg1 Nxf3+; 20.Kg2,
20... Nxg4;
("-/+") {D?}
and Black's attack crashes through. ]
18...c4;
{Box?}
{Diagram?}
According to several programs,
this move is probably forced here.
[
...Nc2 looked interesting, but ...
</= 18...Nc2!?; ('?!')
19.Nxc5!! dxc5;
20.dxc5! Nxe3!?;
('?') {Diagram?}
Not good - but there is nothing
here
that will save Black's game.
( Or 20...e6; 21.Rad1+, ("+/-") ... White has a winning attack. )
21.Rad1+! Nxd1;
22.Rxd1+ Kc7; 23.Rd7+,
("+/-") {Diagram?}
and mate next move. ]
19.Qxb7!?,
(Maybe - '!'/'!!')
{Diagram?}
This is very sharp, and since the
final denouement is nearly ten
moves (or more!)
away - it might
be beyond the computers ability
to see the true value of this move.
[ Also very good was:
(>/=)
19.Na5!? Nd3; 20.Qxb7 Rc8;
21.Nc6+ Rxc6;
22.Qxc6 Nhf2+!?;
{Diagram?}
It is difficult to suggest real
improvements
(for
Black) in this position.
( </= 22...e6?!; 23.e5!, '±' )
23.Bxf2 Nxf2+; 24.Kg2 Nd3;
25.Qa8+ Kd7; 26.b4!,
"+/=" ('±') {Diag?}
(and) White is clearly better here. ]
Black's reply is forced.
19...Rc8[];
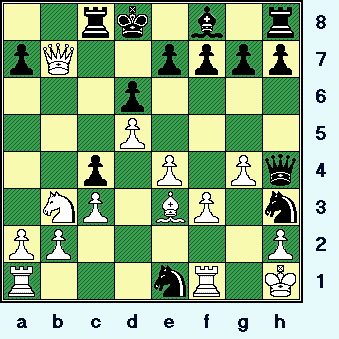
20.d5!?, (hmmm)
(Maybe - '!!')
{See the diagram ... just below.}
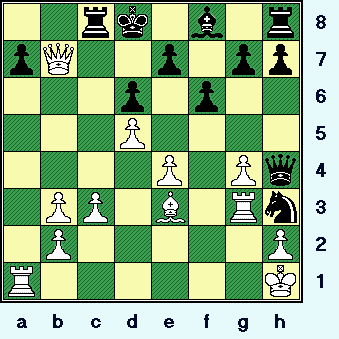
Is this ... "all part of the show," here?
White is preparing several ideas - like Bxa2; and if ...c4xb3; then axb3, opening the key a-file.
*************************
|
|
*************************
Strangely this is like the fourth or fifth
move choice here is several different
strong programs
in this position! (Yet
White wins brilliantly with this move ...
it is hard to argue with success.
And
since the combination is something
like 8 moves long here, it might be {again!} beyond
the machines ability
to correctly see the outcome!)
**************************************************
---> Some of the alternatives are examined just below here.
[
Var.)
# 20W1.
Also good for White was:
(>/=) 20.Na5!? Nd3;
21.Nc6+ Rxc6;
22.Qxc6,
"+/=" (Maybe - '±') {Diagram?}
with play similar to a line that
was analyzed previously.
*************************************************************
Var.) # 20W2.
Another line that was good for White
is the following continuation:
(>/=) 20.Nc5!, ('!!')
20...dxc5; 21.Raxe1! Rc7;
22.Qd5+ Rd7[]; {Diagram?}
This is almost assuredly forced.
( </= 22...Ke8?; 23.Qa8+ Kd7; 24.Rd1!, "+/-" )
23.Qa8+ Kc7; 24.Qxa7+ Kc8;
25.Qa8+ Kc7; 26.dxc5,
'±' {Diag?}
White is practically winning
here. (Black's King is too exposed.)
*************************************************************
Var.) # 20W3.
The best line probably is:
>/= 20.Raxe1!! cxb3; 21.d5! Rc7;
{Diagram?}
This is practically forced.
( </= 21...bxa2??; 22.Bxa7. "+/-" )
22.Qa8+ Kd7[];
{Diagram?}
Absolutely no choice.
( </= 22...Rc8??; 23.Qxa7. "+/-" )
23.Bxa7 Ng5[];
{Diagram?}
Once again - there is no real
choice here for Black.
( </= 23...e6?; 24.Bb6. "+/-" )
24.Bb6 Nxf3; 25.Re2 Qxg4;
26.Re3! Ne5!?; 27.h3! Qg5;
28.Qb8, ("+/-")
{Diagram?}
and Black's cause is hopeless. ]
**************************************************
Black's reply seems forced, and is
the first choice of several strong
{commercial} computer programs.
20...Nxf3;
(best)
{Diagram?}
This is probably best, the only
other reasonable move here is
the move, Knight-to-d3.
[ Or
</= 20...Nd3?!; ('?')
{Diagram?}
This move idea has a nice
refutation here.
21.Bxa7! Rc7; 22.Qb8+ Kd7;
23.Bb6 Nhf2+; {Diag?}
Its worth a try.
( Or 23...f5!?; 24.Qxc7+ Ke8; 25.Qxc4, "+/-" {Diagram?}
with a won game. )
24.Rxf2! Nxf2+; 25.Kg2 f5!?;
26.e5!, ("+/-") {Diagram?}
White is close to administering
a mate in this position. ]
21.Rxf3 cxb3;
22.Rg3!,
{See the diagram - just below here.}
It is a fairly safe bet that Black
probably overlooked this neat
in-between move ...
I know that
I did!! (The first time that I played
over this game. The point is that
Black's Q+N
are now kept out
of the game long enough for White's
Queen-side attack to be successful.)
*************************
|
|
*************************
And now White is winning, no matter what Black plays from here.
[ Or </= 22.axb3 Qxg4; "/+" {Diagram?} and Black is better. ]
22...f6!?;
(Maybe - '?')
{Diagram?}
Black is lost no matter what move
he chooses at this point, but this
move (mercifully?)
allows a quicker
finish to the game. (The first choice
of both Fritz and ChessMaster are
the move, ...Rc7; in this position.)
I am not a big fan of kicking a guy
when he is down. A loss is a loss,
I usually only pipe
up when a player
does something really stupid ... like
(yet) another huge blunder, or walks
into a mating sequence.
The purpose of ...f6; in this position
is to give the Black King an escape
hatch.
(Flight square - to avoid a mate.)
************************************
[ Probably the best move was ...Rc7; but even this will not save Black.
For example:
>/= 22...Rc7;
23.Qb8+! Kd7; 24.Bxa7! e6; 25.Bb6 Nf2+;
26.Kg2! Qd8[];
{Diagram?}
This is forced, otherwise Black
will probably
get mated.
( Not </= 26...Rc4??; 27.axb3, "+/-" {D?} and White will mate Black.
Or </= 26...Nxg4??; 27.Qxc7+ Ke8; 28.Qc8+ Qd8; 29.Qxd8#. )
27.Qxd8+ Kxd8; 28.Kxf2 Kd7;
29.Bxc7 Kxc7; 30.axb3,
("+/-") {D?}
with a massive material edge.
(This was the correct way to avoid a loss in under 25 moves.) ]
************************************
23.axb3!?,
(hmmm)
{See the diagram ... just below.}
The opening of the a-file is
immediately decisive. The computer
prefers the Bishop capture on a7,
but the two ideas are very close
to being interchangeable. (The two
moves may even transpose into
the basically the same variation.)
*************************
|
|
*************************
This probably should have been the
last move of the game, as White's
advantage is now decisive.
(Did
Black play on ... to avoid having
this game labeled as an ultra-brilliant
miniature?)
[ The continuation of:
(>/=) 23.Bxa7 Ng5; 24.axb3 Ke8;
25.Qxc8+ Kf7; 26.Be3,
"+/-" {Diagram?}
is similar to the game.
{And
also winning easily for White!} ]
23...g5!?;
(hmmm) {Diagram?}
Black tries to mix it up ... but it
is getting close to the time to
throw in the towel. (Once again,
...Rc7; might be a little better ...
but it will make no real difference
to the outcome of the game.)
[ Or
23...Rc7; 24.Qb8+ Rc8;
25.Qb5 Rc7; 26.Bxa7,
("+/-") {Diagram?}
and the Black King and Rook
cannot repel White's attackers. ]
24.Rxa7 Ke8; 25.Qxc8+ Kf7; 26.Qe6+, ("+/-") Black Resigns, 1 - 0.
A very brilliant and truly incredible chess game ... that should have also been a "shortie."
I always knew that Rublevsky was
an exceptional player, but this game
gives me more respect
for his tactical
prowess ... in addition to his already
impressive positional skills.
Here is a game that seems to baffle
even the best computer programs.
The combination begun
at move 12
is "once-in-a-lifetime," and took
days of work with the computer
before I began to
appreciate it fully.
This is also an excellent game to try and study in parts, and in depth - to increase your tactical skills.
**************
All pages - HTML code initially generated with
the program, ChessBase 8.0.
The diagrams on this page were generated with the use of the
program, Chess
Captor
2.25.
****************************************************
Copyright (©) A.J. Goldsby, 2004 - 2005.
All rights reserved.
****************************************************
