Loek
Van Wely (2617) - Jan Timman (2578)
|
|
|
*************************
And ... believe it or not ... this move is the first new move of the game, at least as far as I could determine from literally dozens of different database searches. (White usually captures on c5 here. One game saw b4!?, and in another contest, White actually castled on the Queen-side in this position.)
************
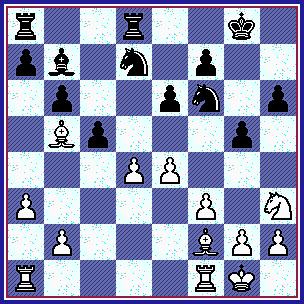
[ Possible ... but not necessarily better was the continuation of:
19.dxc5!? Nxc5; 20.Bxc5 bxc5;
21.Rc1, (isolated c-Pawn)
{Diagram?}
and the first player has the better pawn structure,
...
(two pawn-islands versus three for Black); for the coming endgame.
Merab Gagunashvili (2580) - C. Li Wenliang (2477);
ICT / Masters / 'Harmonie' (Open?) /
Groningen, NED; 2003.
(1-0 in 54 hard-fought moves.)
]
************
19...Rac8;
20.Rad1 a6!?; {Diagram?}
This looks innocent enough here, but later in the game Black will be wishing that he could take
this move back! Really!!
21.Be2!?,
{Diagram?}
White decides to keep the Bishops and not exchange down at this point.
[ Possible was: 21.Bxd7, "~/=" ]
Now the first player finds a nice plan to re-position his pieces and try to increase the pressure.
21...Kf8;
22.Be3! Ke7; 23.Nf2 cxd4; 24.Rxd4 Rc2; {Diagram?}
Black forces an exchange of Rooks, but this does not help him much.
25.Rd2 Rxd2;
26.Bxd2 Rc8; {Diagram?}
A natural move ... Timman grabs the only open file.
[ Or Black can play:
26...Ne5!?; 27.Bb4+ Ke8;
28.Rc1, "+/=" {Diagram?}
but White might maintain a slight edge from this position.
]
27.Nd1!?,
{Diagram?}
An interesting move - Van Wely forgoes the exchange of any more material, and even sets
a small trap.
[ Also to be considered was the move:
27.Rc1,
{Diagram?}
and forcing the exchange of Rooks.
]
27...Ne8;
('!?') {Diagram?}
This looks slightly artificial ...
but there is no easy path to equality for Timman
from this position.
[ Or 27...Rc2; 28.Bb4+ Ke8; 29.Bd3 Rc6; 30.Bc3, "+/=" ]
Note
that when White's Knight comes to the e3-square, the Black Rook cannot
invade on
the seventh rank anymore.
28.Ne3 a5!?;
(Probably - '?!')
{See the diagram, just below.}
This prevents Bb4 by White ... but has the disadvantage of greatly
weakening the b6-square.
(Most programs note an immediate increase in the overall point score.)
*************************
|
|
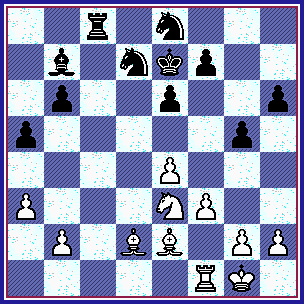
*************************
Additionally, White now has the possibility of a pawn-lever that greatly increases the energy
of his position.
[ Maybe a little better was:
(>/=) 28...Nd6; 29.Rd1,
{Diagram?}
but White maintains an edge. ]
Loek van Wely responds in an extremely vigorous fashion.
29.b4! axb4!?;
{Diagram?}
Seeking solace in exchanges ... but this also brings White's QB strongly into play.
[ Was the move: 29...a4!?; {Diagram?} playable here for Black? ]
30.Bxb4+ Kf6?!;
{Diagram?}
This gets the King almost completely out of trouble but also gets one of
Black's strongest pieces completely out of the fight!
[ Probably better was:
>/= 30...Kd8; 31.Rd1 Kc7!;
32.a4!?, "+/="
32...Bc6!;
"<=>" {Diagram?}
If Black can force White to play a4-a5,
he will have drawing chances based on the fact that
all the Pawns are on
the same side of the board. (Maybe instead of a4, Ng4 might be a small
improvement for White?) ]
31.Bb5 Nb8;
32.Nc4!, {Diagram?}
White immediately brings the Knight to bear on the weak Pawn on b6.
[ Some programs like: 32.Rd1!?, {Diag?} here for White, instead of Nc4. ]
32...Ba6!?;
33.Nxb6 Rd8; {Diagram?}
The old rule of thumb for positions like this is:
"When you have a bad game, avoid the exchange of PIECES! But try to trade as many Pawns
as possible, as this will increase your chances of drawing the game."
[ Or
33...Bxb5!?; 34.Nxc8 Bxf1;
35.Kxf1, '±' (Maybe "+/-") {Diagram?}
White's QRP is very strong here.
]
Black continues to struggle, but GM L. van Wely has a very strong grip on the game now.
34.a4 Nc7;
35.Bc3+ e5; 36.Rb1! Bxb5[]; 37.axb5 Rd3; 38.Ba5 h5;
39.Rc1!?,
39...Nxb5;
40.Nd5+ Kg7; ('?')
{Diagram?}
A small error in a position that is already lost
for Black.
(If Timman wanted to continue, he was forced to sacrifice the exchange
on the d5-square.)
[ >/= 40...Rxd5; 41.exd5 Nd7; 42.Bd8+ Kf5; 43.Kf2, "+/-" ]
41.Rb1, ("+/-") {Diagram?} Black Resigns.
An impressive display of technique by Van Wely. When this volume of TWIC was available
for download, I immediately noticed and played through this game.
During the next week, I went through this game about a dozen more times.
(WITHOUT the aid of any programs or computers!!)
It was NOT immediately evident where or when Black made his mistakes!!
(In fact, it took about two weeks of study to be able to pinpoint exactly where Black went astray.)
*******************************************************************************
Copyright (©) A.J. Goldsby I.
Copyright (c) A.J. Goldsby, 2004. All rights reserved.
************************************************
All games - the HTML code was (initially) generated with the program, ChessBase 8.0
The diagrams on this page were generated with the help of the program, Chess Captor 2.25.
************