GM Alexander Morozevich (2743) -
GM Krishnan Sasikiran (2666)
|
|
|
A.J.'s
"Game of The Month" for
August, 2004. (From TWIC #
508.)
[My website for this feature is {now}
located at: http://www.geocities.com/TheGOTMman/index.html.]
(Also - this page
represents the
third
{# 3.} installment
of ...
MY OPENING SCHOOL.)
Here the fiery player Morozevich,
who won the event
that this contest
was played in - with a near 2900
performance rating - outplays his
strong opponent, in a very sharp
clash of ideas and tactics.
*********************************************************************************
This game was played at the recent Super Tournament in the city/town of Biel, Switzerland.
*** *** *** *** *** *** *** *** *** *** *** *** *** *** *** *** *** *** *** *** *** *** *** ***
{The ratings are accurate and are
these player's current ELO values.
They were the ratings that were assigned
to this game when I downloaded
it from TWIC ... of course it was
completely UN-annotated then.}
1.e4 e5;
{Diagram?}
Probably the best way to meet
White's opening move ... Black
simply mirrors his opponent's
pawn play,
and gets control of
the vital d4-square.
Some other good things that the
Pawn move of ...e7-e5; will do
for Black is:
# 1.) Open the e7-square for
Black's pieces;
# 2.) Clear the diagonals of the
of both Black's Queen and Bishop;
# 3.) Fix White's KP and make the
f6-square safer for Black's Knight;
# 4.) Because of all the above
factors, Black has facilitated a very
rapid King-side development.
The method of initially occupying
the center with Pawns represents
the Classical School of thought here.
(The "hyper-moderns" believed that
most such advances should be held
back until it was clear what the
best
Pawn Formations were going to
be.)
[ Of course, many top GM's also
play the Sicilian in this position.
After 1...c5!?;
{Diagram?} which also controls the d4-square,
but Black's K-side development
is much slower.
[ A fairly recent annotated game where the Sicilian is used. ] ]
2.Nf3, (Maybe - '!') {Diagram?}
For the beginner, this is the best way to play.
White plays one move that adheres to ALL the four (of my) basic Principles of The Opening.
****************************************************************************
[ The four basic concepts,
{Principles of the openings.};
are:
# 1.)
Control the Center.
# 2.) Rapid development.
# 3.)
Protect the King and castle
early. (If at possible.)
# 4.)
Maintain the material balance,
(SQUARE CONTROL!); unless you
are playing
an intentional gambit.
]
*** *** *** *** *** *** *** *** *** *** *** *** *** *** *** *** *** *** *** *** *** *** ***
{These principles should be applied - very systematically - every single move, during the opening phase.}
**********************************************************************************
**********************************************************************************
Note how White's move does all
of these things - hits key center
squares, develops a piece, attacks
the button on e5, and also prepares
K-side castling. [
more
(on this topic) ]
**************
[
In the 17th and 18th Century,
most masters opened with the
flashy and somewhat risky
move of: 2.f4!?,
{Diagram?} While, strictly speaking, this move
is NOT unsound, few
top GM's
play this move today. (I have
always been a big fan of the
King's Gambit. But
when I was
coming up in chess, VERY long
periods ... like 3-4 years ...
would go by,
and you would not
see a single, decent KG
encounter in any issue of the
INFORMANT.)
Needless to say, the King's Gambit
has NOT been refuted ... and many
of the world's best
players,
(Fischer, Spassky and many
others!); have used this
enterprising line. However, it
has
been my experience that when an
inexperienced player tries this
opening, it often leads
to a
complete disaster for White.
[ A game where this opening is analyzed in some depth. ] ]
**************
2...Nc6;
{Diagram?}
The most sensible reply ... and
one that also adheres to ALL 4
of the basic opening principles.
(Although Black rarely castles
on the Q-side in KP openings!!)
[ A move like the one:
2...d6;
{Diagram?}
(The Philidor's
Defense.); will
protect Black's KP. The drawbacks
are that it hems in
Black's KB, the
move does not develop a piece,
and it also severely curtails the
second
player's options.
This opening is both extremely
solid, and playable. But is also dull,
and a little drawish as well.
For
these reasons - and those outlined
above - this opening has never
had much of a following
at the
master level. (GM Bent Larsen, in
his prime, being one happy, very
notable exception.);
**************************************************************************
The other possible move for Black
in this position is the try:
2...Nf6; (counter-attack)
{Diagram?}
which, of course, is the Petroff's
Defense here for Black. [more] ]
3.Bb5,
(Maybe - '!')
{Diagram?}
Here it is, one of the oldest and
most respected of all openings.
>>> The RUY LOPEZ. <<<
(The Spanish Priest - for whom
this opening is named for - called
this a "very old" move ...
several
hundred years ago!!!)
The Ruy Lopez is also one of the
most-played opening systems at
the "master-plus" level, it was
featured in several of the games
between GM Michael Adams and
GM Rustam Kasimdzhanov.
(The FIDE Final Match of the K.O.
Tournament in Tripoli, Libya; 2004.)
{There are literally thousands and
thousands of games of this system
in the databases today.}
But when I have taught many lower-rated players this opening, they
almost always object!
(The move) Bb5 DOES
develop a piece and prepare to get
the King to safety ... but it does
NOT (directly) influence any key
central squares! So why play it?
The simplest answer is that this is
more of a POSITIONAL move, than
a truly TACTICAL one
like Bc4. The
first player plays to UNDERMINE
Black's hold on the center ... and
also immediately
threatens the
second player's defense of his KP.
And if play continues: 3...a6; 4.Ba4,
4...b5!?; 5.Bb3,
White gets his
Bishop to the key a2-g8 diagonal
and hits the f7-square ... but does
so from a SAFER
distance! (On c4,
Black often has tactics like NxP/e4;
followed by ...d7-d5; regaining
the material
because he forks the
WB on c4 and the WN on e4.)
I interpret this opening as a struggle
to dominate the center ...
most importantly the d4-square!
---> THE PLAYER WHO WINS
THE FIGHT OVER THE CENTER ...
WILL OFTEN WIN THE GAME!!!!! {Or at least come out of the opening
phase with some
type of advantage.}
[
The beginner always prefers to
play a {seemingly} much more
aggressive move like:
3.Bc4!?, {Diagram?}
immediately eyeing the sensitive
f7-square.
(Not a bad idea.)
I know quite a bit about this
opening
... it was my number one
opening in tournaments
for over
thirty years!! (I even have a line
in this opening named after me.)
Beginners are always taught this
opening, and interest remains very
high in this method of
development.
(GM Andy Soltis wrote at least two
books on this opening weapon,
and
renowned New Orleans
Master - Jude Acers, has recently
released a brand-new
book in
this variation.)
[ See a good reference book
like MCO-14, for more details on
how to {correctly} play
this often
wild and complex system. ] ]
3...a6!;
(The best!)
{Diagram?}
This is the famous and very
well-known ... "Morphy Defense."
{Morphy did not originate this line,
however, he was the first player
to play this move on a regular
basis ... and he was also the first
person to clearly demonstrate the
strengths and advantages of
this
particular defensive system for
Black.}
In my opinion, this is absolutely
the best move here. (This does
not mean the other systems are
not
fully playable! They certainly are!) But it seems to
give Black the best chances -
and statistically - it
also has the
best results at the GM level. It
also seems to greatly increase
Black's options ... and even
the
energy of the position for the second player here as well.
*********************
[
Black can also play:
("=") 3...Nf6!?; 4.0-0 Nxe4!?;
5.d4! Nd6!?; 6.Bxc6 dxc6;
7.dxe5 Nf5; 8.Qxd8+ Kxd8; "~"
{Diagram?}
when Black's position ... despite
its seemingly ugly and anti-positional nature ...
has withstood
near all attempts by the first player
to refute Black's set-up here.
Probably the best game - and one
of the most memorable - would be
the
following encounter:
GM G. Kasparov -
GM V. Kramnik; "The Brain-Games" ...
Chess World's Championships.
/ London, England; (UK) 2000.
This was played in the very first
game of the match ... and Garry
was unable to break
down
Black's iron-willed defense.
This stood the world of chess
opening theory on its ear ... "The Berlin Defense,"
was always
viewed as a grossly inferior
opening line. As a result, many
players have
taken up the banner;
and today play this line on a very
regular basis.
[ See MCO-14, page # 45; column # 08, and all applicable notes for this line. ]
*** *** *** *** *** *** *** *** *** *** *** *** *** *** *** *** *** *** ***
{My objections to this line are:
# 1.) It is boring - the Queens are
traded very early on.
# 2.) It is a line that ONLY aspires
to draw - Black does NOT attempt
to win
with this variation.} ]
*********************
4.Ba4!?,
(Maybe - '!')
{Diagram?}
One of the best lines ... White
maintains the tension, as well
as all the threats.
Of course White could play the
"Exchange Variation," (Bxc6) which is
a system that is completely
different
than the one chosen by White
here. (It also poses an entirely
different set of unique problems
for the second player - see any
good or reliable reference work
for more information here.)
[ White
was not yet threatening to
win a Pawn. For example:
</= 4.Bxc6!? dxc6; 5.Nxe5?! Qd4!;
6.Nf3 Qxe4+; ("=/+")
{D?}
and Black regains the Pawn
with a very slight advantage. ]
**********************************************************************************
**********************************************************************************
Both sides continue to develop
- in a fairly normal manner.
(Black plays to hold the e5
point - whereas the
move of
capturing on e4 with the Black Knight
on move five - greatly clears the
lines in the center ... and
is the
beginning of, "The Open Variation." This is a completely
different system than the one used
in this
particular encounter.)
4...Nf6;
5.0-0 Be7!?; ('!')
{Diagram?}
The most solid choice here
for the second player here.
("The Closed System" for
Black - in the Ruy Lopez.)
With this continuation, Black simply
develops a piece ... and maintains
his Pawn on the e5-square.
The
second player is also now ready
to castle next move.
[ For the continuation of:
5...Nxe4!?; {Diagram?}
This move marks the beginning
of the so-called "Open System"
for Black.
(Some GM's like it, and
some don't. According to my books
- which run from
a book that is
very recent, all the way back to a
book printed in the late 1960's -
this opening line has always been
under a cloud.
{Theoretically speaking!}
Personally, I feel the variation
is OK, but I will also be the first to
admit I am NOT
an expert on this
particular sub-system of the
Ruy Lopez!)
6.d4 b5; 7.Bb3 d5;
8.dxe5, "+/=" 8...Be6;
"~" {Diagram?}
The current position strikes me
as unclear. Nevertheless, the
second player's results
with this particular line have been dismal,
especially at the World
Championship level.
(See the FIDE World Championship
Matches of the 1950's, Korchnoi's
failures against
Karpov, and finally
Anand's loss against Kasparov in
the WCS Match in 1995.)
See MCO-14. (Or any other good, opening reference book.) ]
6.Re1,
('!') {Diagram?}
The simplest move, and the play
that is most consistent with
White's overall strategy of trying
dominate
the center with the
foot soldiers. {And now that
White's KP is protected, the
first player is really threatening
to play BxN/c6, followed by
NxP/e5 ... winning a Pawn.}
[
Interesting is:
6.Nc3!?,
"+/=" {Diagram?}
but White can no longer play
c3, followed by d2-d4. ]
Black's next move is specifically
designed to meet the threats
against Black's e5-square.
6...b5!;
7.Bb3 d6; {Diagram?}
The most solid line. Black
protects his Pawn on the e5-square, and also threatens to
play
... N/c6-a5; gaining the
Bishop pair.
*********************
[ After the following moves:
7...0-0!?; 8.c3 d5!?; ('!!?!')
9.exd5 Nxd5;
10.Nxe5 Nxe5; 11.Rxe5 c6!;
"~" {Diagram?}
we reach the modern lines of
Black counter-attack known as
... "The Marshall Gambit."
I strongly advise any player who
is seriously considering to play
these sharp lines,
to consult a
chess coach; and also purchase
a book completely dedicated to
the
ideas of this very sharp line.
[more]
[ See also MCO-14, pg. # 91.] ]
*********************
******************************************************************************
White next move accomplishes MANY
different things! (It covers
both the d4 and the b4-squares,
it prepares a general Pawn
advance in the middle of the
chess board, {d2-d4}; and it also
gives the
White light-squared
Bishop a ... "hidey-hole" ...
on the c2-square.)
8.c3! 0-0;
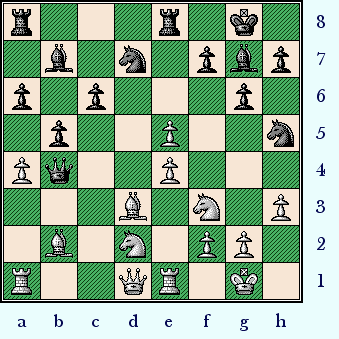
9.h3!, {See
the diagram ... just below.}
Absolutely the best and the most
positional treatment. (White
prevents the pin and exchanges -
but most
importantly, the d4
square is a key part of White's
plan. Without the Knight on f3,
White cannot win the
fight for
this crucial square!)
Of course d2-d4 IS OK ... and is
fully playable for White ... but is the
starting point for a completely
different system!!
************************************************
|
|
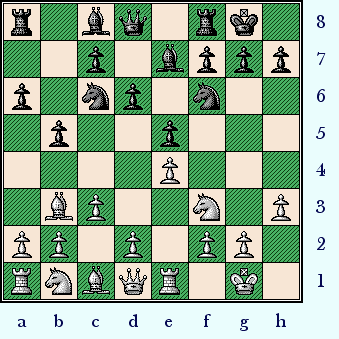
{The actual position on the chess board, after White plays 9.h3.}
************************************************
*** *** *** *** *** *** *** *** *** *** *** *** *** *** *** *** *** *** *** *** ***
Black now has many different
responses to White's last move;
each one initiates an entirely
different (sub) - system of the
Ruy Lopez!! (Tchigorin, Zaitzev,
Keres, etc.)
[ After the moves of:
9.d4!? Bg4; 10.Be3!?,
{Diagram?}
This is the move almost
universally recommended by
most opening books
in this
particular position.
( Also possible is: 10.d5!?, "=" {Diagram?}
which seems to be about
equal ... maybe, just
maybe
... White is a little better. )
10...exd4; 11.cxd4 Na5;
12.Bc2 c5; "~" {Diagram?}
White may have a TINY edge,
however I evaluate this position
as being somewhat unclear.
Haba - Foisor; ICT / Masters {open?} / Bad Worishofen, GER; 1992.
[ See MCO-14, page # 79;
columns four, (# 04); through column
five, (# 5);
and all applicable notes. ]
*** *** *** *** *** *** *** *** *** *** *** *** *** *** *** *** *** *** *** *** ***
See {also} the following clash:
GM Rustam Kasimdzhanov - GM Michael
Adams;
ICT/ FIDE World Championships
{A Knock-Out event.} (Game # 7)
Tripoli, Libya; / June 19th, 2004.
{This game was drawn after
some very wild and rather
strange adventures.}
I have deeply annotated ALL the
games of this match ... this e-book
is available
on my "downloads"
web-site,
now - at no charge!
(However, you MUST
have a
current ChessBase program ...
in
order to be able to read this file!!) ]
**************************************************************************
Black's next move looks almost
like a beginner's play ... ... ...
9...Nb8;
('!?')
{See
the diagram - - - just below here.}
This 'strategic retreat' is the
beginning of ... "The Breyer
System."
***************************************
|
|
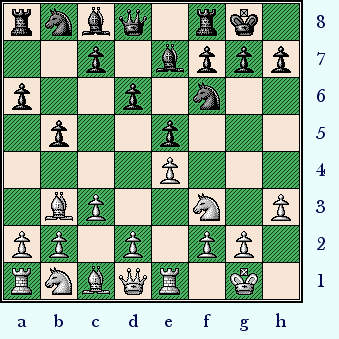
***************************************
{Julius} Breyer was one of the members
of the "Hyper-Modern School."
(Although this is not technically a
real hyper-modern type of
opening, this school of thought
brought
new ideas to many of the
older opening lines.)
*******
The
main ideas
of this variation are:
A.)
Free Black's Queen-side
Pawn majority to advance; ('!!')
B.)
Clear the long diagonal for
possible use by the Black QB;
C.)
Re-position the Black
Knight on the d7-square ... where it is much more flexible,
(and also not unprotected!);
supports is 'brother' on f6, and
can even be rushed to
the
defense of the King - should
the situation on the chessboard
require it.
(In some lines, if
White should play the pawn
push of d4-d5, a BN on d7 can
also
utilize the handy c5-square.)
*********************
[ The older move here is:
9...Na5!?;
{Diagram?}
which leads to the lines of
... "The Tchigorin System."
{See any good reference book.}
[ See also MCO-14, beginning on page # 81. (All columns.) ] ]
We continue with the actual
game ... both sides continue to
travel a well-known main line.
10.d4,
(lever)
{Diagram?}
Note how this move is basically a
moral victory for White. The first
player has achieved
the objective
of dominating the center with
pawns.
*********************
[
A very interesting game was:
10.a4!? Bb7; 11.d3!?,
{Diagram?}
Much too slow a treatment to
be effective here.
( Better was: >/= 11.d4!; "~" )
11...Nbd7; 12.Bc2 Re8;
13.Nbd2 Bf8; 14.Nf1 c5; 15.Ng3 g6;
{Diagram?}
This is good - very solid
and sensible. (Fritz likes
...d6-d5; in this position,
I am
not sure if Black is
ready for this advance.)
16.Bg5 Qc7; 17.Nh2!?,
{Diagram?}
White has no time for such a
maneuver ... his first priority
should have been to
control
the center of the chess board.
( Better was: >/= 17.Qe2, "=" {Diagram?} or even the try, c3-c4!? here. )
Black now offers to (possibly) sacrifice a Pawn ... simply to allow his pieces more play.
(It is strange to see this idea
played in this game. I get the
eerie feeling that
Garry Kasparov
might have played the same
move in this particular position!!)
17...d5!; ('!!')
18.Qf3 Bg7; 19.h4?!,
{Diagram?}
This is too ambitious ... and
is not merited by the current
position.
( >/= 19.Ng4 Nxg4; "~" ("=/+") )
Black now gains space ... a
very important basic element
of chess. Meanwhile, the first
player continues on his merry
way ... with his ... "attack."
19...d4!;
{Diagram?}
This is good ... and several
annotators praised this move.
(Fritz likes this idea, but prefers
to play ...h6; and then ...d4.)
20.h5!? c4!; 21.Rac1!? Qb6;
22.axb5 axb5; 23.Bb1!?, (Maybe - '?!')
{Diag?}
This could be less than best,
but it is difficult to be sure.
( Maybe slightly better was: 23.h6!? Bf8; 24.Qe2!? dxc3!?;
25.bxc3 Ra3!; "=/+" (The a-file.)
(and) Black holds a small edge. )
Black continues to work on
the idea of holding extra
space ... and maybe just
trying to
smother White.
(It is fairly instructive how
Spassky just overwhelms
White on d3 and c3.)
23...Rac8; 24.Ba2!? Ba6!;
25.hxg6!? hxg6; 26.Red1 Nh7!?; 27.Bd2!?
Nc5!;
28.dxc4 bxc4; 29.cxd4 Nd3!;
30.Rb1?!, {Diagram?}
This is - again - too passive.
(White seems to be fiddling ... while Rome burns!)
** ** ** ** ** ** ** ** ** ** ** ** ** ** ** ** ** ** ** **
( It seems that White had to
try and play:
>/= 30.Rc3 Nb4; 31.Bb1 exd4;
"/+" {Diagram?}
but Black remains solidly better. )
** ** ** ** ** ** ** ** ** ** ** ** ** ** ** ** ** ** ** **
30...exd4; 31.Ng4 Ne5!?;
{Diagram?}
It is very nice to play only thirty
moves ... against a very
strong master ...
and have such a favorable position.
( Several different strong
programs, like Fritz, DJ,
CM9000 ...
all prefer to
play: (>/=)
= 31...Bb5!; "/+" {Diagram?}
with a big plus for Black. )
32.Nxe5 Rxe5; 33.Rdc1 Ng5;
34.Qg4!? Nxe4!; {Diagram?}
GM Andy Soltis calls this ...
"The final shot in the positional
struggle." He goes on to say,
"All that Black needs now to
win ... is a little King safety."
35.Nxe4 f5; 36.Qe2 Rxe4;
37.Qf1!? Qe6!; 38.b4 Bb5;
{Diagram?}
Black is probably winning here.
But now Qd3 was worth a try ...
39.Qd1?! Kf8!;
{Diagram?}
This wins ... playing the Black
Rook to the e2-square! ... was also decisive here.
*************************************************
|
|
(An analysis diagram, the position after 39...Kf8; in the quoted game.)
*************************************************
40.Qf3 d3; 41.Rc3!?,
{Diagram?}
This is equivalent to
resignation. No further comment is required.
( Or 41.Be3 Ra8; ("-/+") )
Now ...Ra8; might be best.
41...Qc6!?; 42.Ra1 Re2; 43.Qf4 Qf6!?;
44.Rd1, {Diagram?}
Stop squirming! [ (>/=) Bxc4 ]
( 44.Rac1 g5!; "-/+" - A. Soltis. )
44...Rxd2!; 45.Rxd2 Qxc3; 46.Qd6+ Kg8;
47.Rd1 Kh7; 48.Qh2+ Bh6;
49.Qd6 Re8; 50.Qc7+ Qg7; 51.Qc5 d2!;
("-/+) {Diagram?}
and ... WHITE RESIGNED.
(0-1)
"When White loses in a Ruy
Lopez, it is often due to a
tactical error or a dangerous
counter-attack. But rarely is
he so completely squashed
positionally ... as in this game!"
- Andrew Soltis
Borislav Milic
(YUG) -
(future)
GM Boris Spassky
(USSR);
The
(FIDE?) Student Olympiade /
Lyons, France; 1955.
{Many databases give this game
as being played in 1952.}
[ See the excellent book:
"The Best Chess Games of
Boris Spassky," by A. Soltis.
Copyright (c) 1973.
Published by David McKay.
(Of New York City, NY; USA.)
Library of Congress card catalog
number: # 72-95165 ]
** ** ** ** ** ** ** ** ** ** ** ** ** ** ** ** ** ** ** ** ** ** ** ** ** ** ** **
( Now if White takes the
Pawn on d2 ... he is quickly
mated.
For example:
51...d2!; 52.Rxd2?, {Ugh!}
{Diagram?}
This is a mistake ... the box
says Rf1 was forced here for
White.
(I would prefer to throw
in the towel before making
such a silly move as Rf1!)
( After the moves: 52.Qxb5 Re1+; 53.Rxe1 dxe1Q+;
("-/+") {D?}
Black is also winning. )
52...Re1+; 53.Kh2 Bf4+;
54.g3 Qh6+; ("-/+")
{Diagram?}
and mate - on h1 - next. )
]
******************************************************************************
******************************************************************************
Returning now to the actual
game that we are attempting to
analyze -- for this month.)
10...Nbd7;
11.Nbd2, {Diagram?}
As in just about all the variations of
the Ruy Lopez, White maneuvers
his QN to-d2-f1-g3, (or e3);
in
order to activate this piece. (Many
times this Knight is a useful
component if the first player
decides
to launch an all-out
King-side attack.)
[ The move of:
11.Bg5!?,
{Diagram?}
looks very playable to me
... but is generally thought
to be
ineffective by opening theory. ]
Now Black continues with his
development ... forcing White to
defend the e4-square.
11...Bb7;
12.Bc2 Re8; {Diagram?}
Here is another useful maneuver
for the second player in the Ruy
Lopez. Black plays ...Re8; to be
followed by ...Bf8. Then Black
has the option of ...g6; and ...Bg7;
re-deploying the KB to a much
more useful diagonal. (Another
point is that ...g7-g6; is often very
useful to Black, who wishes to
prevent White from sinking his
QN into the f5-square, via the
d2-f1-g3 route.)
13.a4!?,
(Q-side lever!)
{Diagram?}
White seeks to break down the
pawn structure on the Q-side,
and possibly open the a-file for
his QR.
This move also softens
up b5, making a hanging Pawn
on that square a problem that
Black must keep
constant watch
over.
The most often played move is Nf1.
Naturally - depending on what both
parties play here ...
play can often
transpose from one line to another.
**************
[ I think the main line here is the move Nf1.
For example:
13.Nf1 Bf8; 14.Ng3 g6;
{Diagram?}
Just in time to prevent White
from playing Nf5!
15.a4!?,
{Diagram?}
There's that move again!
( Possible was: 15.Bd2!? )
15...c5;
{Diagram?}
There are 739 games in the CB
database ... with this position!!
16.d5,
(block) {Diagram?}
This move attempts to make
the Black QB ineffective on
the b7-square.
( Or 16.dxc5!? dxc5!?; "~" )
16...c4; 17.Bg5 h6;
{Diagram?}
The end of the column here.
18.Be3 Nc5; 19.Qd2 h5!?;
{Diagram?}
Putting the King on h7 looks to
be a little better or saner here.
20.Bg5 Be7; 21.Ra3!?,
"+/=" {Diagram?}
And now White's move of Ra3 ...
"leaves White slightly better in a
complex, multifaceted position."
- GM Nick de Firmian (In MCO.)
GM Alexey Shirov (2710) -
GM Paul van der Sterren (2555);
ICT / Hoogoven's Masters (A) /
Wijk aan Zee, NED; 1998.
(A pretty long and interesting
contest ... that was drawn.)
{1/2 - 1/2; 61 moves.}
[ See MCO-14, page # 85; column # 19, and also note # (f.) ]
**********************************************************
For a model attacking game, (from
this particular position); see:
GM Michael Adams -
GM Giorgi Giorgadze;
FIDE World Championships
(knock-out) /
Groningen, NED; 1997. ]
**************
Black's next move clears the
e-file for his Rook, and strengthens
his grip on the e5-square.
13...Bf8;
(re-deploy)
{Diagram?}
This is an extremely common
Ruy Lopez maneuver.
(Very often
this piece is ... "reborn" ... on the
long diagonal, and finds new vistas
to gaze at.)
[ Possibly better was:
>/= 13...c5!?,
('!') {Diagram?}
with good play for Black. ("=")
]
14.Bd3,
('!?' or '!')
{Diagram?}
Placing the Bishop on a slightly
better square here - and also
attacking the b5-square.
(I told
you to watch out for this!)
[ Also possible was: 14.b4!? ]
Black now protects b5. (But Black could have considered the pawn advance, ...d6-d5.)
14...c6;
('!?') {Diagram?}
I spent a great deal of time ...
and many different sessions
trying to decide whether or not
the move
...d5; was a substantial improvement over the game. (I am still not completely sure.)
[ After the following moves:
(</=)
14...d5!?; ('?!') 15.axb5 dxe4;
16.Nxe4 Nxe4;
17.Bxe4 Bxe4; 18.Rxe4 axb5;
19.Rxa8 Qxa8; 20.Qe2,
"+/=" ('±') {Diag?}
White has a very solid edge. (But this is only one variation,
are many more
and literally
hundreds of side-lines.) ]
15.b3!?,
('!') {Diagram?}
To me, this is sort of a high-class waiting move. White protects
his a-pawn, and gives himself a few
more squares on the Q-side to
work with. Meanwhile, the first player
has adopted a sort of ...
"wait-and-see" attitude here.
[ Also a very good and a logical
move was the simple:
15.Qc2!?, {Diagram?}
maintaining a small edge
("+/=") for White here. ]
15...g6!?;
(hmmm)
{Diagram?}
The book move here ... Black
continues with the plan of getting
his KB to a slightly better square.
Is it possible ... that this extremely
logical-looking move ... is dubious?
If so, then Black must have
went
very badly astray earlier in this
contest. Where did Black miss the
best line?
[ Another possibility here is:
(>/=)
15...b4!?;
('!') "~" {Diag?}
with play against White's Q-side
Pawn chain. ]
16.Bb2 Qb6!?;
{Diagram?}
This looks somewhat inconsistent.
(This might have worked just a
little better last move.)
Having already played ...g6; the
second player should go ahead
and play his Bishop to ...g7.
{The move of ...Qc7; also looked
a little better here than Q-to-b6.}
[ (>/=) 16...Bg7; 17.Qc2, "+/=" ]
White {now} finds a somewhat
surprising - and a very energetic
reply in this position.
17.c4!,
(b5 - again!)
{Diagram?}
White increases the tension in
the position.
When looking for the best GM game
for the month, I often play through
many games on the computer.
{Sometimes 50-100 a week!} I do
this in the program, ChessBase 8.0. {Most of the time, I use the
"TRAINING" tab in the program,
which means you cannot see the
next move in the game.}
White's vigorous reply here - which
I failed to even seriously consider -
was the main reason that I
chose to feature this particular game.
(And there are more good, {and
also unexpected} moves that
are
coming!!!)
*** *** *** *** *** *** *** *** *** *** *** *** *** *** *** *** *** *** *** *** *** ***
Oh ... by the way ... apparently this
move is also brand-new to master
-level play. (TN) {Previously
White
had always played Qc2 here. I also
found one example of Rb1 in the
on-line database.}
I guess the only question left I had, (...
... ...)
"Was this idea prepared in advance,
or was it discovered at the board?"
***
[
Much less effective would be:
</= 17.dxe5 dxe5; 18.Qc2 Nc5;
19.Bf1 Rad8; "~" {Diag?}
when I feel that Black is no worse
than White in this position.
****************************************************
*** *** *** *** *** ***
*** *** *** *** *** *** *** *** ***
Mostly - White has played Qc2
in this position. For example:
17.Qc2!? Nh5; 18.Bf1 exd4; 19.cxd4 d5!?;
20.Qc3!? Nf4;
21.a5 Qd8; 22.b4 Nf6; 23.e5, "+/="
{Diagram?}
White is very solidly better in
this position ... but the game
was
eventually drawn in just
37 total, overall moves.
GM Sergei Dolmatov
(2565) -
GM Bartosz Socko (2435);
ICT / Euro. Cup (Final-Rd. #3)
/
Kazan, RUS; 28,12,1997. ]
***
17...Nh5!?
(Hmmmm.)
{Diagram?}
Black heads for the outpost on
the f4-square. Surprisingly, and
without any really visibly faulty
moves,
Sasikiran has drifted into
a distinctly inferior position here.
*******
[ Variation # 17B01.)
The other alternative for Black
was to try the continuation:
17...exd4!?; 18.Bxd4 c5;
{Diagram?}
This is more-or-less forced
here, otherwise Black drops a
Pawn on b5.
( Not to be recommended
was the following line:
</= 18...Qd8?!; 19.axb5 axb5;
20.cxb5 c5;
21.Bc3, ('±') {Diagram?} and Black does not have
sufficient compensation for the
Pawn in this position. )
19.Bxf6 Nxf6; 20.cxb5,
"+/=" ('±') {Diagram?}
Black loses a Pawn, but does
have some limited compensation
in the form
of the two Bishops.
{Since Sasikiran rejected this line,
we can only assume
that he felt
it was inadequate for Black.}
*************************************************************************
Variation # 17B02.)
Black could also try: (</=)
17...bxa4!?; ('?!')
18.c5 dxc5!?;
(Probably - '?!') {D?}
This move is the first reaction of
several computer programs
that I tested this line on ...
but (the
move of) ...Qc7; might be a much safer
try for Black in this position.
( After the following moves: >/= 18...Qc7[];
19.cxd6 Bxd6;
20.Rxa4, "+/=" ('±') {Diagram?}
White is markedly better ...
but this still looks like a solid
improvement for Black. )
19.dxe5 Nh5; 20.Rxa4 Nf4;
21.Nc4 Qc7; 22.Bf1,
'±' {Diagram?}
but White is hugely better in
this {final} position. ]
*******
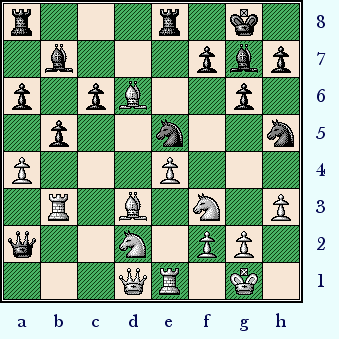
18.b4!?,
(Maybe - '!!!??!?!?')
{See the diagram - just below.}
An extremely violent, creative and
imaginative move by Morozevich.
(With a very high shock value!!)
My initial reaction was that this had
to be an error ... someone was
playing a prank on me ...
this could
not possibly be the correct move,
the one that was actually played
in the [real] game.
{ONLY after I had
verified this through several different
sources did I begin to take this
move seriously.}
***************************************
|
|
***************************************
The point of this move - is mainly to gain space on the Q-side.
[ Another (good) alternative here
for White was the following
continuation:
(>/=)
18.cxb5!? axb5; 19.axb5 cxb5; 20.Rxa8 Bxa8;
{Diagram?}
This is forced here.
( After the moves: </= 20...Rxa8?; 21.dxe5, '±' {D?}
Black is losing a Pawn. )
21.Bf1,
"+/=" (Maybe - '±') {Diagram?}
White seems to be very much
better here ... but is it enough
to actually
win the game? ]
18...Bg7; {Diagram?}
Having placed his Knight on the
edge of the board, it would seem to
be more logical to
take possession
of the f4-outpost-square.
(Maybe Saskiran thought he could
play the
move ...Nf4; at any time
that he so pleased?)
[
Maybe slightly better than the
game was the continuation of:
(>/=) 18...Nf4;
19.Bf1 Bg7; 20.a5!?,
{Diagram?}
A suggestion of an FM that I
sent this game to.
( Probably better is: >/= 20.cxb5, '±' {Diagram?}
which appears to win a Pawn. )
20...Qd8;
21.g3!? Ne6; 22.d5!? cxd5; 23.cxb5,
"+/=" {Diag?}
White seems to be better, but this
is a very sloppy, complex, and a
mostly unclear position. (To me.)
]
19.c5!?,
('!')
(hmmm)
{Diagram?}
Either this is very good, or more
than a little inaccurate. (And after
analyzing this game - with
the help
of several strong computer
programs - I am really unable to
determine the real truth!)
White ignores the win of a pawn to: dominate the Q-side, get a grip on
the dark squares,
increase his space
advantage, and also achieve a very
favorable end-game.
[ In this position, the box greatly
prefers the move:
19.cxb5,
"+/=" {Diagram?}
with a very solid edge to White.
{However, I spent most of one
morning trying
to "prove"
an
advantage for White ... and I
was completely unable to find ...
... "the big bust"
for White.}
]
Now we enter a fairly long sequence
of moves. Black's replies look to be
relatively forced ...
but White has all
the options in this line.
19...Qc7;
20.cxd6!? Qxd6; 21.dxe5!, (Maybe - '!!')
{Diagram?}
This appears to be the most forcing
move here. (And also the correct
move for White in this position.)
But when I allowed the computer
to automatically annotate this game
for me, {while I was sleeping};
the
nefarious box chose Nb3 instead.
[ Or 21.Nb3 exd4; 22.Qd2 Nf4; "~" ]
21...Qxb4;
{BOX???}
{See the
diagram - - - just below.}
I allowed Fritz 8.0 to think while
I ate my evening meal ... the box
was therefore able to 'cogitate' for
over 30
minutes in this position.
The move, ...Qb4; appears to be
the correct, indicated play for
Black in this position.
(Of course,
if Black captures the B on d3, he
will regret it in very short order!!)
***************************************
|
|
***************************************
This is a good place for a diagram ... and also to take a deep breath, and take a long, slow look around.
[
Not </=
21...Qxd3?; 22.Re3!,
"+/-" {Diagram?}
as Black's Queen is trapped.
*********************************************
The following continuation is
inferior for Black:
</= 21...Qe7?!;
22.Qb3,
"+/=" ('±') {Diagram?}
and White has a fairly sizeable
advantage in this position. ]
Now
White could play Rb1 here,
but chooses a more devious
and trappy move instead.
And
once more ... all of Black's moves
appear to be best or forced.
22.Ba3!? Qc3;
23.Bd6! Nxe5; {Diagram?}
Continuing as before.
[ If
</= 23...Qxd3?!;
then 24.Ra3,
"+/=" {Dm?}
etc. (Black loses the Queen.)
]
24.Ra3 Qb2;
{Box?}
{Diagram?}
This move - at first glance -
appears to be 100% forced.
However, the machine may have
come up with a very sharp and
playable alternative
here for
Black.
[ Fritz 8.0
prefers:
(>/=) "="
24...Qxa3!;
('!!') {Diagram?}
I gave a small, almost involuntary
shudder in this position.
(The move
was very "Tal-like" to me.)
25.Bxa3 Nxd3; 26.Re3 Nhf4;
"~" {Diagram?}
Black appears to have tremendous
piece play and also good "comp"
for the material sacrificed here.
{Actually White won Black's Queen,
but the second player has Rook,
Bishop, and a Pawn for the lady.} ]
25.Rb3 Qa2!?;
(Probably - '?!')
{See the diagram ... just below here.}
Many weaker programs do not
notice it, but this move could be
the losing move.
(Although when
this game is analyzed on the CB
web site, they fail to point this out.)
***************************************
|
|
***************************************
Common sense would tell you that
Black's Queen is in trouble, and the
second player will probably
benefit the exchange of pieces on f3.
*******
[ Variation # 25B01.)
After the following moves: >/=
25...Nxf3+; 26.Nxf3 Qa2;
"~" {Diagram?}
I never
found a forced win for
White from this position.
(And
I looked ... during many different
sessions - that spanned many different
days. And - as always - the computer
was always running in the
background.)
*****************************************************************
Variation # 25B02.)
Another reasonable try for Black
would have to be:
(>/=) 25...Nxd3!?; 26.Rxb2 Nxe1;
27.Ra2; "~" {Diagram?}
The computer says this is equal,
I prefer ... VERY unclear! ]
*******
Now White find an interesting
and exciting combination:
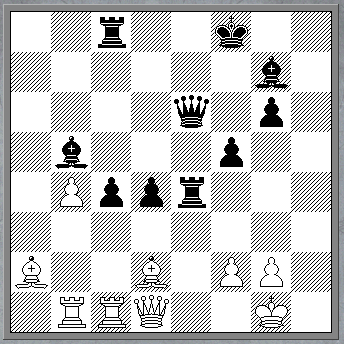
26.Nxe5! Bxe5;
27.Bxe5 Rxe5;
{See
the diagram, just below.}
Black is hanging in there.
***************************************
|
|
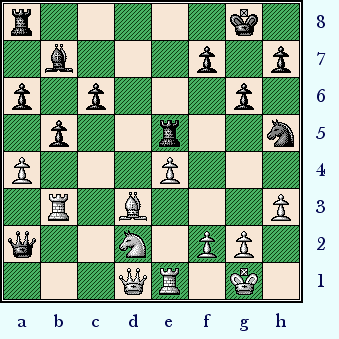
The position after Black plays his move, 27...Rxe5.
***************************************
White to move here ... what move would you play in this position?
**********************************************************************************
White's next move may have
induced what Tarrasch called: "Sacrificial shock."
(A fear that
seems to completely paralyze
normal thought processes.)
At any rate, it was nearly forced.
If White plays 28.Qc1, ('?') then Black plays ...Nf4; "=/+" with a small - but clear - advantage.
28.Nc4!! Re7?;
(Maybe - '??')
{Diagram?}
Absolutely, positively the losing
move here ... and most programs
will see an almost instant change
in
their evaluations of this position
after this very errant play. (In
some cases the change in the
'scores' of the game changes by
close to four points!!)
I was very glad to find this move ...
for a long time - when analyzing
this game without the aid of a
computer - Morozevich's winning
technique looked almost like
witchcraft to me. (Understanding
that this move was a lemon, did
much to dispel the mental notion ...
that the first player's winning
technique was something that I
would never be able to grasp.)
***********************************
(Editor's
note - Yet another reason that I became deeply involved in this
game, was the extremely
poor analysis that several different websites, (and
even newspaper columns); did of this
game.
See the CB web site for
just one small example
of what I am talking about here.)
***********************************
To be fair, one website reported that
this mistake might have been the result
of severe time pressure ...
apparently
Sasikiran was very short of 'clock
time' at this point in the game.
***
[ Maybe GM K. Sasikiran was seeing {time pressure} ghosts here.
But
after the following moves:
>/= 28...bxc4[];
29.Bxc4 Qxa4!;
30.Bxf7+! Kh8!; 31.Rxb7 Qxd1;
32.Rxd1 Rxe4;
"~" {Dm?}
Black is a Pawn ahead ...
and I
see NO
forced win for White.
(It
is true that White may eventually
double the Rooks on the 7th rank
here, but Black's position would
not be without some counter-
chances against the White King.)
]
***
Black now loses his Queen ...
{It gets trapped on a3.}; and no further comment
is really required.
29.Ra3 bxc4;
30.Rxa2 Rd8; 31.Rd2 Red7; 32.Qf3 Rxd3; 33.Rxd3 Rxd3;
34.Re3 Rd7;
35.Qe2, ("+/-") {Diagram?}
Black Resigns.
(1-0)
There was no good reason for Black to play on from here.
An astounding game from
Morozevich ... who walked to the
very edge of the precipice ...
but it was his opponent who fell
in to the yawning chasm!
[It took well over two weeks to properly analyze this game!!! (08/15/04)
The tactical complications of this
game were almost off the end of
the chart ...
it definitely pegged the
meter on my scale!!]
*******
Copyright (c) A.J. Goldsby I.
Copyright (c) A.J. Goldsby, 2004. All rights reserved.
*******